

Managing OAuth2 Clients
Create, update, and delete OAuth2 clients using the dashboard or the GraphQL API
oauth2 client confidential public cimd graphql client secret scopesEach OAuth2 client represents a third-party application that can authenticate users through your Nhost project. How you manage clients depends on your use case.
Client Types
Section titled “Client Types”| Type | Has Secret | PKCE Required | Description |
|---|---|---|---|
| Confidential | Yes (bcrypt hash) | No | Server-side apps that can securely store a secret |
| Public | No | Yes | Browser or mobile apps that cannot keep a secret |
| CIMD | No | Yes | URL-based client IDs resolved via metadata document (RFC 9728) |
A client is confidential when it has a clientSecretHash and public when this field is null. The client type is determined entirely by whether a secret hash is present.
Use Case 1: Admin-Managed Clients
Section titled “Use Case 1: Admin-Managed Clients”If you want to integrate third-party services with your project — like connecting Outline as a wiki, Grafana for dashboards, or an MCP tool — you manage the OAuth2 clients yourself as an admin. This is the most common use case.
The Nhost Dashboard provides a built-in UI for creating and managing clients. Go to your project’s dashboard, then navigate to Auth → OAuth2 Clients.
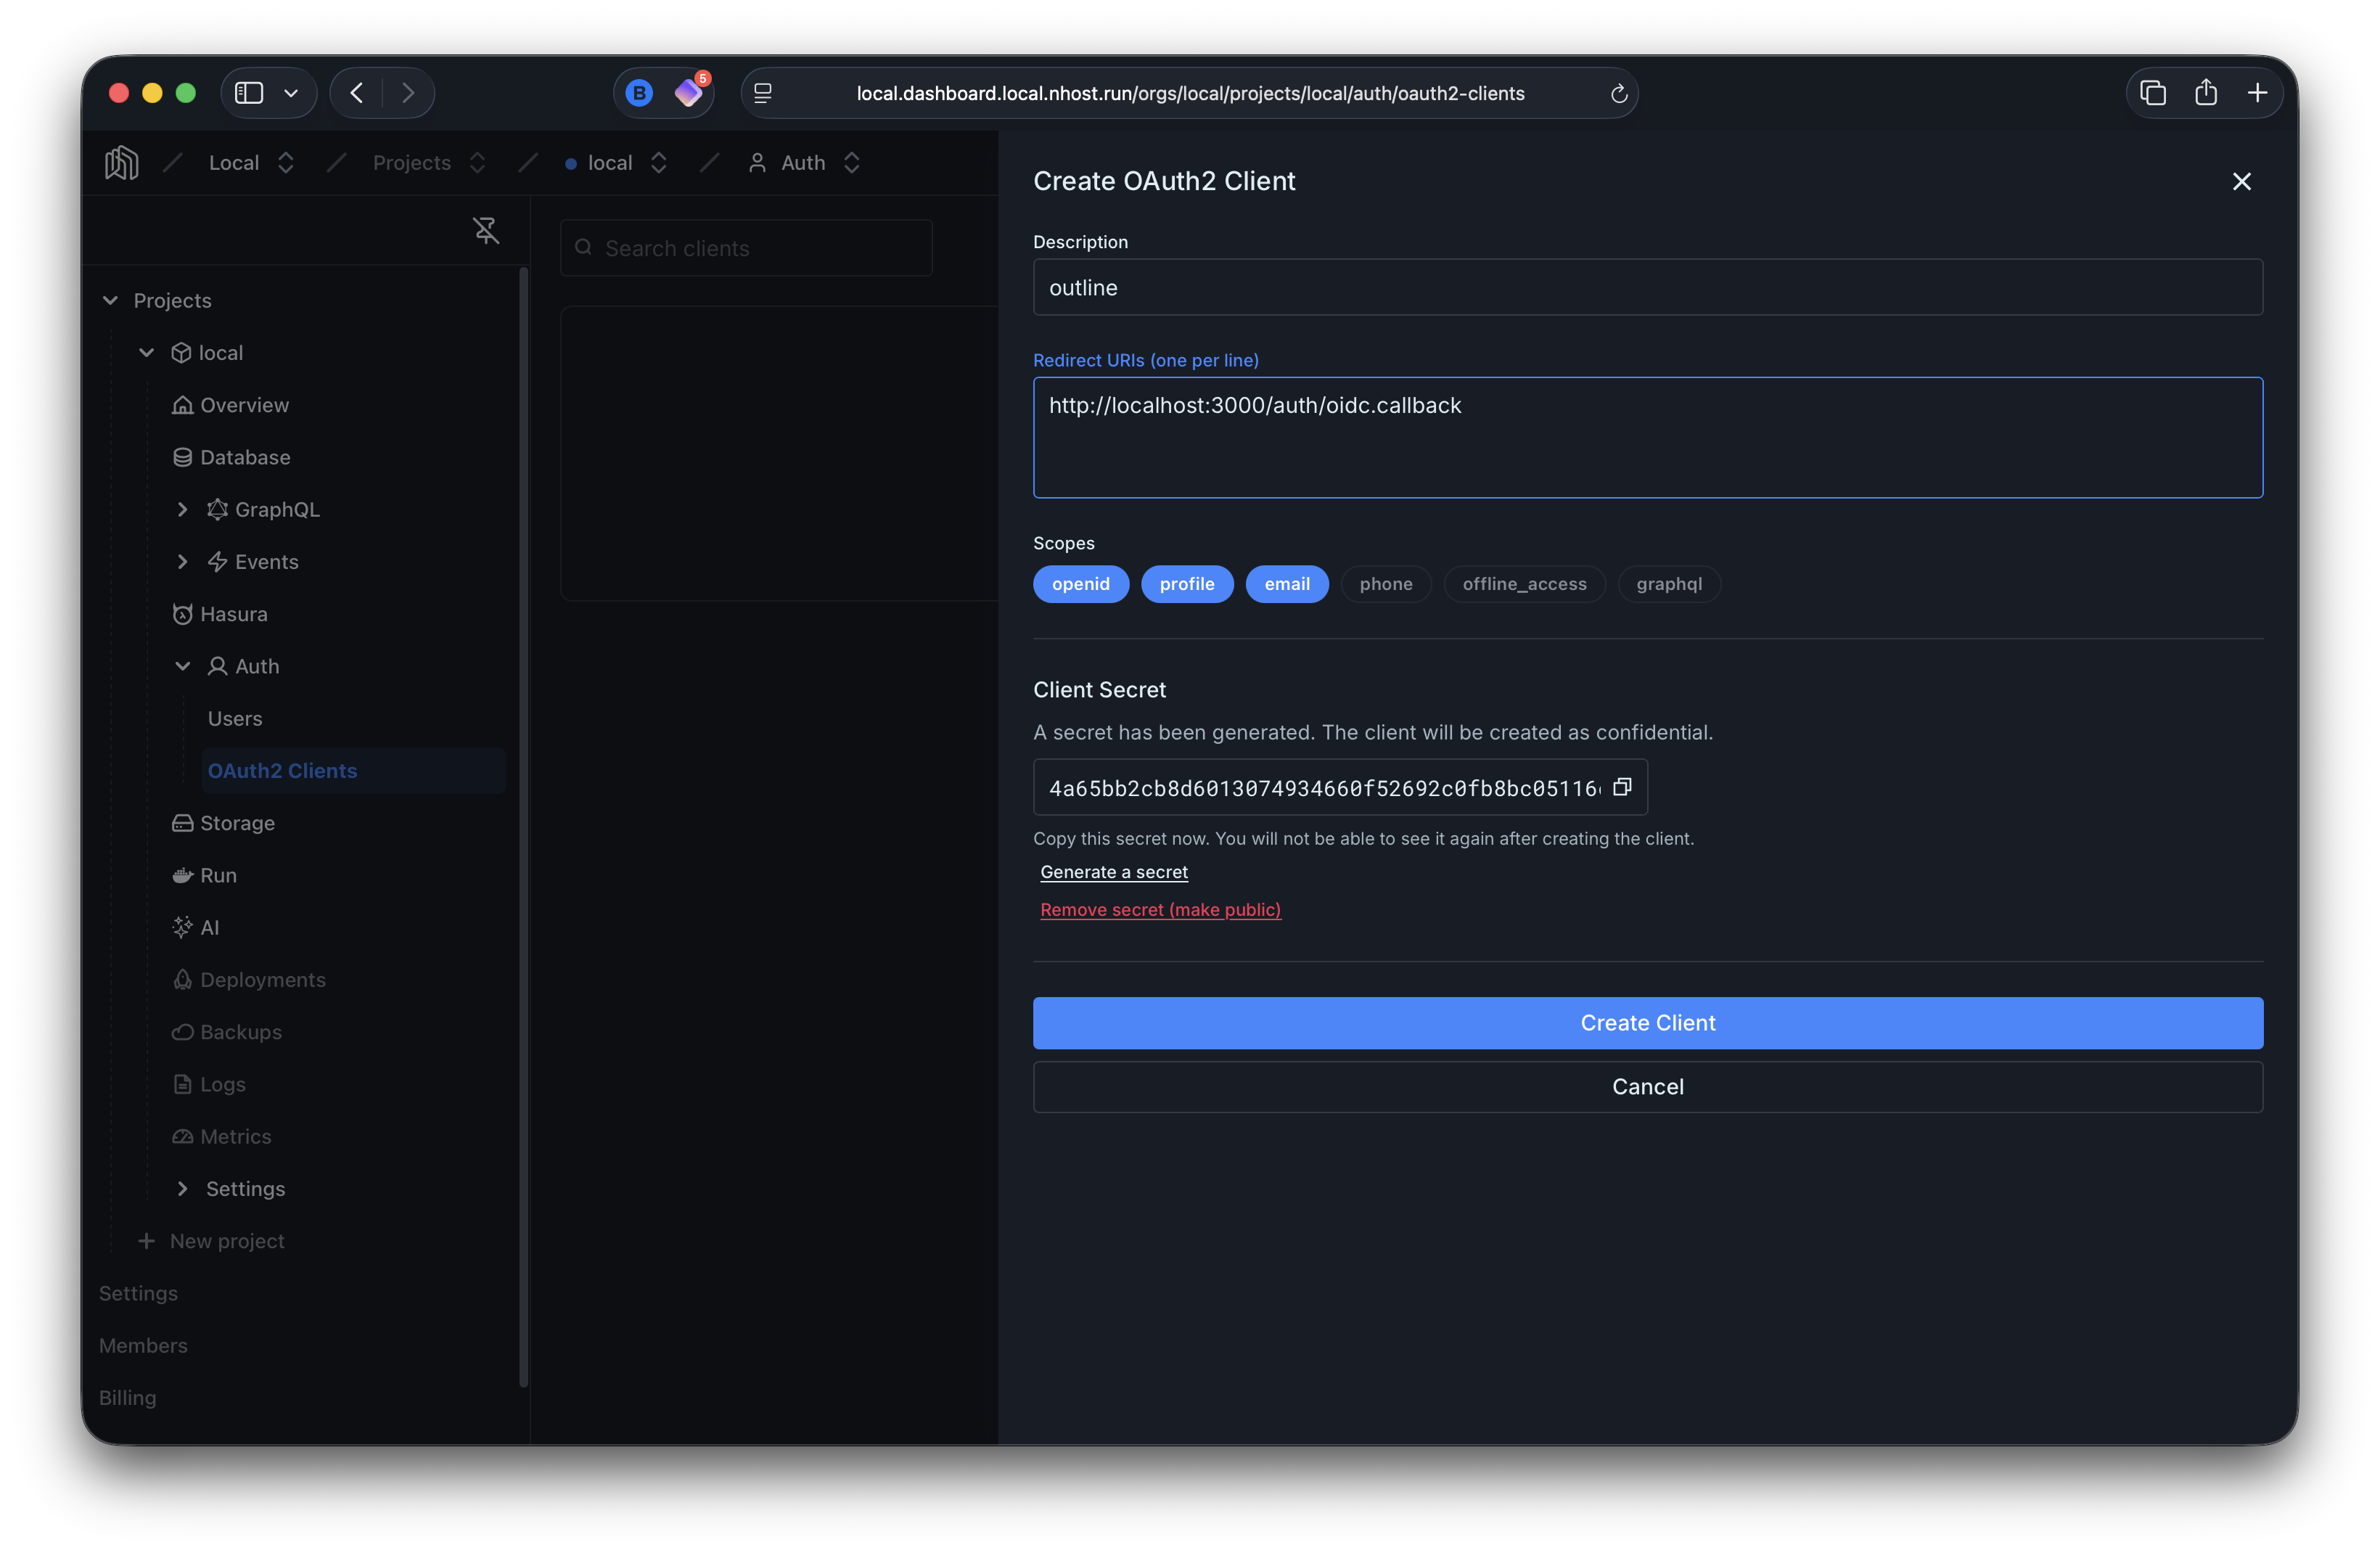
From here you can create clients, set redirect URIs, choose scopes, and manage secrets.
For most projects, the dashboard is all you need. The rest of this page covers the GraphQL API approach, which is useful when you want to automate client management or let your users create their own clients.
Use Case 2: User-Managed Clients
Section titled “Use Case 2: User-Managed Clients”If you want your users to create their own integrations — for example, letting them add a “Sign in with your app” button to their own services — you’ll need to:
- Expose client management through the GraphQL API
- Configure permissions so users can manage oauth2 clients
- Build a management UI in your application
Client Fields
Section titled “Client Fields”| Field | Type | Required | Description |
|---|---|---|---|
clientSecretHash |
String | No | Bcrypt hash of the client secret. If set, the client is confidential. If null, the client is public. A database trigger validates the value is a valid bcrypt hash. |
redirectUris |
String[] | Yes | List of allowed redirect URIs. The authorization request’s redirect_uri must exactly match one of these. |
scopes |
String[] | No | Scopes the client is allowed to request. Defaults to all scopes: openid, profile, email, phone, offline_access, graphql. |
metadata |
JSON | No | Arbitrary JSON metadata (e.g. { "description": "My app" }). Not used by the auth server — for your own reference. |
createdBy |
UUID | No | User ID of the creator. Sets a relationship to the users table. |
The following fields are auto-generated and returned in responses:
| Field | Description |
|---|---|
clientId |
Auto-generated identifier with nhoa_ prefix (e.g. nhoa_a1b2c3d4e5f67890) |
createdAt |
Timestamp of creation |
updatedAt |
Timestamp of last update (auto-maintained by trigger) |
Creating a Confidential Client
Section titled “Creating a Confidential Client”Use a GraphQL mutation to create a client with a bcrypt-hashed secret. The clientId (prefixed with nhoa_) is auto-generated.
mutation CreateConfidentialClient($object: authOauth2Clients_insert_input!) { insertAuthOauth2Client(object: $object) { clientId redirectUris scopes createdAt updatedAt metadata }}Variables:
{ "object": { "clientSecretHash": "$2b$10$...", "redirectUris": ["https://myapp.example.com/callback"], "scopes": ["openid", "profile", "email"], "metadata": { "description": "My server-side application" } }}The secret must be hashed with bcrypt before passing it. A database trigger validates that the value is a valid bcrypt hash.
Generating and Hashing the Secret
Section titled “Generating and Hashing the Secret”In JavaScript (using bcryptjs):
import bcrypt from 'bcryptjs';
// Generate a random secretconst chars = 'ABCDEFGHIJKLMNOPQRSTUVWXYZabcdefghijklmnopqrstuvwxyz0123456789';const array = new Uint8Array(48);crypto.getRandomValues(array);const plainSecret = Array.from(array, (b) => chars[b % chars.length]).join('');
// Hash it with bcrypt before sending to the APIconst clientSecretHash = await bcrypt.hash(plainSecret, 10);
In Node.js / Bun (using native APIs):
import { randomBytes } from 'crypto';
const plainSecret = randomBytes(32).toString('hex');const clientSecretHash = await Bun.password.hash(plainSecret, {  algorithm: 'bcrypt',  cost: 10,});
Creating a Public Client
Section titled “Creating a Public Client”Create a client without a clientSecretHash. Public clients must use PKCE for the authorization flow.
mutation CreatePublicClient($object: authOauth2Clients_insert_input!) { insertAuthOauth2Client(object: $object) { clientId redirectUris scopes }}Variables:
{ "object": { "redirectUris": ["http://localhost:3000/callback"], "scopes": ["openid", "profile", "email"] }}The response will have clientSecretHash: null, confirming it is a public client.
Listing Clients
Section titled “Listing Clients”query ListOAuth2Clients { authOauth2Clients(order_by: { createdAt: desc }) { clientId redirectUris scopes metadata createdAt updatedAt }}Updating a Client
Section titled “Updating a Client”Update redirect URIs, scopes, description, or rotate the secret:
mutation UpdateClient($clientId: String!, $changes: authOauth2Clients_set_input!) { updateAuthOauth2Clients( where: { clientId: { _eq: $clientId } } _set: $changes ) { returning { clientId redirectUris scopes updatedAt } }}Variables (updating redirect URIs):
{ "clientId": "nhoa_a1b2c3d4e5f67890", "changes": { "redirectUris": ["https://myapp.example.com/callback", "https://myapp.example.com/callback2"] }}Secret Rotation
Section titled “Secret Rotation”To rotate a confidential client’s secret, hash the new secret and update clientSecretHash:
{ "clientId": "nhoa_a1b2c3d4e5f67890", "changes": { "clientSecretHash": "$2b$10$<new_hash>" }}The old secret stops working immediately.
Converting Between Public and Confidential
Section titled “Converting Between Public and Confidential”- Public to confidential: Set
clientSecretHashto a bcrypt hash - Confidential to public: Set
clientSecretHashtonull
Deleting a Client
Section titled “Deleting a Client”mutation DeleteClient($clientId: String!) { deleteAuthOauth2Clients(where: { clientId: { _eq: $clientId } }) { affected_rows }}Deleting a client also cascades to all associated authorization requests, codes, and refresh tokens.
Permissions
Section titled “Permissions”By default, only the admin role has access to the oauth2_clients table. If you want users to manage their own clients, you need to configure permissions on the table.
Here is a reference configuration that scopes each user to the clients they created. You are free to adjust these permissions to match your needs.
Insert
Section titled “Insert”Users can create clients. A column preset automatically sets created_by to the authenticated user’s ID.
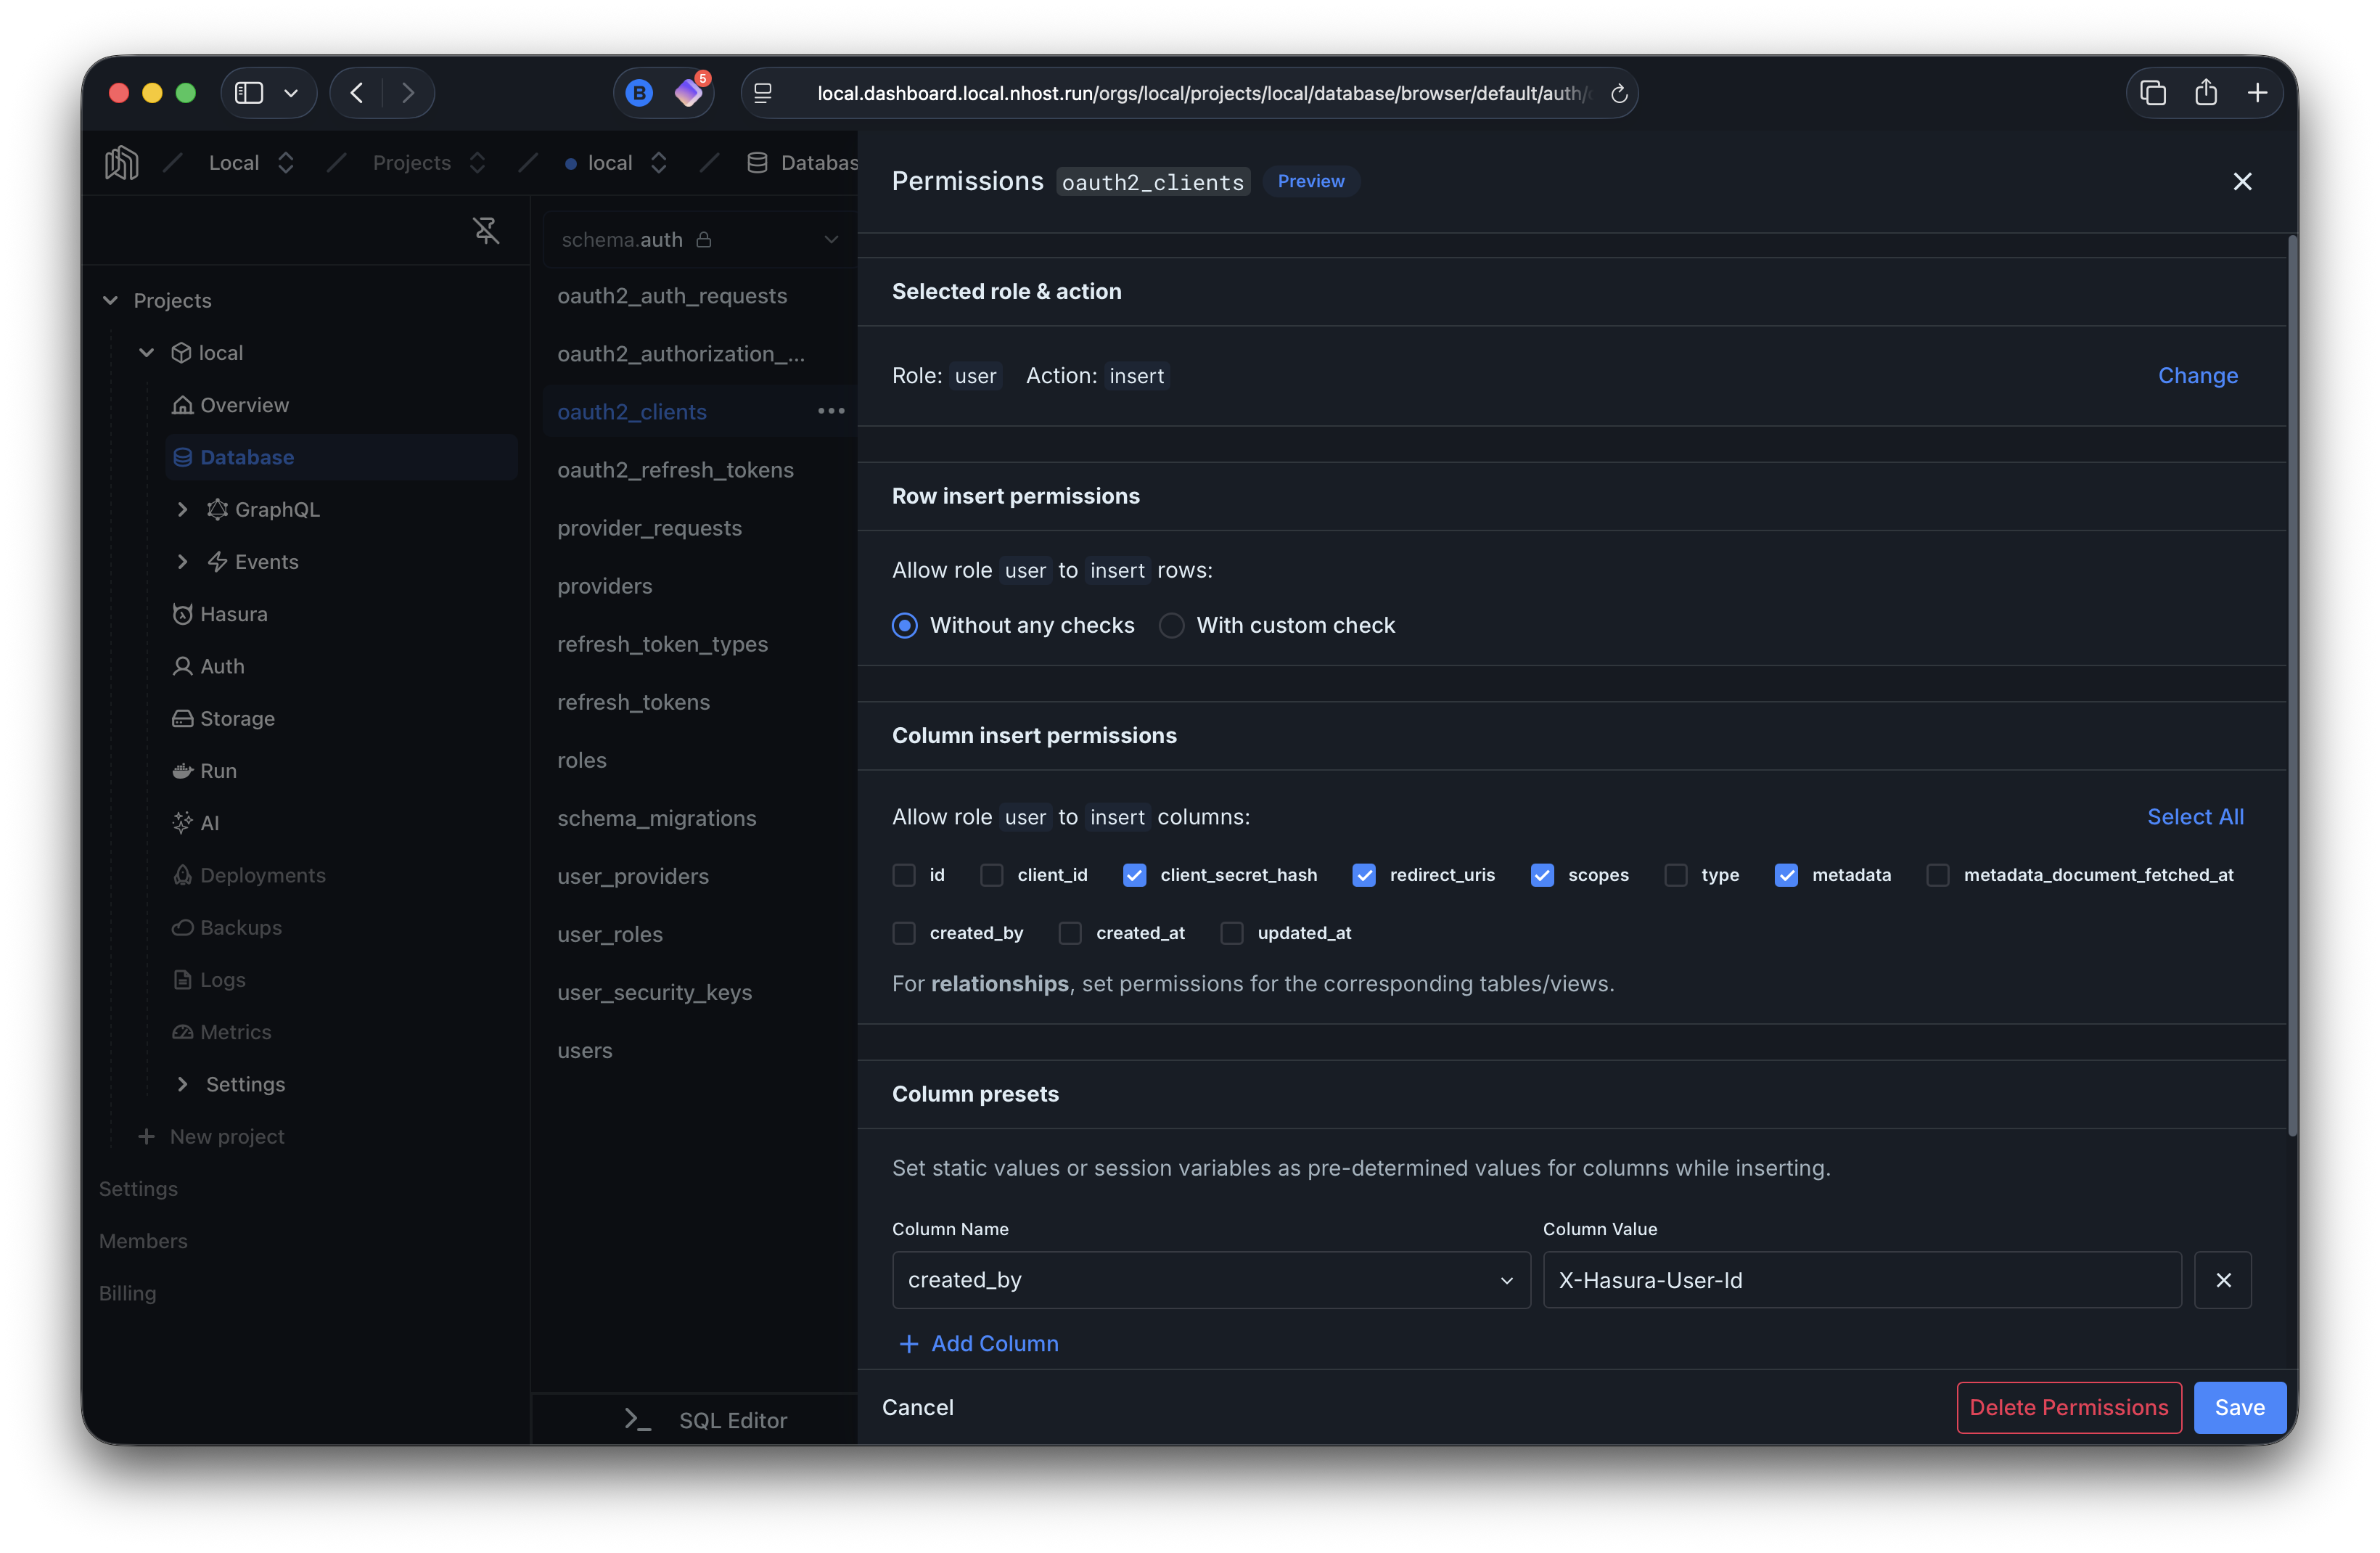
insert_permissions: - role: user permission: check: {} set: created_by: X-Hasura-User-Id columns: - client_secret_hash - redirect_uris - scopes - metadataSelect
Section titled “Select”Users can only read their own clients (where created_by matches their user ID).
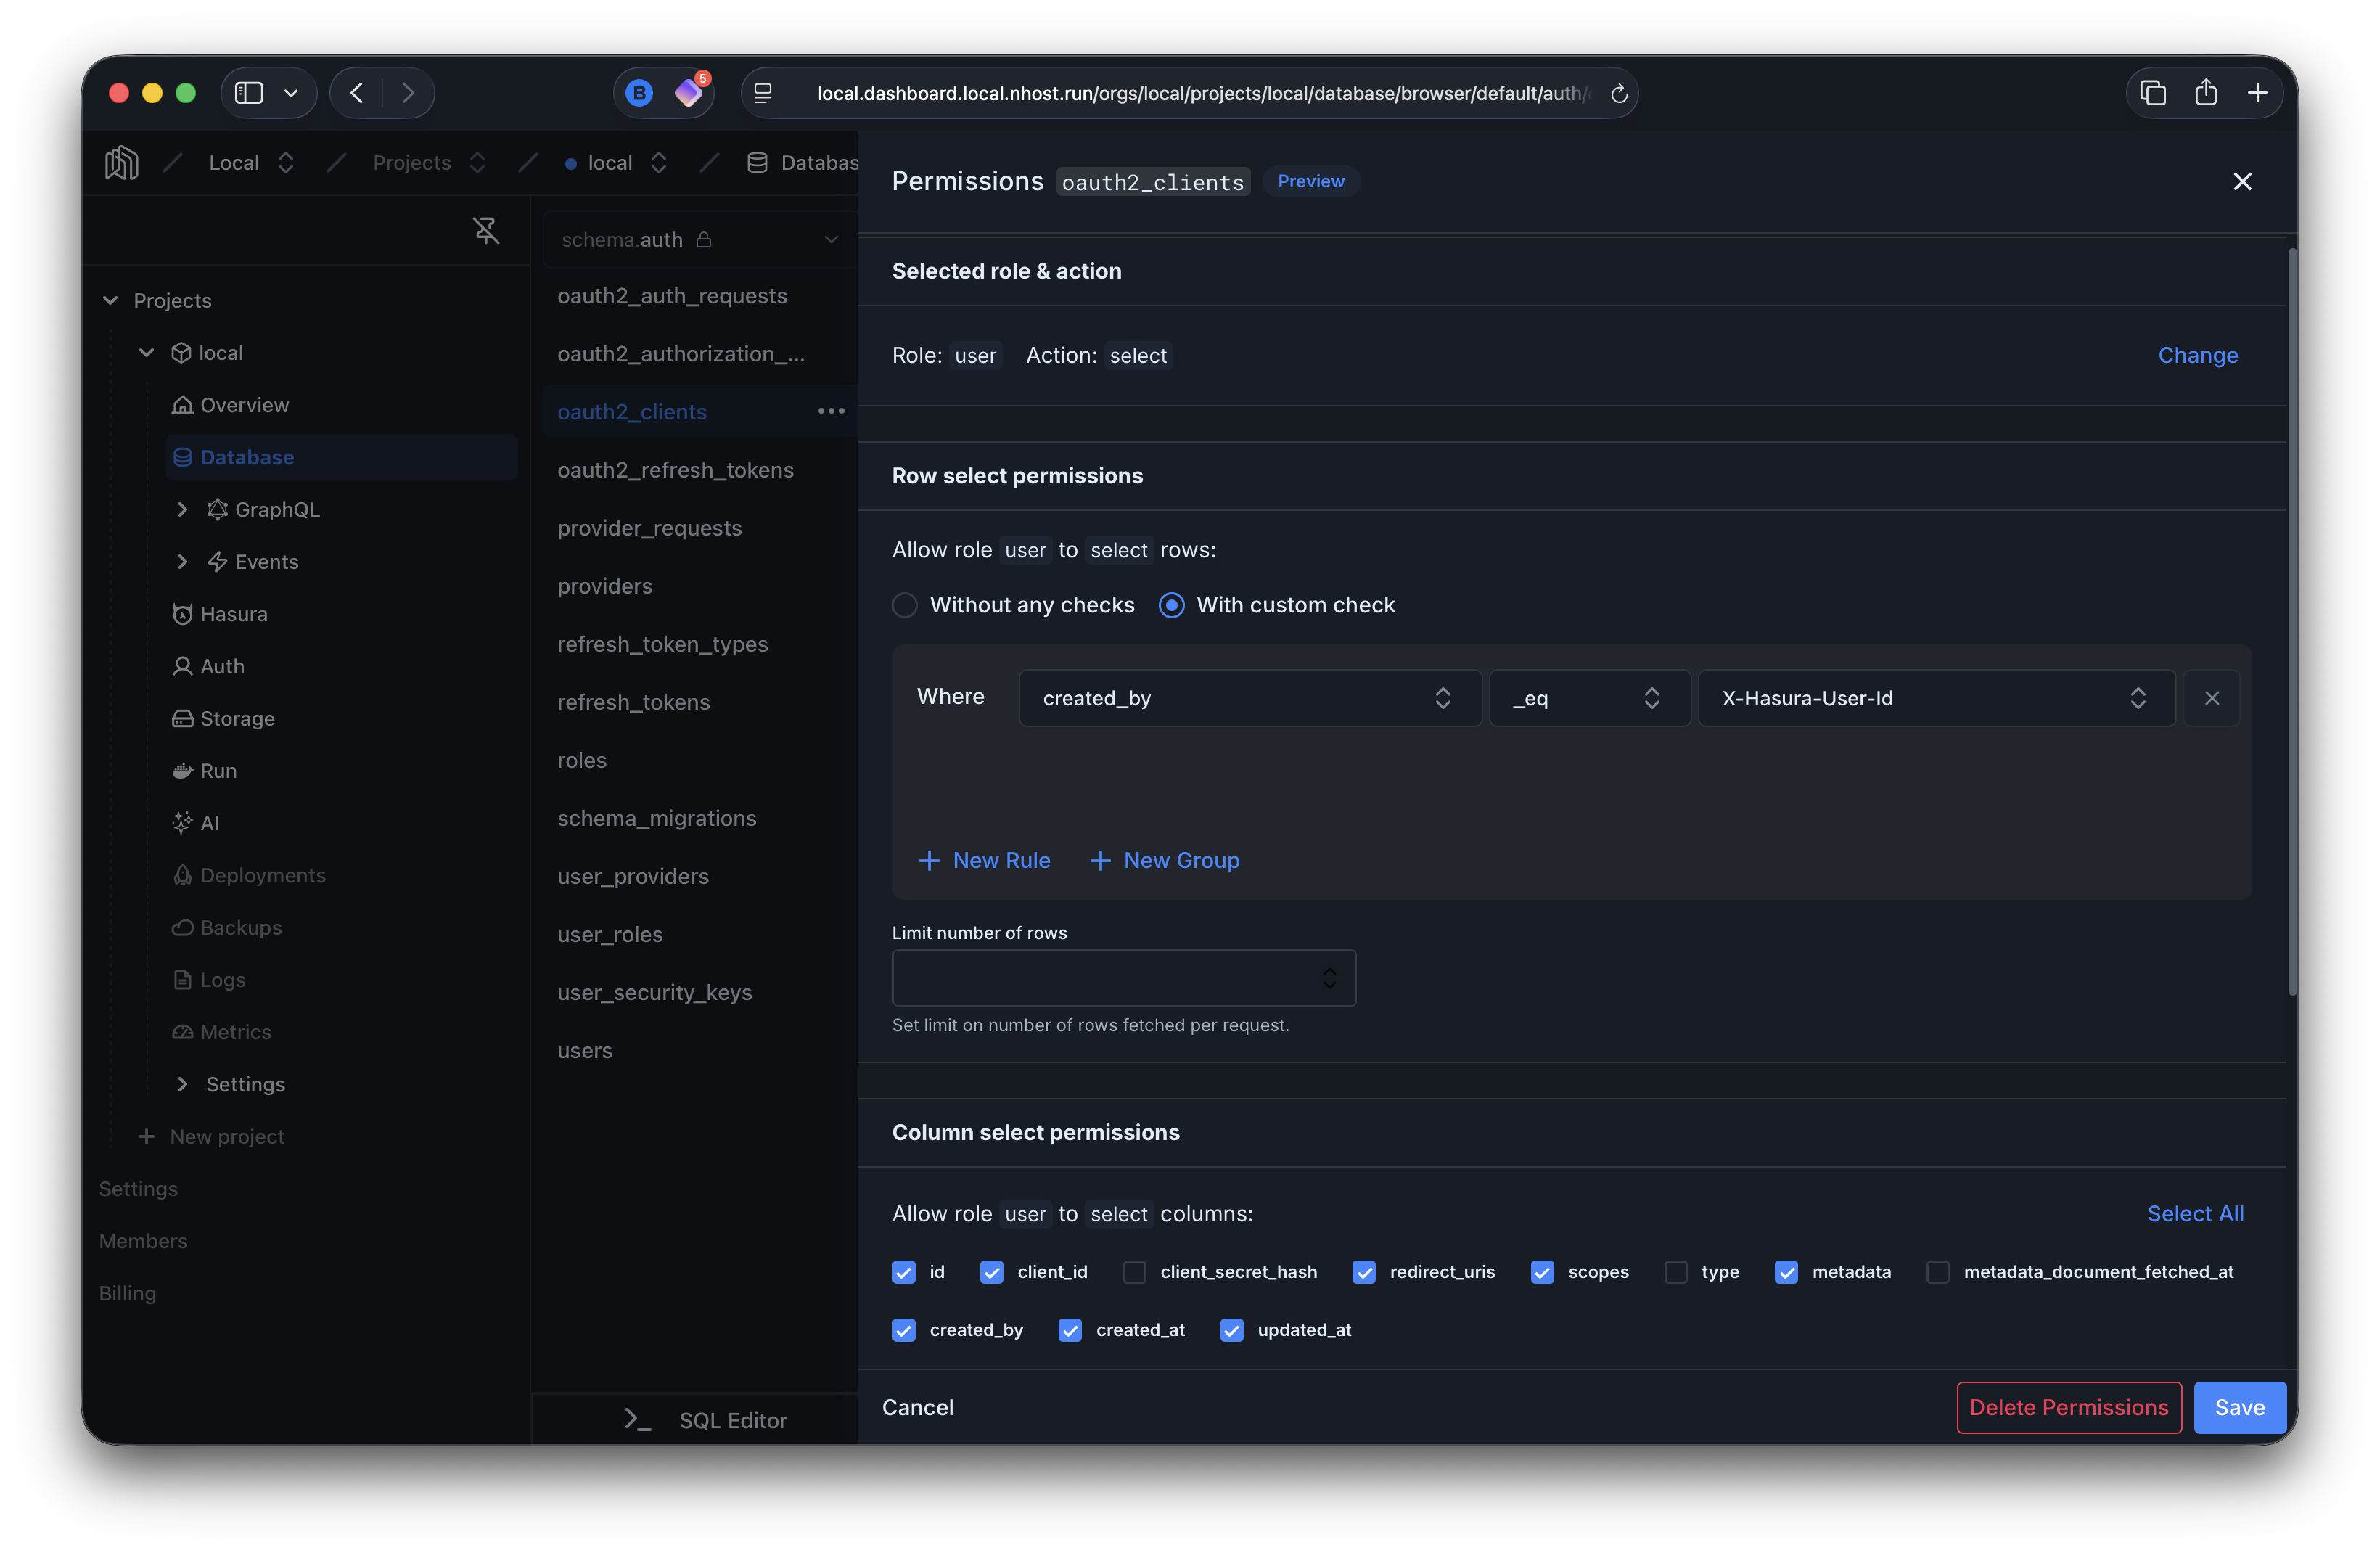
select_permissions: - role: user permission: columns: - id - client_id - redirect_uris - scopes - metadata - created_by - created_at - updated_at filter: created_by: _eq: X-Hasura-User-IdUpdate
Section titled “Update”Users can update their own clients (where created_by matches their user ID).
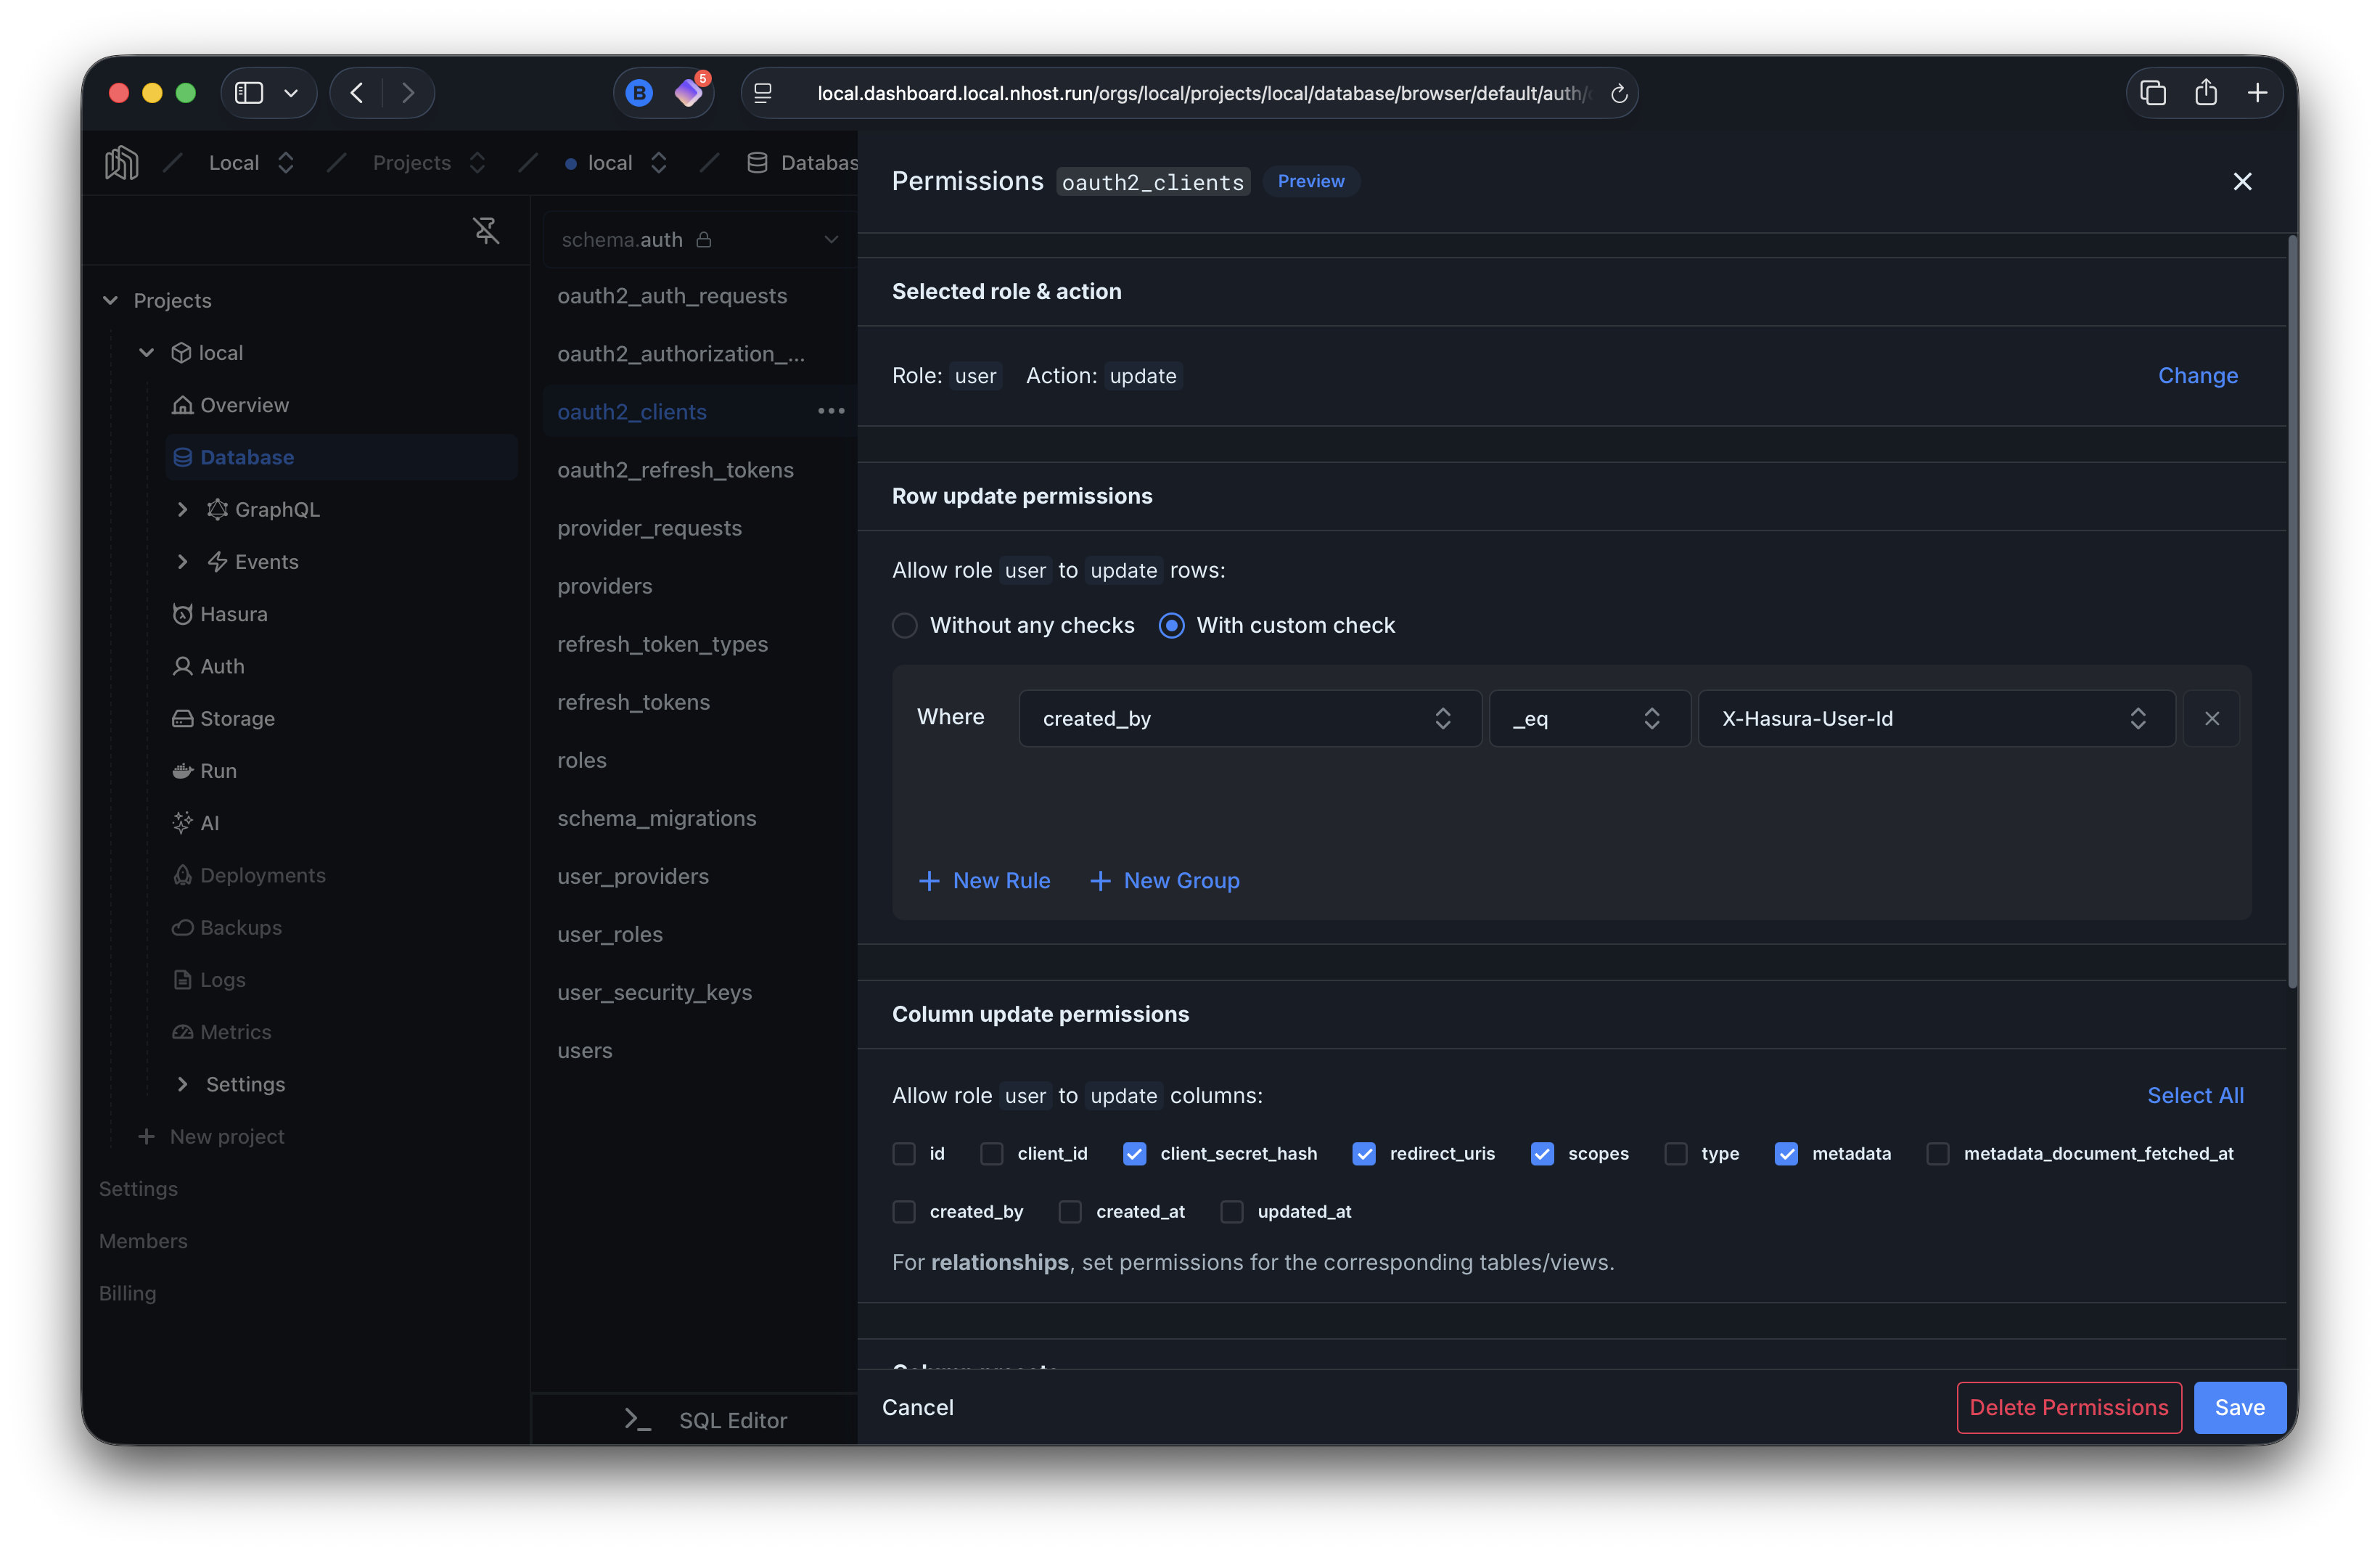
update_permissions: - role: user permission: columns: - client_secret_hash - redirect_uris - scopes - metadata filter: created_by: _eq: X-Hasura-User-Id check: nullDelete
Section titled “Delete”Users can delete their own clients (where created_by matches their user ID).
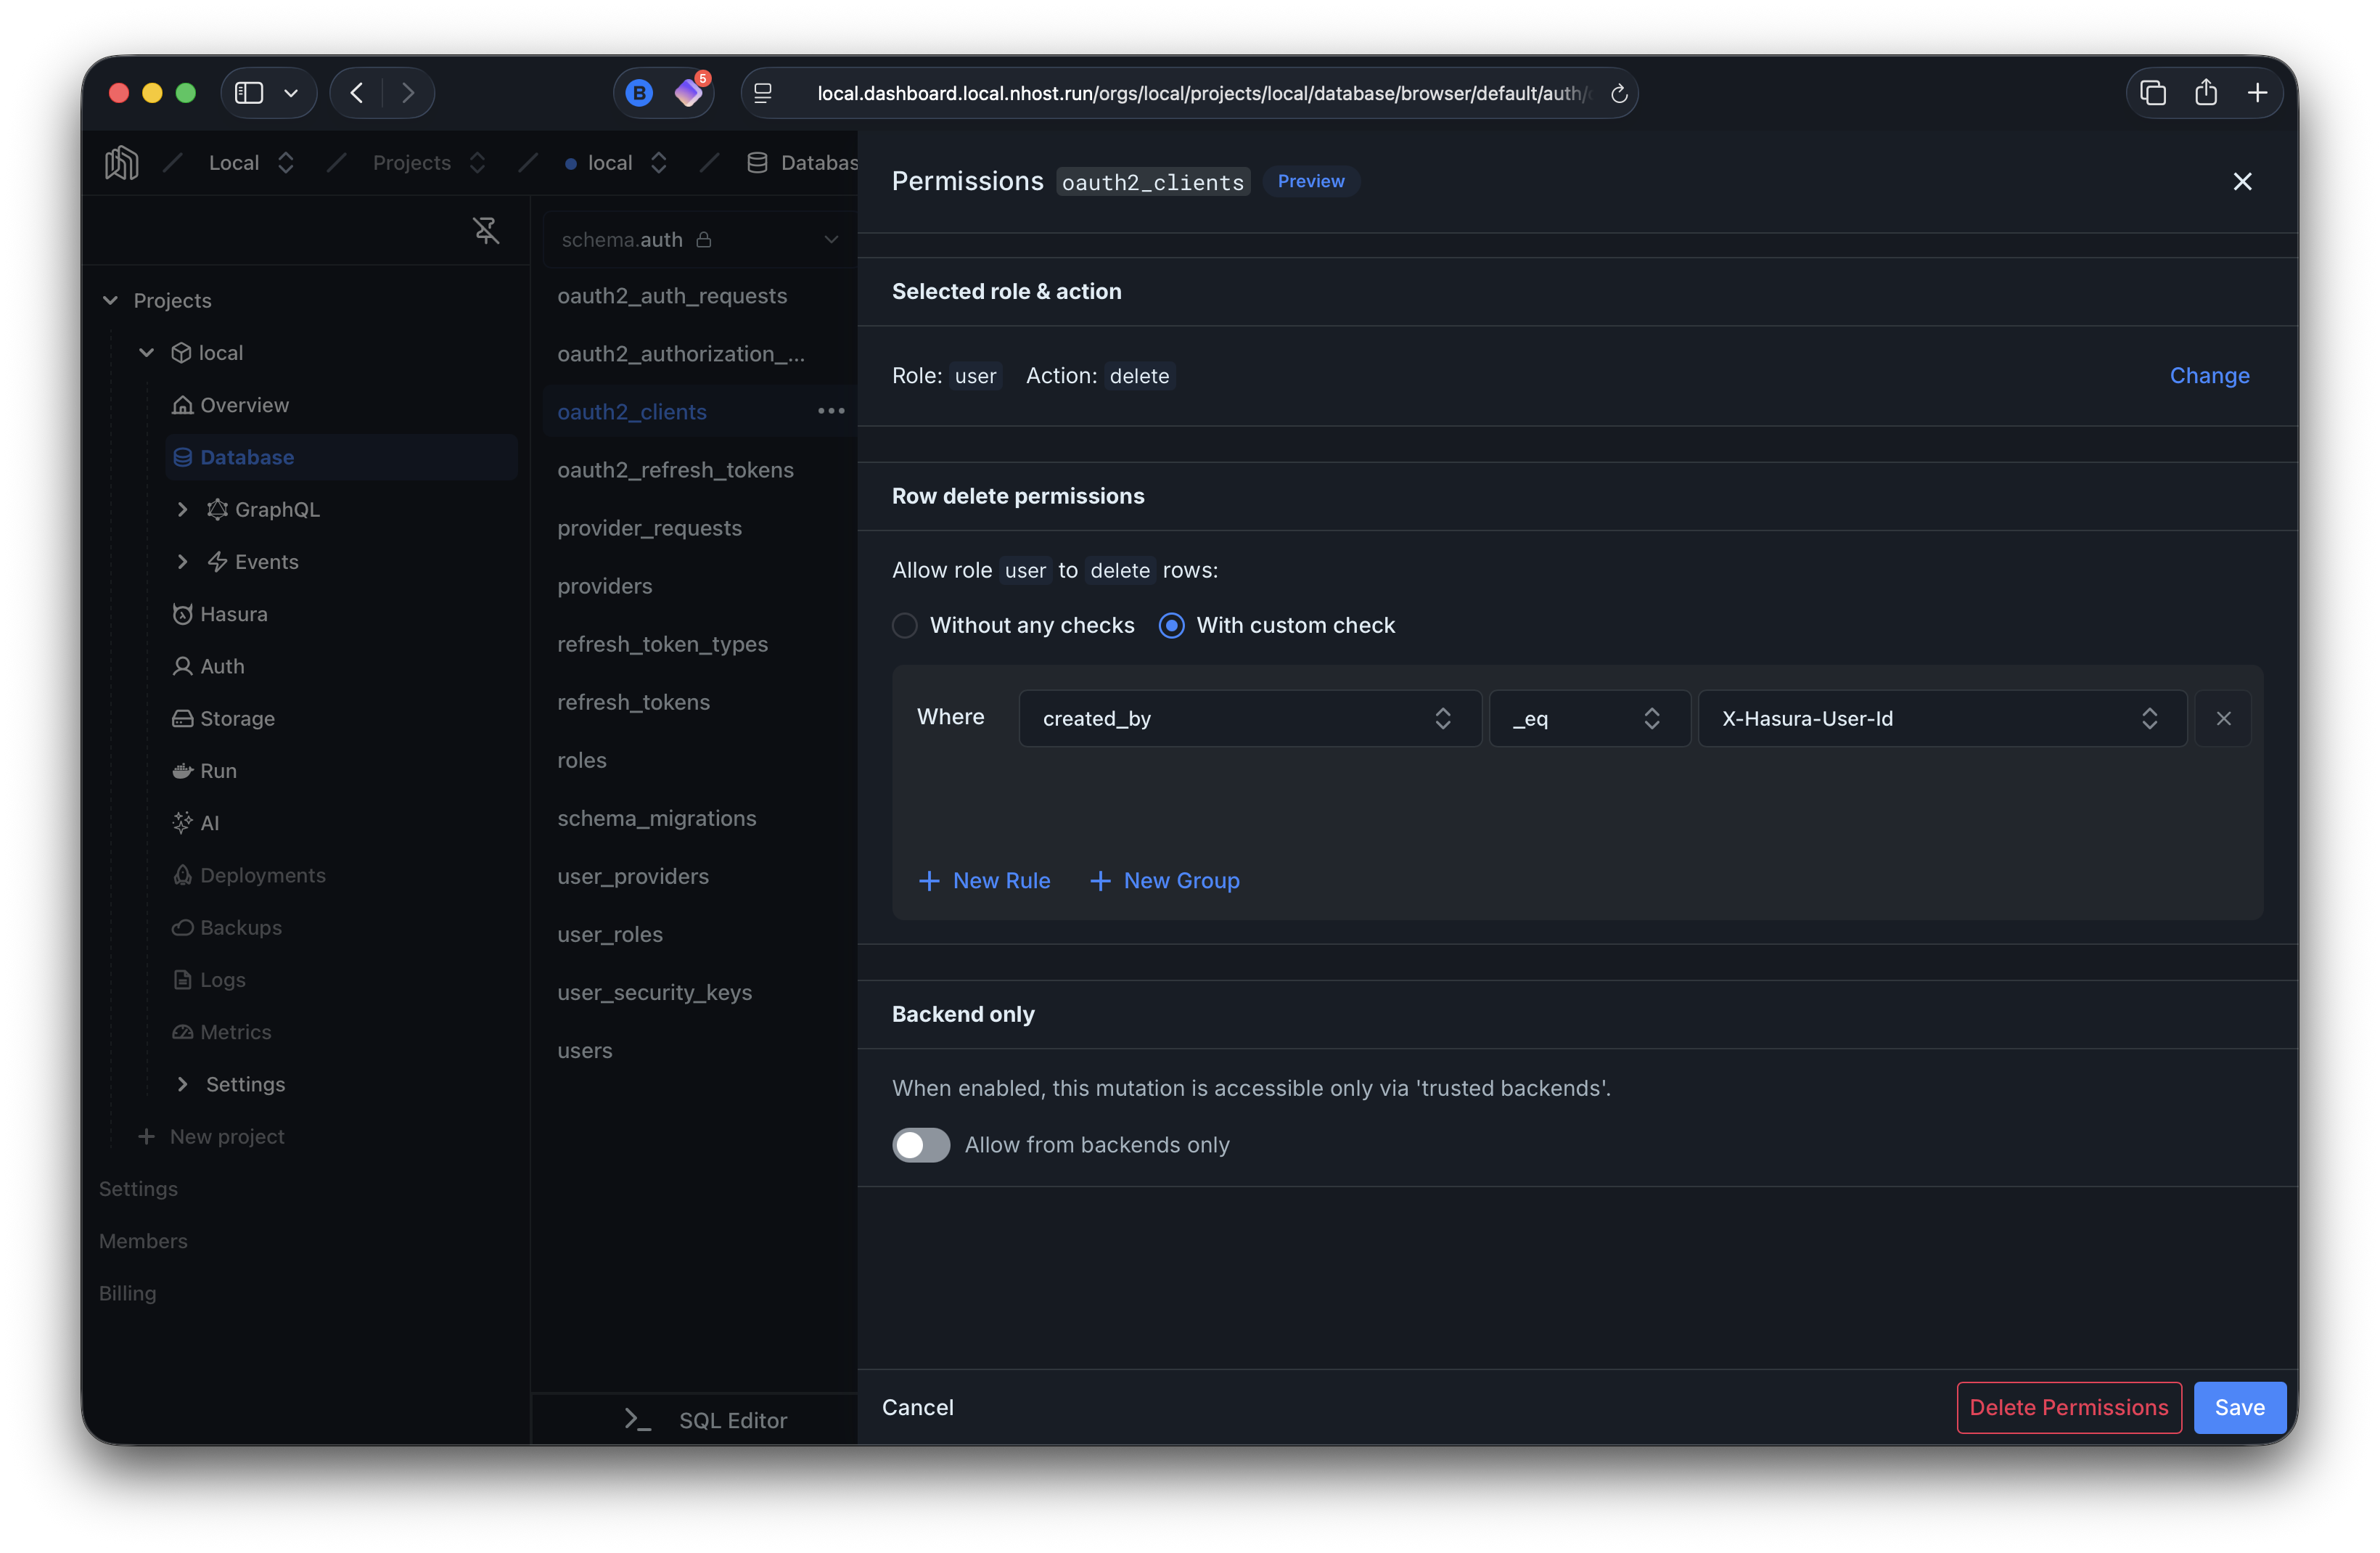
delete_permissions: - role: user permission: filter: created_by: _eq: X-Hasura-User-IdReact Example
Section titled “React Example”For a full working example of creating and managing OAuth2 clients from a React application (including secret generation with bcrypt, scope selection, and secret rotation), see OAuth2Providers.tsx in the react-demo example.
Available Scopes
Section titled “Available Scopes”| Scope | Description |
|---|---|
openid |
Required for OIDC. Triggers ID token issuance. |
profile |
Adds name, picture, locale to ID token and UserInfo |
email |
Adds email, email_verified to ID token and UserInfo |
phone |
Adds phone_number, phone_number_verified to ID token and UserInfo |
offline_access |
Recognized in discovery metadata. Refresh tokens are always issued. |
graphql |
Adds GraphQL-compatible claims (https://hasura.io/jwt/claims) to access tokens with all user roles |
graphql:role:xxxx |
Like graphql, but narrows claims to only the specified role(s). See Tokens and Scopes for details. |
When creating a client, the scopes array defines which scopes the client is allowed to request. If no scopes are specified, the default is the standard scopes (openid, profile, email, phone, offline_access, graphql). To allow graphql:role:xxxx scopes, add them explicitly — for example:
{ "scopes": ["openid", "profile", "graphql:role:viewer", "graphql:role:editor"]}The plain graphql scope acts as a superset — if a client is allowed graphql, any graphql:role:xxxx scope is implicitly permitted. The reverse is not true: having graphql:role:xxxx does not implicitly grant graphql. To restrict a client to specific roles only, omit graphql and list the individual graphql:role:xxxx scopes instead.