Permissions
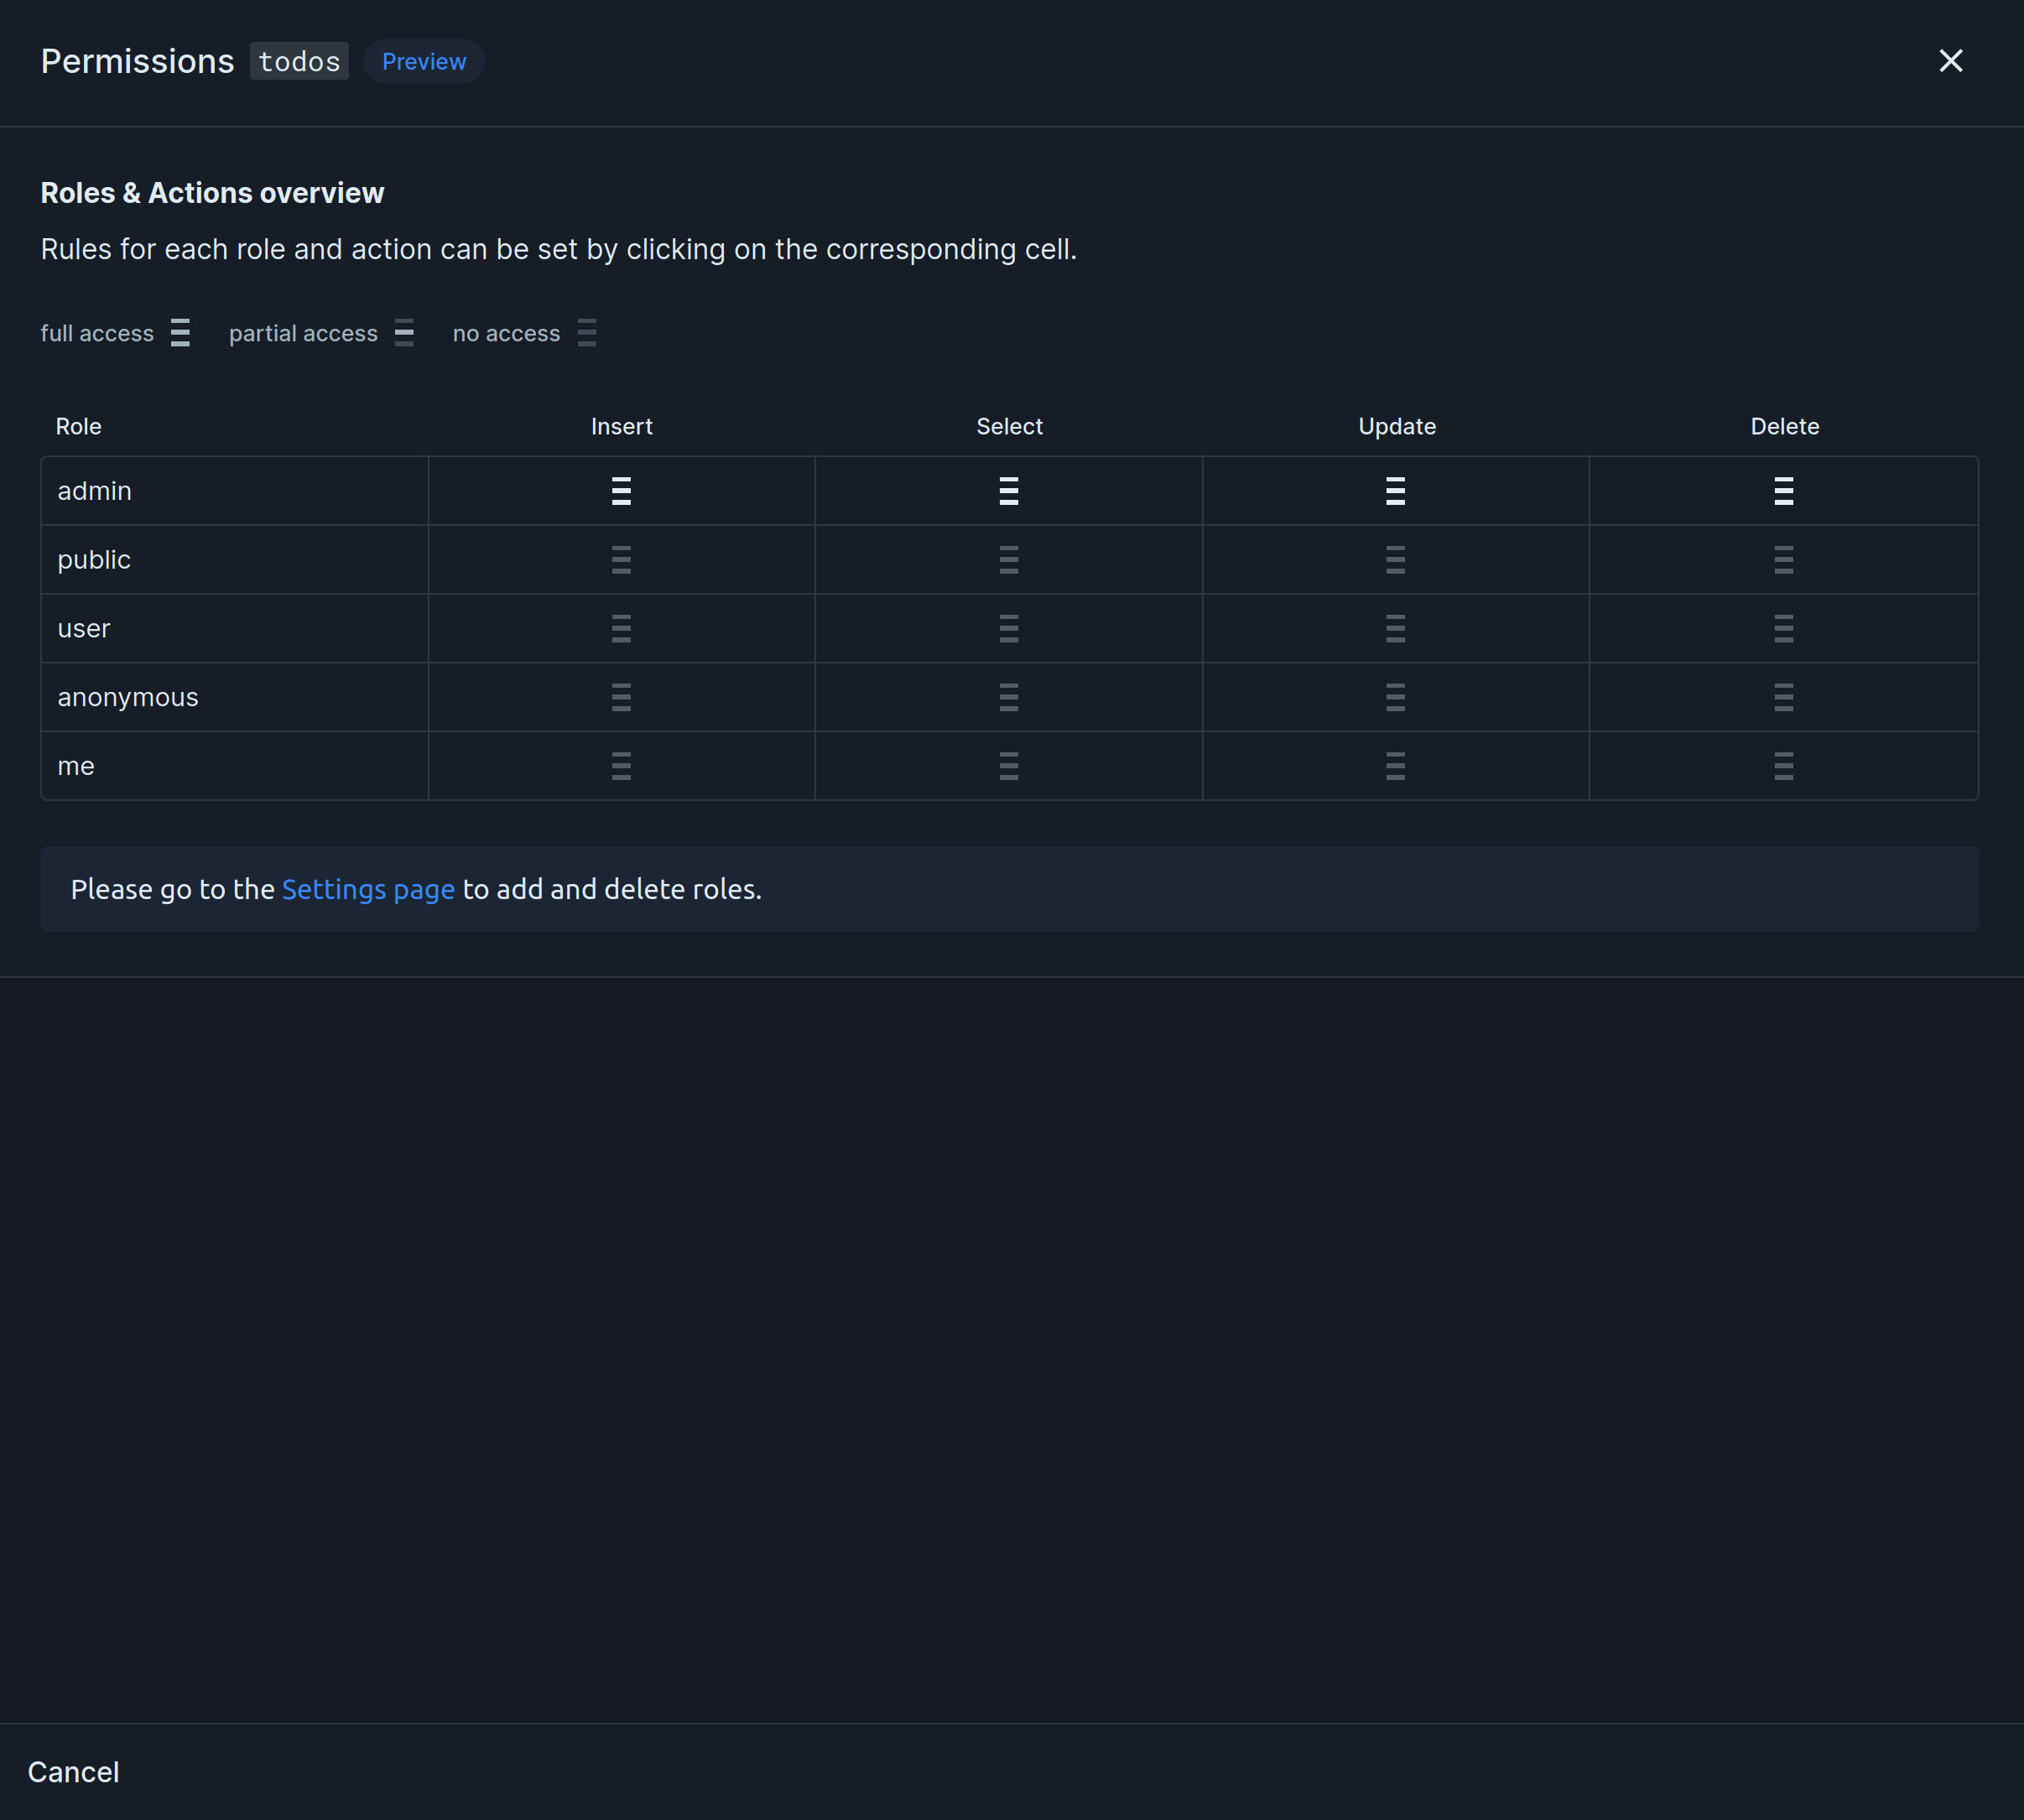
permissions authorization access control roles row-level security RLS Hasura permissions ACLPermissions or authorization rules are used to control acess to data and are set per role and table for each of the select, insert, update, and delete database operations.
Permissions follow a Zero Trust model, meaning that by default, no role, with the exception of admin, has any access. Access has to be explicitly granted.

Imagine a table todos with id, title, and user_id columns. We want users to only have access to their own todos. This is how we would do it:

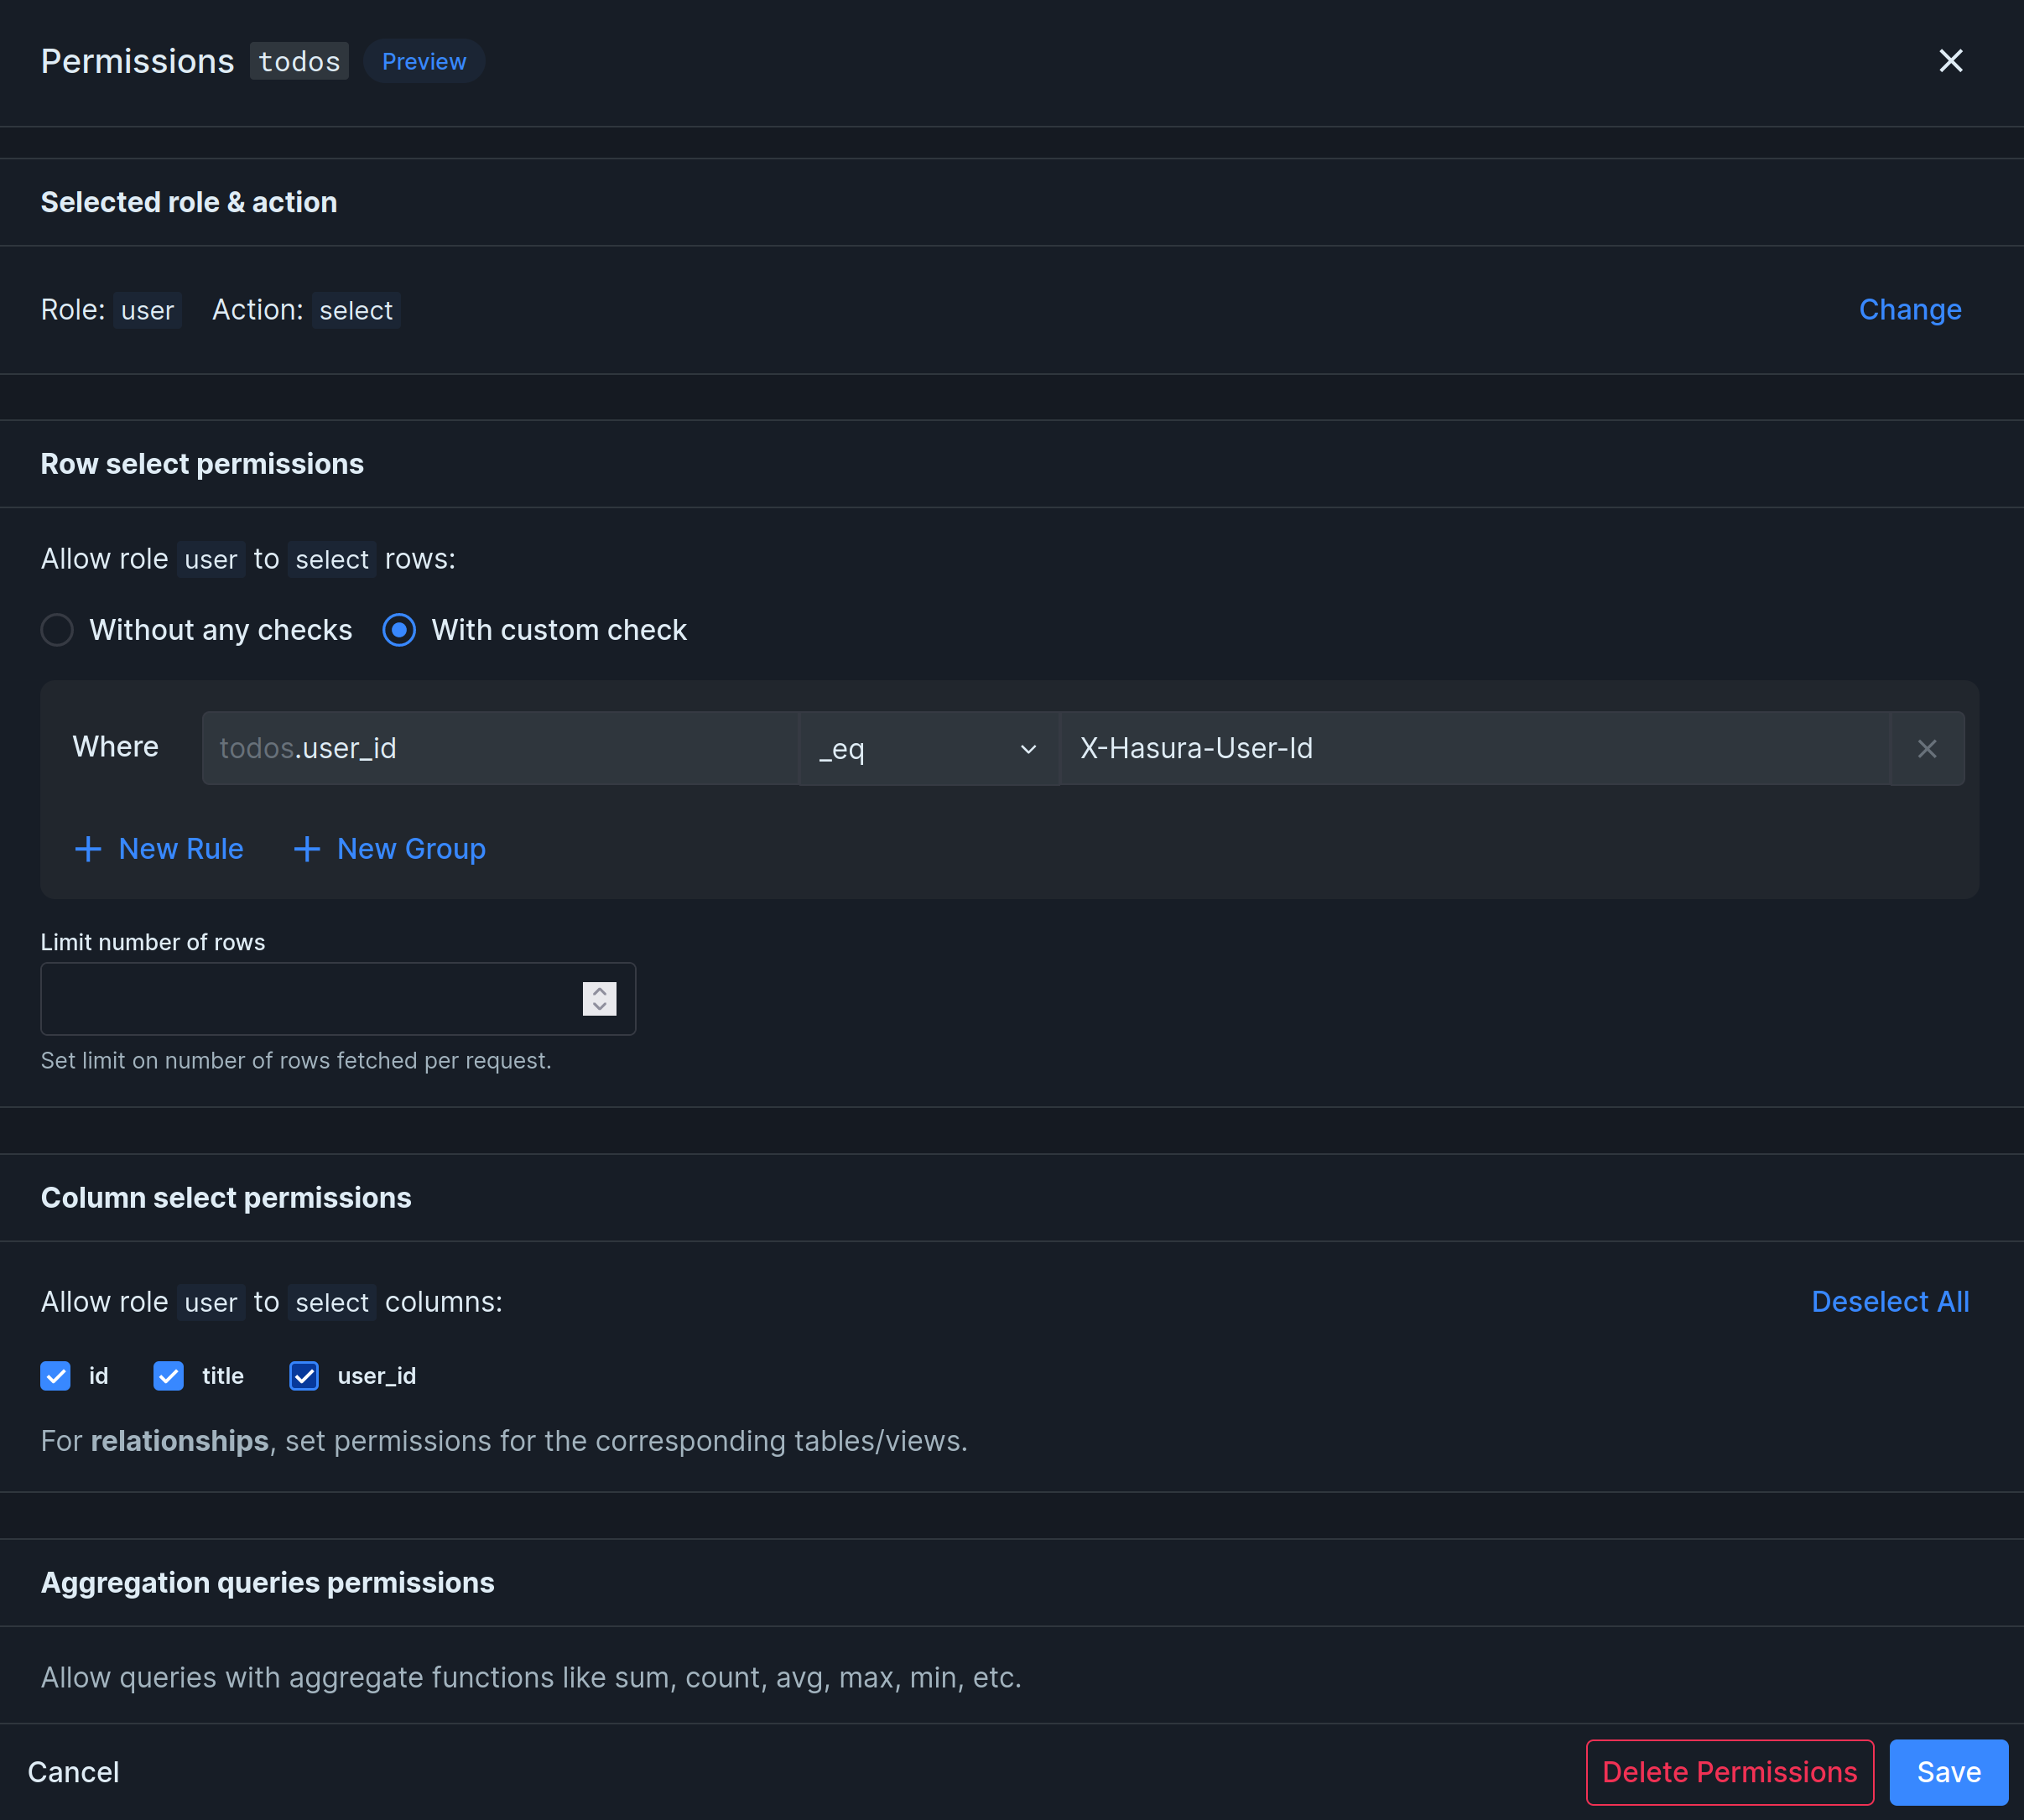
The permission above makes sure users can only select their own todos, because the value of user_id must be equal (_eq) to the authenticated user’s ID (x-hasura-user-id).
What is x-hasura-user-id?
Section titled “What is x-hasura-user-id?”x-hasura-user-id is a permission variable that is used to create permission rules. Permission Variables come from the session’s access token. You can add custom permission variables to create more complex permission rules unique to your project.
Permission Variables
Section titled “Permission Variables”You can add your own permission variables through the Nhost Dashboard under Settings -> Roles and Permissions -> Permission Variables. All variables are available in users’ access tokens which means you can use them when defining permissions for the GraphQL API.
Example
Section titled “Example”Let’s say you add a new permission variable x-hasura-company-id with path user.company.id. Nhost Auth will get the value for x-hasura-company-id by generating and running the following GraphQL query:
query { user(id: "<user-id>") { company { id } }}JSONPath
Section titled “JSONPath”We leverage JSONPath to extract the data which means you have a good amount of flexibility. To help you build your queries you can leverage the following playground. Just remember to skip $. when configuring them.
Example
Section titled “Example”Let’s say you have a permission variable x-hasura-organization-ids, the path should be, e.g., user.profile.organizations[*].id.
This will result in the following GraphQL query internally:
query { user(id: "<user-id>") { profile { organizations { id } } }}And result in the following permission variable:
{ "x-hasura-organization-ids": "{\"13\",\"37\"}"}Limitation on JSON/JSONB columns
Section titled “Limitation on JSON/JSONB columns”JSON columns cannot be used in custom claims, except the users.metadata column.
Permission Variables locally with the CLI
Section titled “Permission Variables locally with the CLI”To use permission variables locally, add your claims to nhost.toml as follows:
Example
Section titled “Example”Add a permission variable x-hasura-organization-id:
[[auth.session.accessToken.customClaims]]key = 'organization-id'value = 'profile.organization.id'default = '00000000-0000-0000-0000-000000000000'Every GraphQL request resolves permissions using a single role.
Default Role
Section titled “Default Role”Every user has one default role. The default role is used to resolve permissions if no role is specified using the x-hasura-role header in the GraphQL request.
user is the default role for authenticated users.
Allowed Roles
Section titled “Allowed Roles”Every user also has an array of allowed roles. Allowed roles are roles that the user is allowed to use to override the default role when making a GraphQL request. To override the default role, add a header x-hasura-role = <role> to the GraphQL request.
Public Access and Unauthenticated Users
Section titled “Public Access and Unauthenticated Users”GraphQL requests from unauthenticated users resolve permissions using the public role.
Insert Permissions
Section titled “Insert Permissions”
Here is a popular approach for insert permission for authenticated users.
- At the top of the page, click “insert” on the “user” role.
- Select “Without any checks”.
- Select the columns you want to allow users to insert. In our example, we do not mark
idnoruser_id, because they should not be inserted by the user. Theidis automatically generated by the database anduser_idis set using a column preset. - Under Column presets, set
user_idtox-hasura-user-id. This way, every new record’suser_idvalue is set to the ID of the user making the request.
Now, authenticated users are allowed to insert todos. Users are allowed to add a title when inserting a todo. The todo’s id is automatically generated by the database and the user_id is automatically set to the user’s id using the user_id = x-hasura-user-id column preset.
Select, Update and Delete Permissions
Section titled “Select, Update and Delete Permissions”Select, update, and delete permissions usually follow the same pattern. Here’s an example of how to add select permissions:

One of the most common permission requirements is that authenticated users should only be able to read their own data. This is how to do that:
- Go to the Database section in the Nhost Dashboard.
- In the context menu of the table you want to edit, click on Edit Permissions.
- Click on the role and operation you want to set.
- Select “With custom check” to create a new rule
- Enter
user_id,_eqandx-hasura-user-idinto the rule form. This means that in order for users to read data, the user ID value in the database row must be the same as the user ID in the access token. - Limit the number of rows to 100 (or some other relevant number).
- Select the columns you want the user to be able to read. In our case, we’ll allow the user to read all columns.
- Click Save.
Known issues
Section titled “Known issues”Permissions are slow
Section titled “Permissions are slow”In certain situations, permission checks can cause significant delays. One way to identify this issue is by comparing the execution time of a GraphQL query when performed as an admin versus as a regular user. To resolve such cases, disabling the Just-in-Time (JIT) compilation in Postgres can be beneficial.
Next Steps
Section titled “Next Steps”Hasura has more in-depth documentation related to permissions that you can learn from: