

GraphQL Operations in Next.js
Learn how to perform GraphQL operations and manage database permissions while building a complete todos application with Nhost and Next.js
Next.js GraphQL CRUD operations server actions todos app App RouterThis part builds upon the previous parts by demonstrating how to perform GraphQL operations with proper database permissions using Next.js App Router patterns. You’ll learn how to design database tables, configure user permissions, and implement complete CRUD operations through GraphQL queries and mutations using server components, client components, and server actions.
Full-Stack Next.js Development with Nhost
Section titled “Full-Stack Next.js Development with Nhost”Prerequisites
Section titled “Prerequisites”- Complete the User Authentication part first
- The project from the previous part set up and running
What You’ll Build
Section titled “What You’ll Build”By the end of this part, you’ll have:
- GraphQL queries and mutations for complete CRUD operations
- Database schema with proper relationships and constraints
- User permissions for secure data access control
- Next.js components using server/client patterns that interact with GraphQL endpoint
- Server actions for secure data mutations
- Server components for efficient data fetching
Step-by-Step Guide
Section titled “Step-by-Step Guide”Create the To-Dos Table
Section titled “Create the To-Dos Table”First, we’ll perform the database changes to set up the todos table with proper schema and relationships to users.
In your Nhost project dashboard:
- Navigate to Database
- Click on the SQL Editor
Enter the following SQL:
CREATE TABLE public.todos (  id uuid DEFAULT gen_random_uuid() NOT NULL,  created_at timestamptz DEFAULT now() NOT NULL,  updated_at timestamptz DEFAULT now() NOT NULL,  title text NOT NULL,  details text,  completed bool DEFAULT false NOT NULL,  user_id uuid NOT NULL,  PRIMARY KEY (id),  FOREIGN KEY (user_id) REFERENCES auth.users (id) ON UPDATE CASCADE ON DELETE CASCADE);

CREATE OR REPLACE FUNCTION update_updated_at_column()RETURNS TRIGGER AS $$BEGIN  NEW.updated_at = now();  RETURN NEW;END;$$ language 'plpgsql';

CREATE TRIGGER update_todos_updated_at  BEFORE UPDATE ON public.todos  FOR EACH ROW  EXECUTE FUNCTION update_updated_at_column();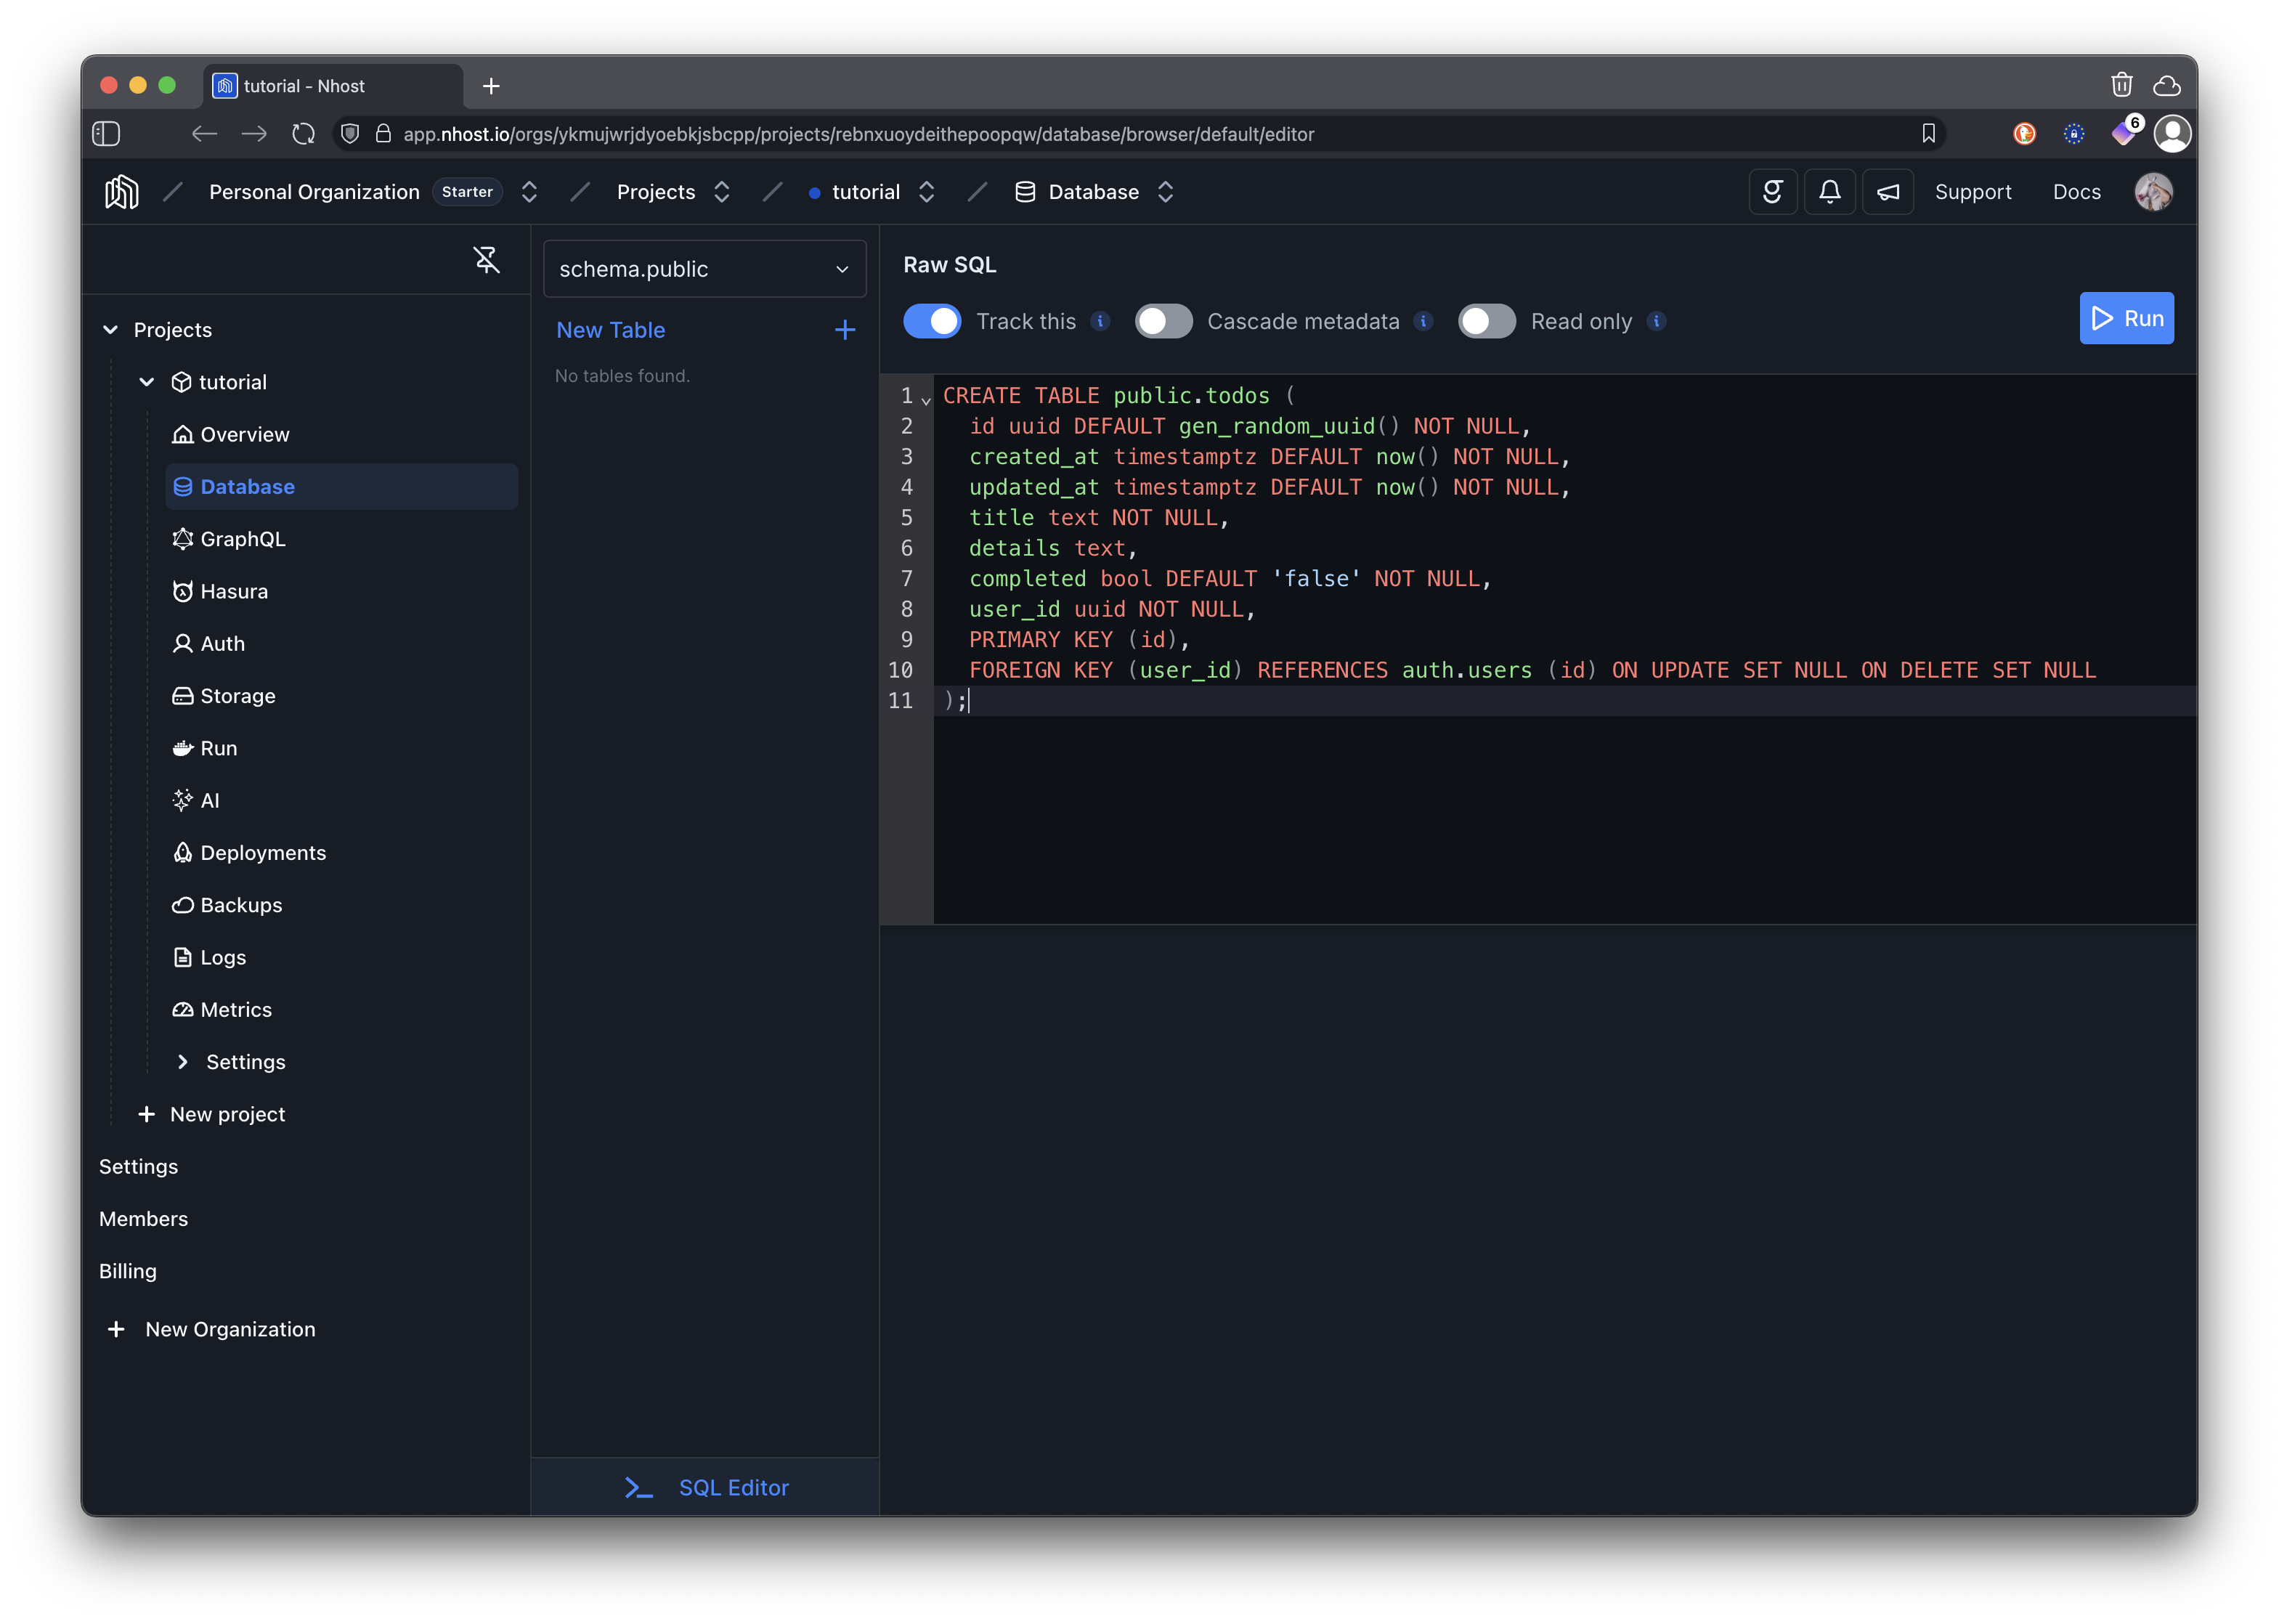
Set Up Permissions
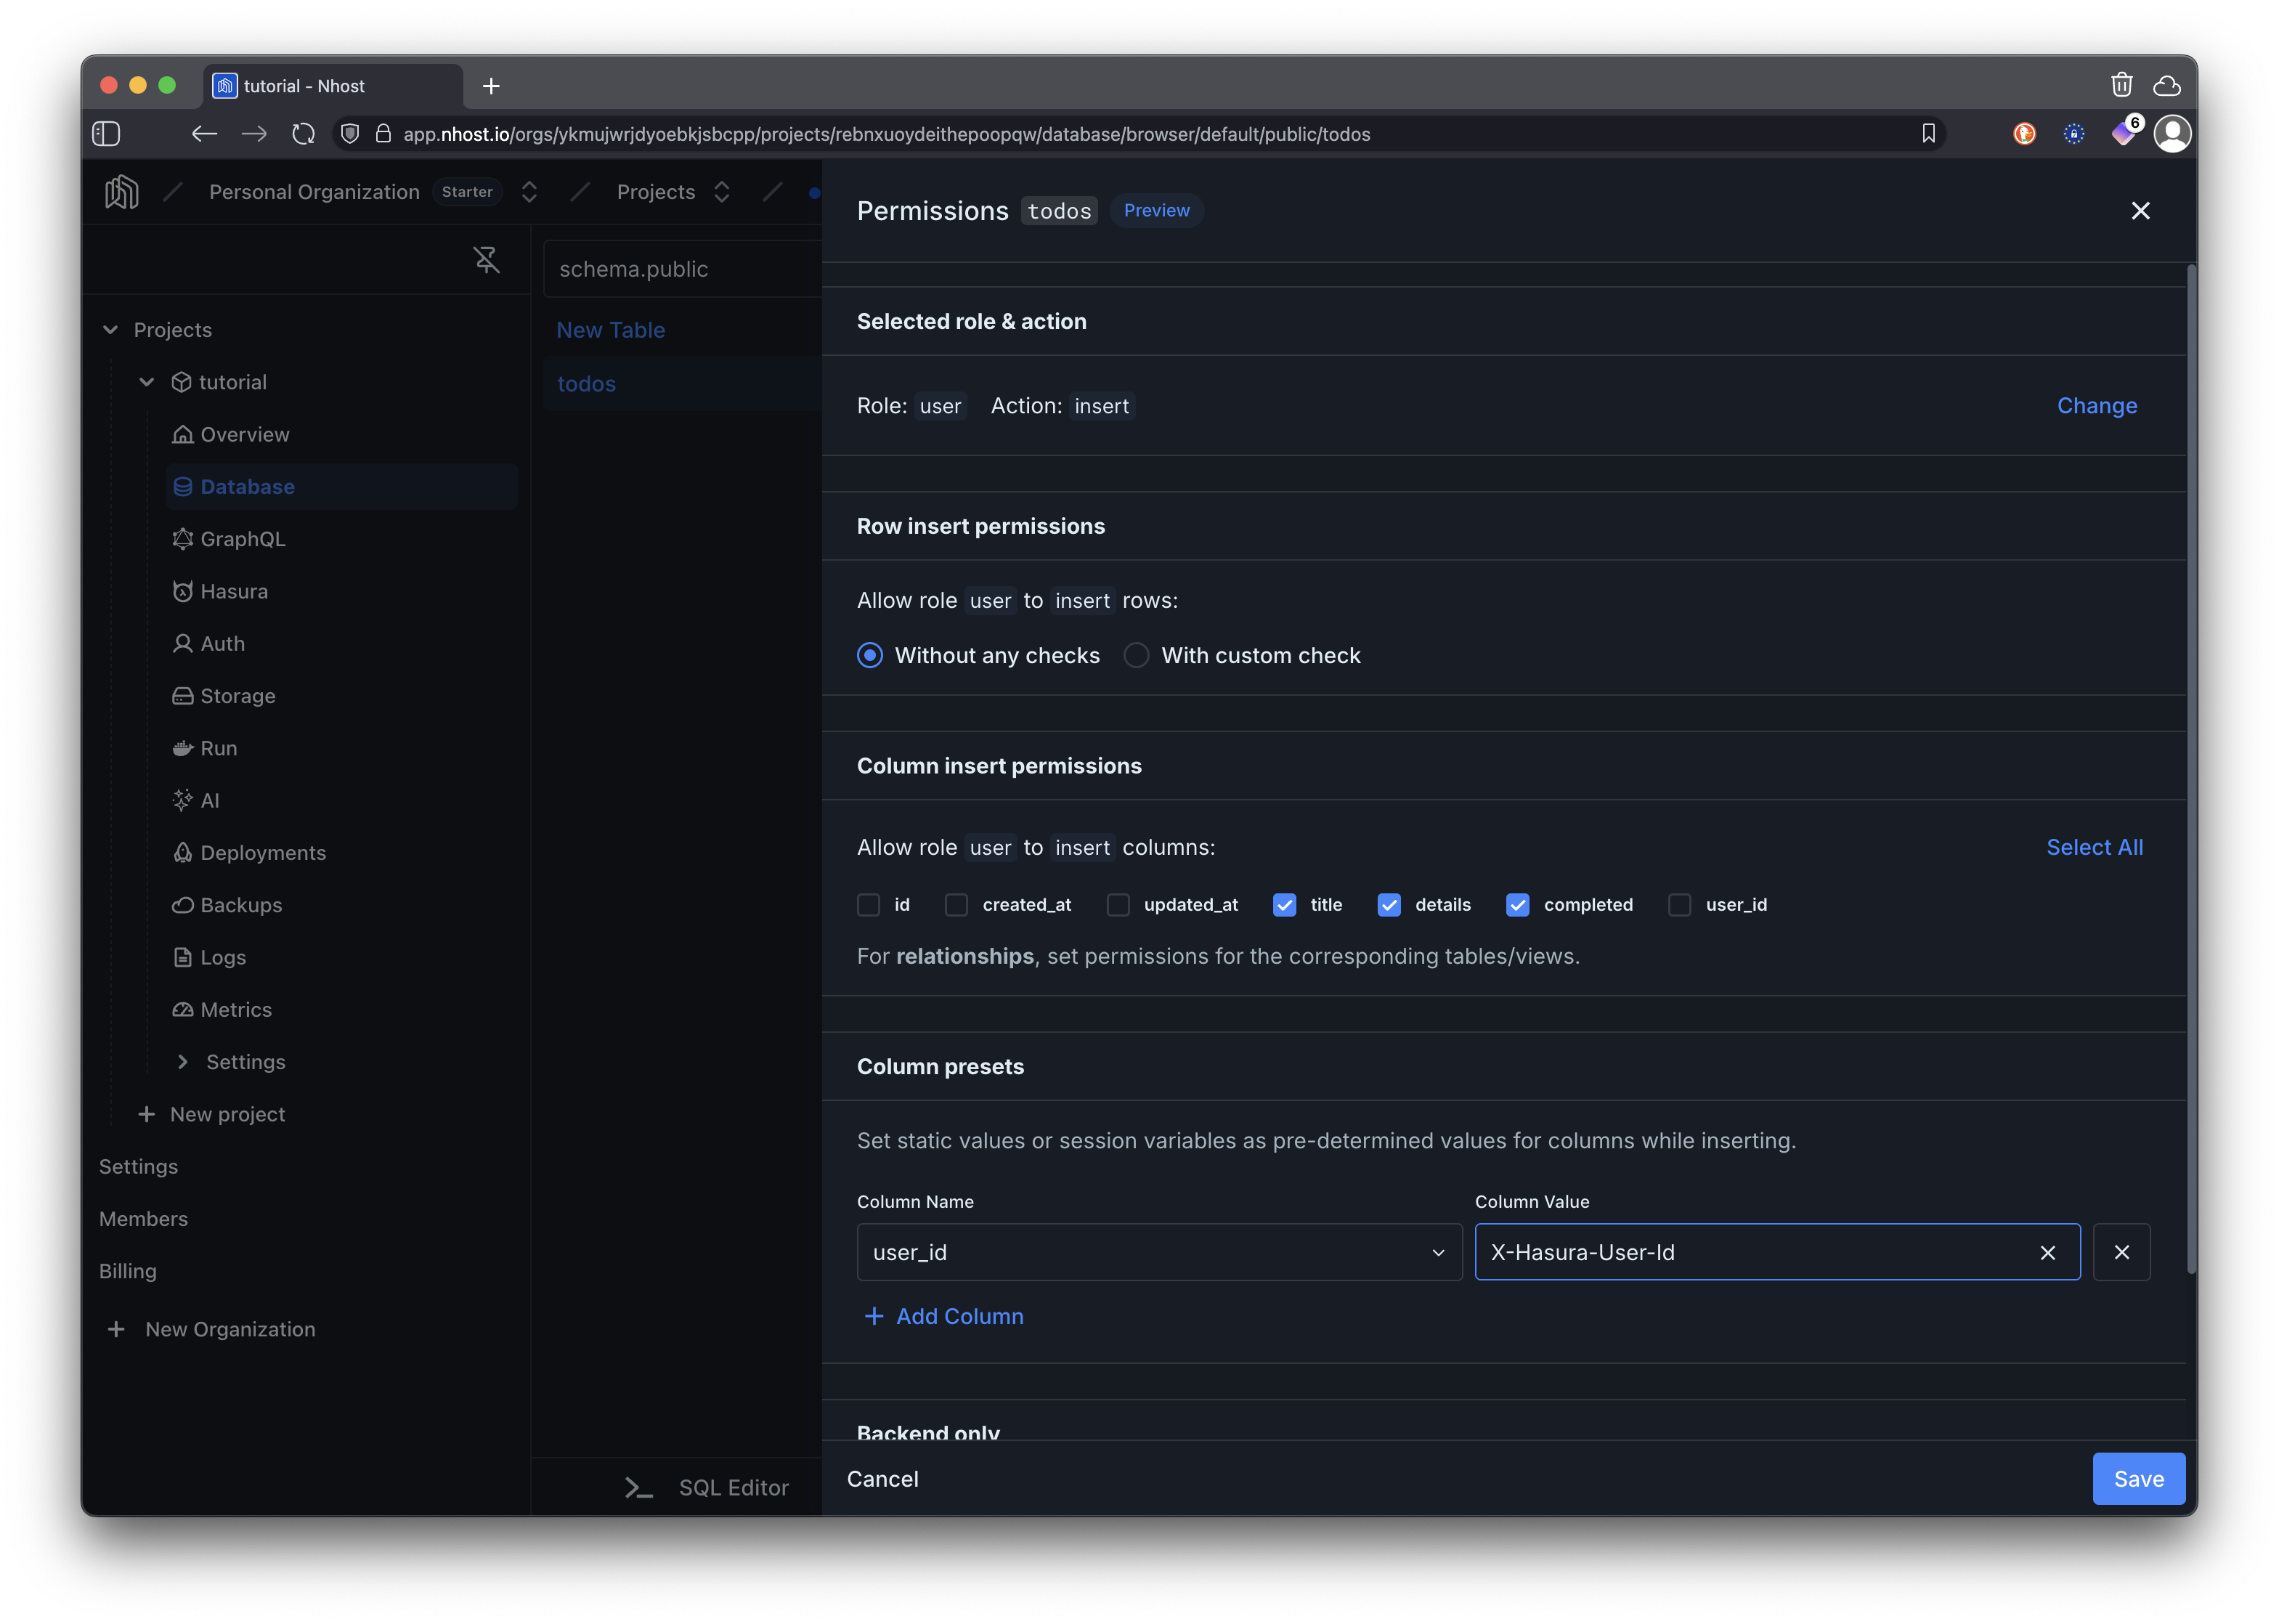
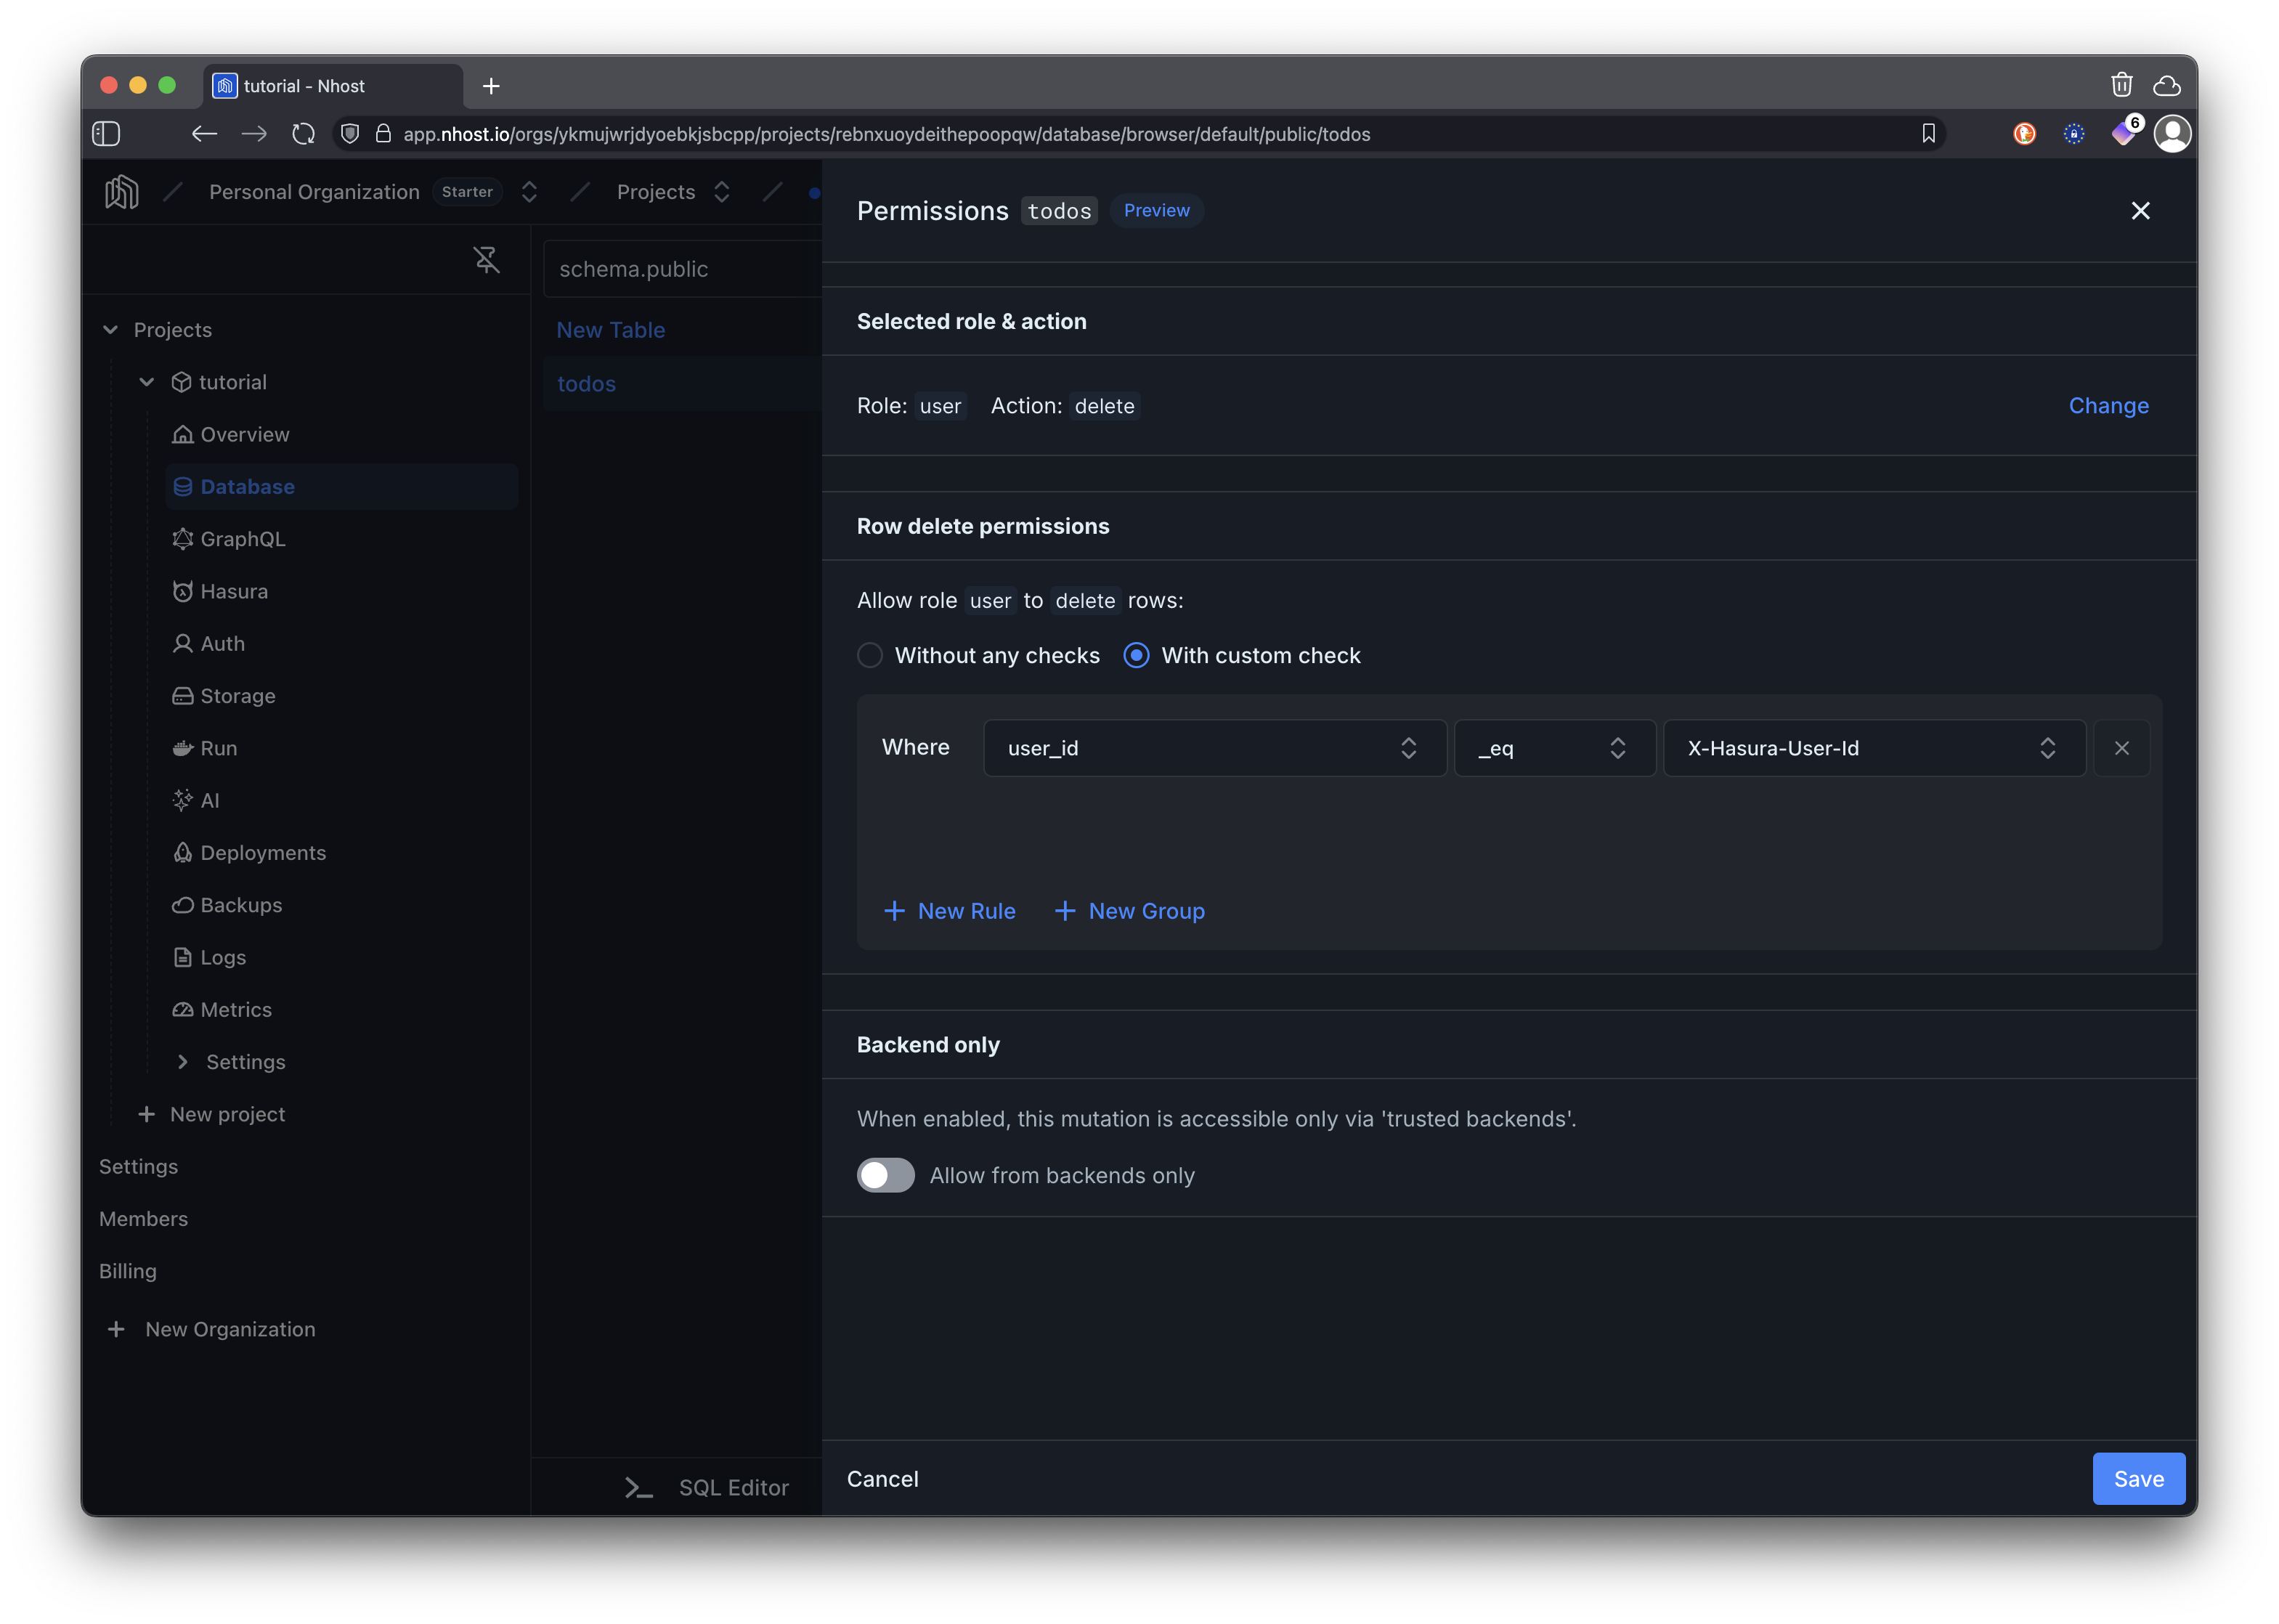
Section titled “Set Up Permissions”It’s now time to set permission rules for the table you just created. With the table todos selected, click on …, followed by Edit Permissions.
You will set permissions for the user role and actions insert, select, update, and delete.
When inserting permissions we are only allowing users to set the title, details, and completed columns as the rest of the columns are set automatically by the backend. The user_id column is configured as a preset to the currently authenticated user’s ID using the X-Hasura-User-Id session variable. This ensures that each todo is associated with the user who created it.
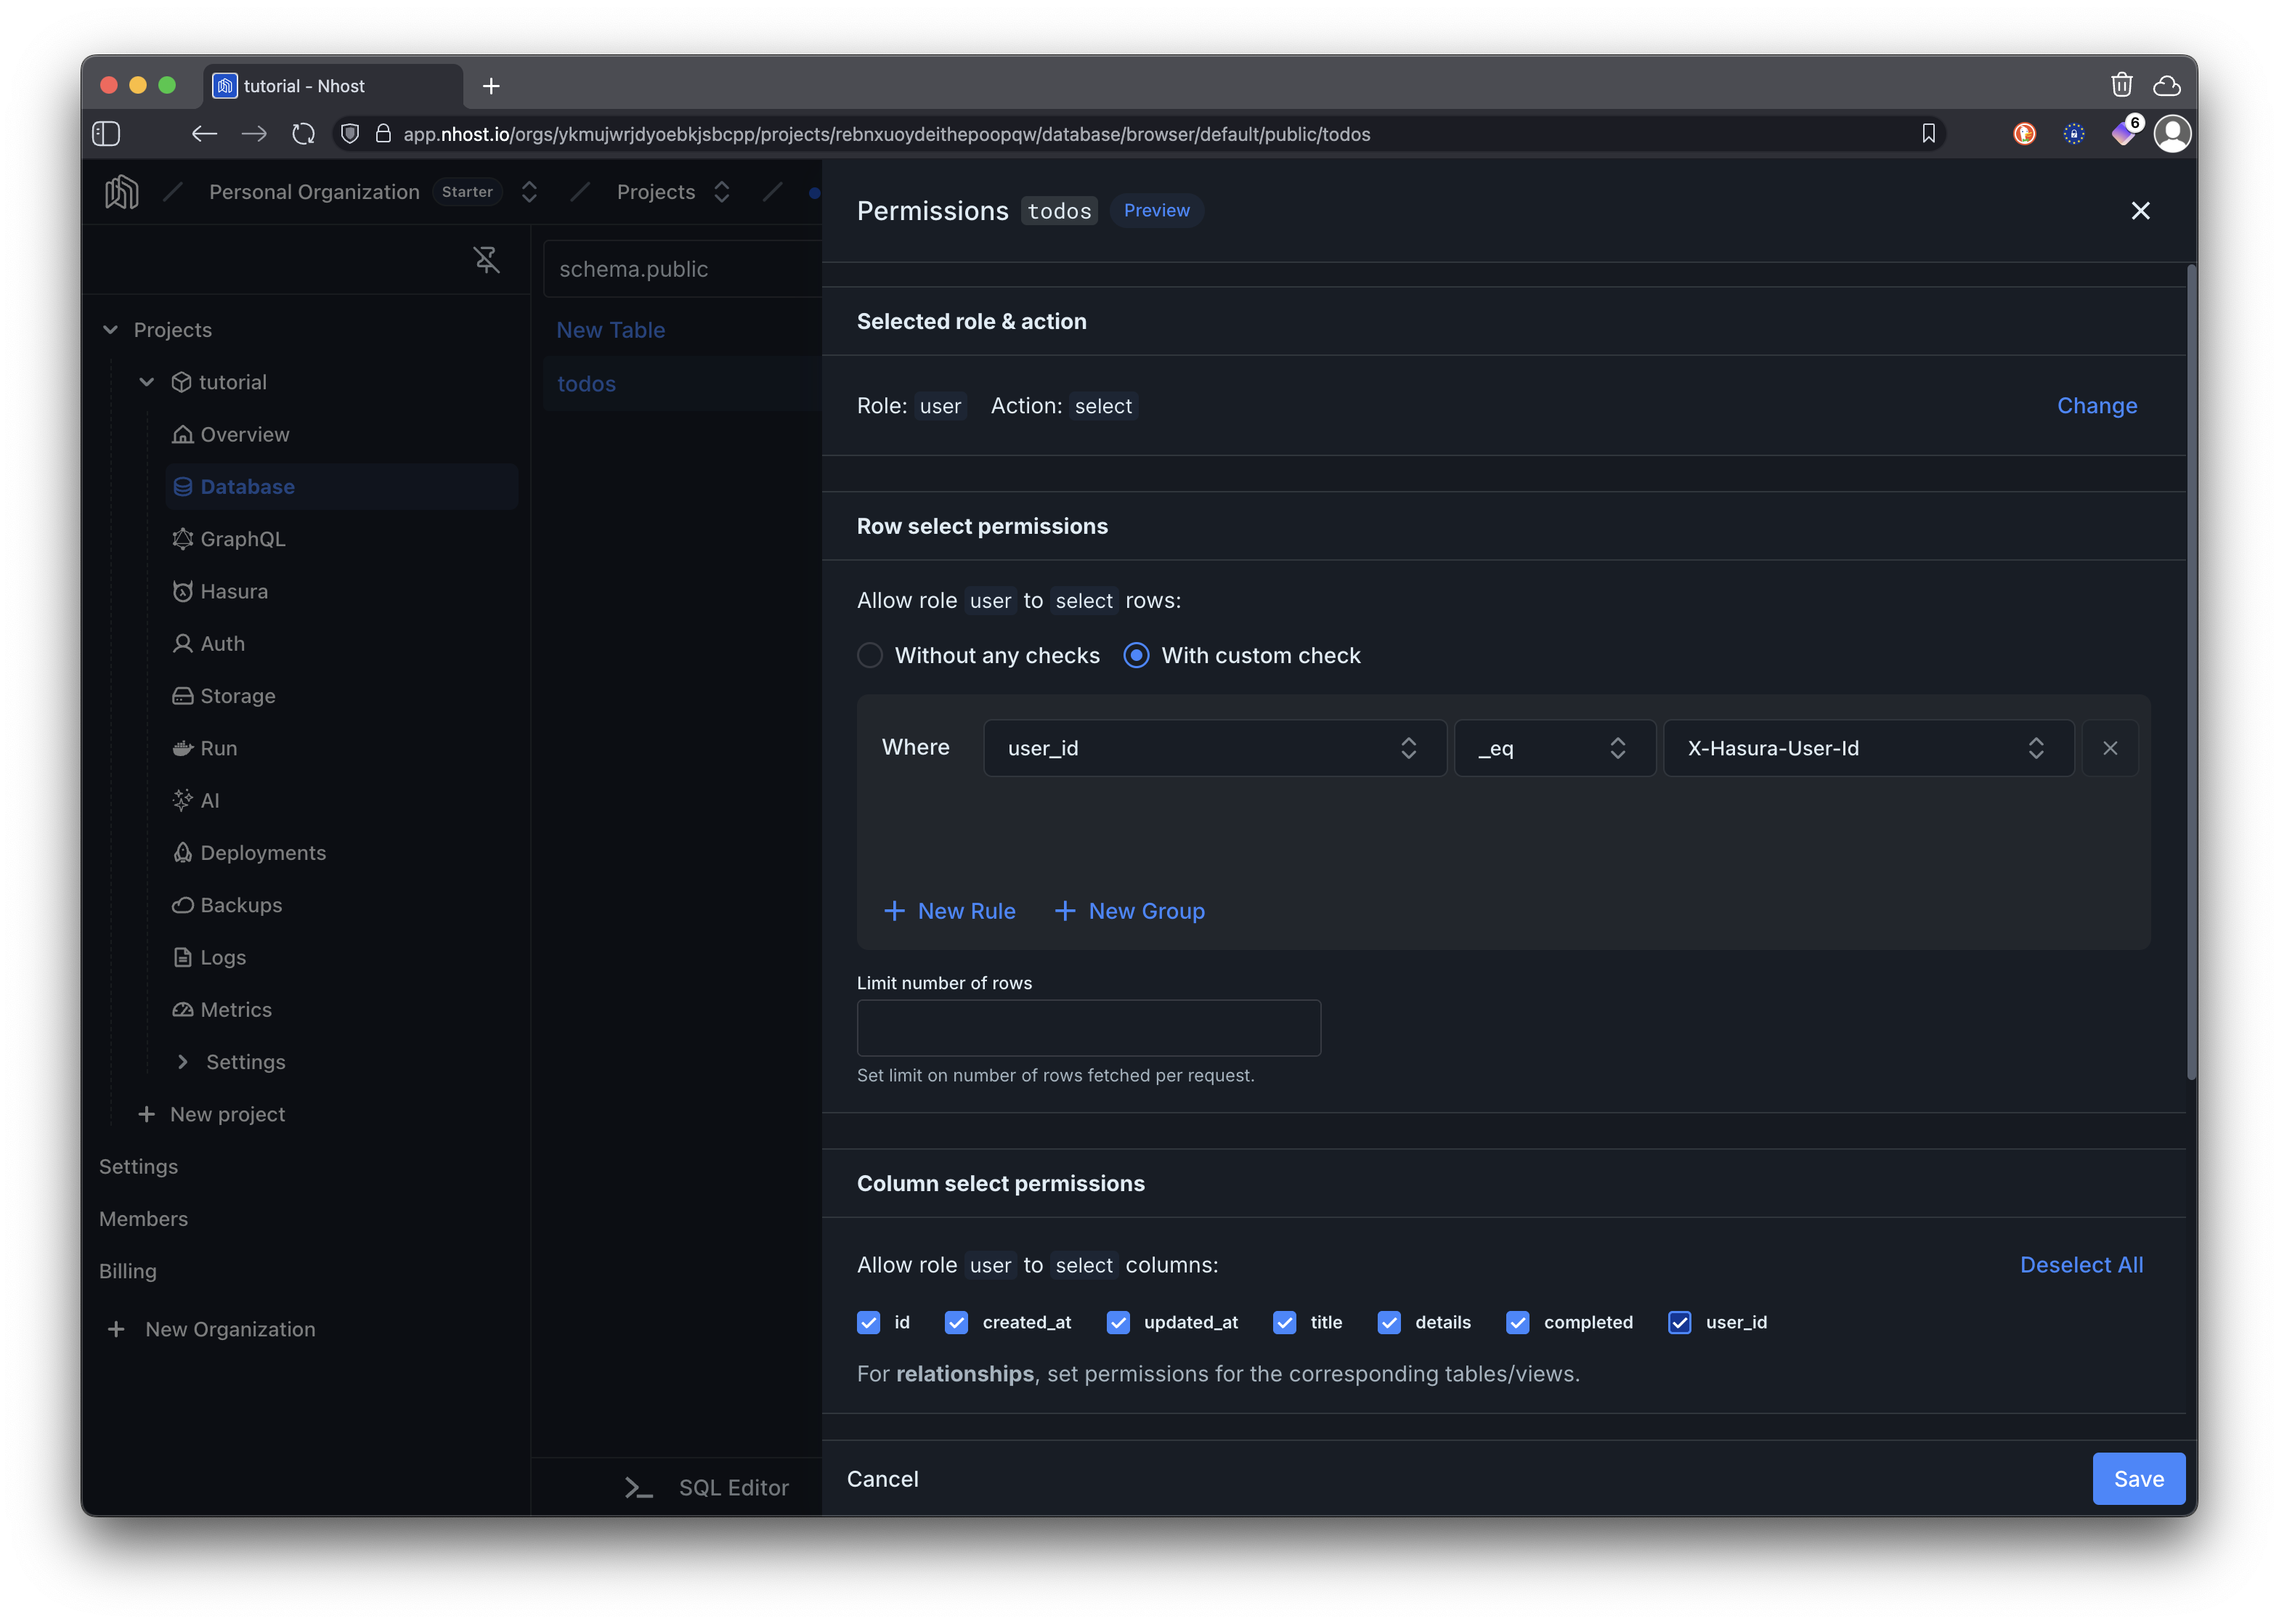
For selecting (reading) todos, we are allowing to read all columns but only for rows where the user_id matches the authenticated user’s ID. This ensures that users can only see their own todos.
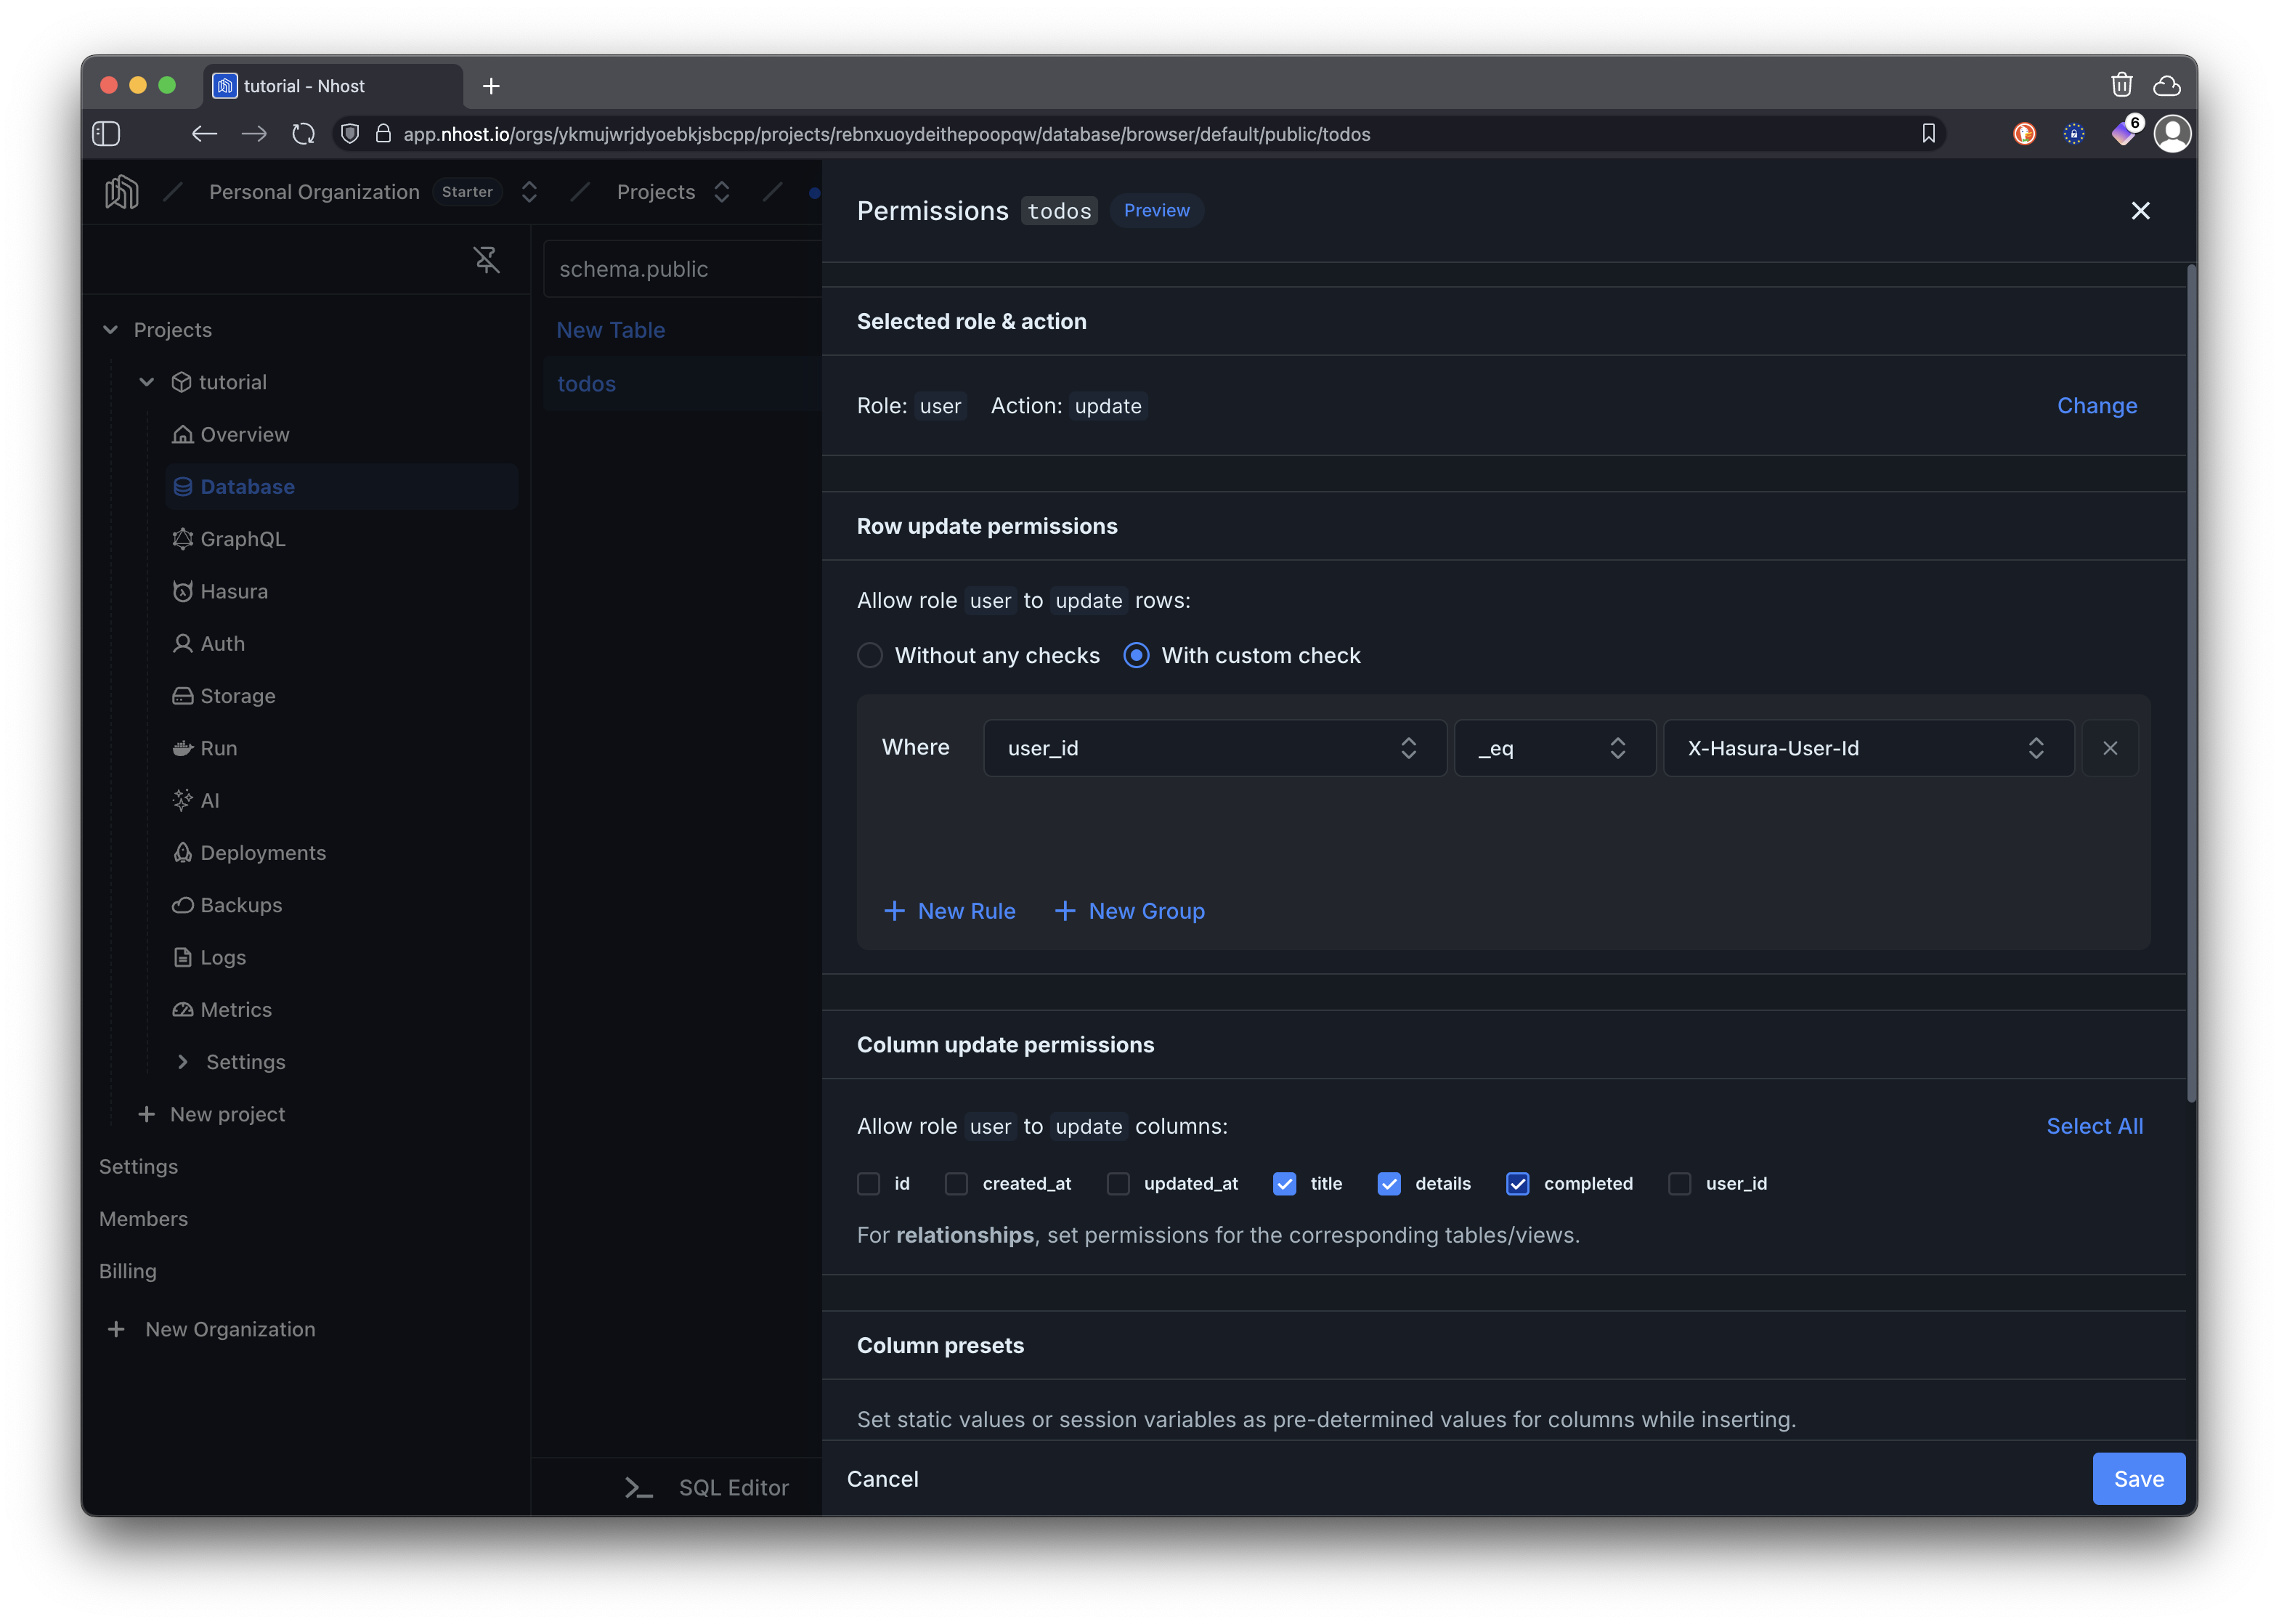
When updating todos, we are allowing users to modify the title, details, and completed columns but only for rows where the user_id matches their own ID. This prevents users from modifying todos that do not belong to them.
For deleting todos, we are allowing users to delete rows only where the user_id matches their own ID. This ensures that users cannot delete todos that belong to other users.
Create the Todos Page System
Section titled “Create the Todos Page System”Now let’s implement the Next.js page system that uses the database we just configured. We’ll create a server component for the main page, a client component for the interactive todos interface, and server actions for secure data mutations.
The main todos page is a server component that fetches initial data server-side and renders the todos interface. This component runs on the server and provides the initial state to the client component.
import { createNhostClient } from "../../lib/nhost/server";import TodosClient from "./TodosClient";
// The interfaces below define the structure of our data// They are not strictly necessary but help with type safety
// Represents a single todo itemexport interface Todo { id: string; title: string; details: string | null; completed: boolean; created_at: string; updated_at: string; user_id: string;}
// This matches the GraphQL response structure for fetching todos// Can be used as a generic type on the request methodinterface GetTodos { todos: Todo[];}
export default async function TodosPage() { // Fetch initial todos data server-side const nhost = await createNhostClient(); const session = nhost.getUserSession();
let initialTodos: Todo[] = []; let error: string | null = null;
if (session) { try { // Make GraphQL request to fetch todos using Nhost server client // The query automatically filters by user_id due to Hasura permissions const response = await nhost.graphql.request<GetTodos>({ query: ` query GetTodos { todos(order_by: { created_at: desc }) { id title details completed created_at updated_at user_id } } `, });
// Check for GraphQL errors in the response body if (response.body.errors) { error = response.body.errors[0]?.message || "Failed to fetch todos"; } else { // Extract todos from the GraphQL response data initialTodos = response.body?.data?.todos || []; } } catch (err) { error = err instanceof Error ? err.message : "Failed to fetch todos"; } }
return <TodosClient initialTodos={initialTodos} initialError={error} />;}The todos client component is a client component that handles all interactive functionality including form submissions, state management, and user interactions. It receives initial data from the server component and manages the client-side state.
"use client";
import { useId, useState } from "react";import { addTodo, deleteTodo, updateTodo } from "./actions";import type { Todo } from "./page";
interface TodosClientProps { initialTodos: Todo[]; initialError: string | null;}
export default function TodosClient({ initialTodos, initialError,}: TodosClientProps) { const [todos, setTodos] = useState<Todo[]>(initialTodos); const [error, setError] = useState<string | null>(initialError); const [newTodoTitle, setNewTodoTitle] = useState(""); const [newTodoDetails, setNewTodoDetails] = useState(""); const [editingTodo, setEditingTodo] = useState<Todo | null>(null); const [showAddForm, setShowAddForm] = useState(false); const [expandedTodos, setExpandedTodos] = useState<Set<string>>(new Set()); const [isLoading, setIsLoading] = useState(false);
const titleId = useId(); const detailsId = useId();
const handleAddTodo = async (e: React.FormEvent) => { e.preventDefault(); if (!newTodoTitle.trim()) return;
setIsLoading(true); try { // Call server action to add todo const result = await addTodo({ title: newTodoTitle.trim(), details: newTodoDetails.trim() || null, });
if (result.success && result.todo) { setTodos([result.todo, ...todos]); setNewTodoTitle(""); setNewTodoDetails(""); setShowAddForm(false); setError(null); } else { setError(result.error || "Failed to add todo"); } } catch (err) { setError(err instanceof Error ? err.message : "Failed to add todo"); } finally { setIsLoading(false); } };
const handleUpdateTodo = async ( id: string, updates: Partial<Pick<Todo, "title" | "details" | "completed">>, ) => { try { // Call server action to update todo const result = await updateTodo(id, updates);
if (result.success && result.todo) { setTodos( todos.map((todo) => (todo.id === id ? (result.todo ?? todo) : todo)), ); setEditingTodo(null); setError(null); } else { setError(result.error || "Failed to update todo"); } } catch (err) { setError(err instanceof Error ? err.message : "Failed to update todo"); } };
const handleDeleteTodo = async (id: string) => { if (!confirm("Are you sure you want to delete this todo?")) return;
try { // Call server action to delete todo const result = await deleteTodo(id);
if (result.success) { setTodos(todos.filter((todo) => todo.id !== id)); setError(null); } else { setError(result.error || "Failed to delete todo"); } } catch (err) { setError(err instanceof Error ? err.message : "Failed to delete todo"); } };
const toggleComplete = async (todo: Todo) => { await handleUpdateTodo(todo.id, { completed: !todo.completed }); };
const saveEdit = async () => { if (!editingTodo) return; await handleUpdateTodo(editingTodo.id, { title: editingTodo.title, details: editingTodo.details, }); };
const toggleTodoExpansion = (todoId: string) => { const newExpanded = new Set(expandedTodos); if (newExpanded.has(todoId)) { newExpanded.delete(todoId); } else { newExpanded.add(todoId); } setExpandedTodos(newExpanded); };
return ( <div className="container"> <header className="page-header"> <h1 className="page-title"> My Todos {!showAddForm && ( <button type="button" onClick={() => setShowAddForm(true)} className="add-todo-btn" title="Add a new todo" > + </button> )} </h1> </header>
{error && ( <div className="error-message"> <strong>Error:</strong> {error} </div> )}
{showAddForm && ( <div className="todo-form-card"> <form onSubmit={handleAddTodo} className="todo-form"> <h2 className="form-title">Add New Todo</h2> <div className="form-fields"> <div className="field-group"> <label htmlFor={titleId}>Title *</label> <input id={titleId} type="text" value={newTodoTitle} onChange={(e) => setNewTodoTitle(e.target.value)} placeholder="What needs to be done?" required disabled={isLoading} /> </div> <div className="field-group"> <label htmlFor={detailsId}>Details</label> <textarea id={detailsId} value={newTodoDetails} onChange={(e) => setNewTodoDetails(e.target.value)} placeholder="Add some details (optional)..." rows={3} disabled={isLoading} /> </div> <div className="form-actions"> <button type="submit" className="btn btn-primary" disabled={isLoading} > {isLoading ? "Adding..." : "Add Todo"} </button> <button type="button" onClick={() => { setShowAddForm(false); setNewTodoTitle(""); setNewTodoDetails(""); }} className="btn btn-secondary" disabled={isLoading} > Cancel </button> </div> </div> </form> </div> )}
{!showAddForm && ( <div className="todos-list"> {todos.length === 0 ? ( <div className="empty-state"> <svg className="empty-icon" fill="none" stroke="currentColor" viewBox="0 0 24 24" aria-hidden="true" > <path strokeLinecap="round" strokeLinejoin="round" strokeWidth={1.5} d="M9 5H7a2 2 0 00-2 2v10a2 2 0 002 2h8a2 2 0 002-2V7a2 2 0 00-2-2h-2M9 5a2 2 0 002 2h2a2 2 0 002-2M9 5a2 2 0 012-2h2a2 2 0 012 2" /> </svg> <h3 className="empty-title">No todos yet</h3> <p className="empty-description"> Create your first todo to get started! </p> </div> ) : ( todos.map((todo) => ( <div key={todo.id} className={`todo-card ${todo.completed ? "completed" : ""}`} > {editingTodo?.id === todo.id ? ( <div className="todo-edit"> <div className="edit-fields"> <div className="field-group"> <label htmlFor={`${titleId}-edit`}>Title</label> <input id={`${titleId}-edit`} type="text" value={editingTodo.title} onChange={(e) => setEditingTodo({ ...editingTodo, title: e.target.value, }) } /> </div> <div className="field-group"> <label htmlFor={`${detailsId}-edit`}>Details</label> <textarea id={`${detailsId}-edit`} value={editingTodo.details || ""} onChange={(e) => setEditingTodo({ ...editingTodo, details: e.target.value, }) } rows={3} /> </div> <div className="edit-actions"> <button type="button" onClick={saveEdit} className="btn btn-primary" > ✓ Save Changes </button> <button type="button" onClick={() => setEditingTodo(null)} className="btn btn-cancel" > ✕ Cancel </button> </div> </div> </div> ) : ( <div className="todo-content"> <div className="todo-header"> <button type="button" className={`todo-title-btn ${todo.completed ? "completed" : ""}`} onClick={() => toggleTodoExpansion(todo.id)} > {todo.title} </button> <div className="todo-actions"> <button type="button" onClick={() => toggleComplete(todo)} className="action-btn action-btn-complete" title={ todo.completed ? "Mark as incomplete" : "Mark as complete" } > {todo.completed ? "↶" : "✓"} </button> <button type="button" onClick={() => setEditingTodo(todo)} className="action-btn action-btn-edit" title="Edit todo" > ✏️ </button> <button type="button" onClick={() => handleDeleteTodo(todo.id)} className="action-btn action-btn-delete" title="Delete todo" > 🗑️ </button> </div> </div>
{expandedTodos.has(todo.id) && ( <div className="todo-details"> {todo.details && ( <div className={`todo-description ${todo.completed ? "completed" : ""}`} > <p>{todo.details}</p> </div> )}
<div className="todo-meta"> <div className="meta-dates"> <span className="meta-item"> Created:{" "} {new Date(todo.created_at).toLocaleString()} </span> <span className="meta-item"> Updated:{" "} {new Date(todo.updated_at).toLocaleString()} </span> </div> {todo.completed && ( <div className="completion-badge"> <svg className="completion-icon" fill="none" stroke="currentColor" viewBox="0 0 24 24" aria-hidden="true" > <path strokeLinecap="round" strokeLinejoin="round" strokeWidth={2} d="M9 12l2 2 4-4m6 2a9 9 0 11-18 0 9 9 0 0118 0z" /> </svg> <span>Completed</span> </div> )} </div> </div> )} </div> )} </div> )) )} </div> )} </div> );}Server actions handle all data mutations securely on the server side. They validate permissions, execute GraphQL operations, and return type-safe responses to the client components.
"use server";
import type { ErrorResponse } from "@nhost/nhost-js/auth";import type { FetchError } from "@nhost/nhost-js/fetch";import { createNhostClient } from "../../lib/nhost/server";import type { Todo } from "./page";
// Response types for server actionstype ActionResult<T = void> = { success: boolean; error?: string; todo?: T;};
// GraphQL response typesinterface InsertTodoResponse { insert_todos_one: Todo | null;}
interface UpdateTodoResponse { update_todos_by_pk: Todo | null;}
interface DeleteTodoResponse { delete_todos_by_pk: { id: string } | null;}
export async function addTodo(data: { title: string; details: string | null;}): Promise<ActionResult<Todo>> { const { title, details } = data;
if (!title.trim()) { return { success: false, error: "Title is required", }; }
try { const nhost = await createNhostClient(); const session = nhost.getUserSession();
if (!session) { return { success: false, error: "Not authenticated", }; }
// Execute GraphQL mutation to insert a new todo // user_id is automatically set by Hasura based on JWT token const response = await nhost.graphql.request<InsertTodoResponse>({ query: ` mutation InsertTodo($title: String!, $details: String) { insert_todos_one(object: { title: $title, details: $details }) { id title details completed created_at updated_at user_id } } `, variables: { title: title.trim(), details: details?.trim() || null, }, });
if (response.body.errors) { return { success: false, error: response.body.errors[0]?.message || "Failed to add todo", }; }
if (!response.body?.data?.insert_todos_one) { return { success: false, error: "Failed to add todo", }; }
return { success: true, todo: response.body.data.insert_todos_one, }; } catch (err) { const error = err as FetchError<ErrorResponse>; return { success: false, error: `Failed to add todo: ${error.message}`, }; }}
export async function updateTodo( id: string, updates: Partial<Pick<Todo, "title" | "details" | "completed">>,): Promise<ActionResult<Todo>> { if (!id) { return { success: false, error: "Todo ID is required", }; }
try { const nhost = await createNhostClient(); const session = nhost.getUserSession();
if (!session) { return { success: false, error: "Not authenticated", }; }
// Execute GraphQL mutation to update an existing todo by primary key // Hasura permissions ensure users can only update their own todos const response = await nhost.graphql.request<UpdateTodoResponse>({ query: ` mutation UpdateTodo($id: uuid!, $updates: todos_set_input!) { update_todos_by_pk(pk_columns: { id: $id }, _set: $updates) { id title details completed created_at updated_at user_id } } `, variables: { id, updates, }, });
if (response.body.errors) { return { success: false, error: response.body.errors[0]?.message || "Failed to update todo", }; }
if (!response.body?.data?.update_todos_by_pk) { return { success: false, error: "Failed to update todo", }; }
return { success: true, todo: response.body.data.update_todos_by_pk, }; } catch (err) { const error = err as FetchError<ErrorResponse>; return { success: false, error: `Failed to update todo: ${error.message}`, }; }}
export async function deleteTodo(id: string): Promise<ActionResult> { if (!id) { return { success: false, error: "Todo ID is required", }; }
try { const nhost = await createNhostClient(); const session = nhost.getUserSession();
if (!session) { return { success: false, error: "Not authenticated", }; }
// Execute GraphQL mutation to delete a todo by primary key // Hasura permissions ensure users can only delete their own todos const response = await nhost.graphql.request<DeleteTodoResponse>({ query: ` mutation DeleteTodo($id: uuid!) { delete_todos_by_pk(id: $id) { id } } `, variables: { id, }, });
if (response.body.errors) { return { success: false, error: response.body.errors[0]?.message || "Failed to delete todo", }; }
return { success: true, }; } catch (err) { const error = err as FetchError<ErrorResponse>; return { success: false, error: `Failed to delete todo: ${error.message}`, }; }}Update Navigation Component
Section titled “Update Navigation Component”Add the todos page to your application navigation by updating the Navigation component to include a link to the todos page.
import Link from "next/link";import { createNhostClient } from "../lib/nhost/server";import SignOutButton from "./SignOutButton";
export default async function Navigation() { const nhost = await createNhostClient(); const session = nhost.getUserSession();
return ( <nav className="navigation"> <div className="nav-container"> <Link href="/" className="nav-logo"> Nhost Next.js Demo </Link>
<div className="nav-links"> <Link href="/" className="nav-link"> Home </Link>
{session ? ( <> <Link href="/todos" className="nav-link"> Todos </Link> <Link href="/profile" className="nav-link"> Profile </Link> <SignOutButton /> </> ) : ( <> <Link href="/signin" className="nav-link"> Sign In </Link> <Link href="/signup" className="nav-link"> Sign Up </Link> </> )} </div> </div> </nav> );}Test Your Complete Application
Section titled “Test Your Complete Application”Run your Next.js application and test all the functionality:
npm run devThings to try out:
- Server-Side Rendering: Notice how the todos are loaded server-side on initial page load, providing faster initial rendering
- Authentication Integration: Try signing in and out and see how the Todos page is only available when authenticated through middleware protection
- CRUD Operations: Create, view, edit, complete, and delete todos. Notice how server actions handle mutations while maintaining type safety
- Multi-User Isolation: Open the application in another browser or incognito window, sign in with a different account and verify that you cannot see or modify todos from the first account
- Real-time Updates: Unlike client-only React apps, changes will be persisted immediately through server actions and reflected in the optimistic UI updates
Key Features Implemented
Section titled “Key Features Implemented”Database Schema
Properly designed todos table with constraints, indexes, and automatic timestamp updates for optimal performance.
GraphQL API
Auto-generated GraphQL API with queries and mutations for full CRUD operations on todos.
Row-Level Security
Comprehensive permissions ensuring users can only access their own todos through all GraphQL operations.
Server/Client Architecture
Next.js App Router patterns with server components for data fetching, client components for interactivity, and server actions for mutations.
Server-Side Data Fetching
Initial todos loaded server-side for improved performance and SEO, with client-side state management for optimal user experience.
Type-Safe Server Actions
Secure server-side mutations with comprehensive error handling and type safety throughout the data flow.
Rich Interface
Expandable todo items, inline editing, completion status, and detailed timestamps with responsive design.