

File Uploads in Next.js
Add file uploads to your Next.js app with Nhost Storage: configure buckets and permissions and build a full file management system.
Next.js file uploads storage buckets file management server components Nhost storageThis part builds upon the previous GraphQL operations part by demonstrating how to implement file upload functionality with proper storage permissions. You’ll learn how to create storage buckets, configure upload permissions, and implement complete file management operations in a Next.js application using server and client components.
Full-Stack Next.js Development with Nhost
Section titled “Full-Stack Next.js Development with Nhost”Prerequisites
Section titled “Prerequisites”- Complete the GraphQL Operations part first
- The project from the previous part set up and running
What You’ll Build
Section titled “What You’ll Build”By the end of this part, you’ll have:
- A personal bucket so users can upload their own private files
- File upload functionality
- File management interface for viewing and deleting files
- Security permissions ensuring users can only access their own files
Step-by-Step Guide
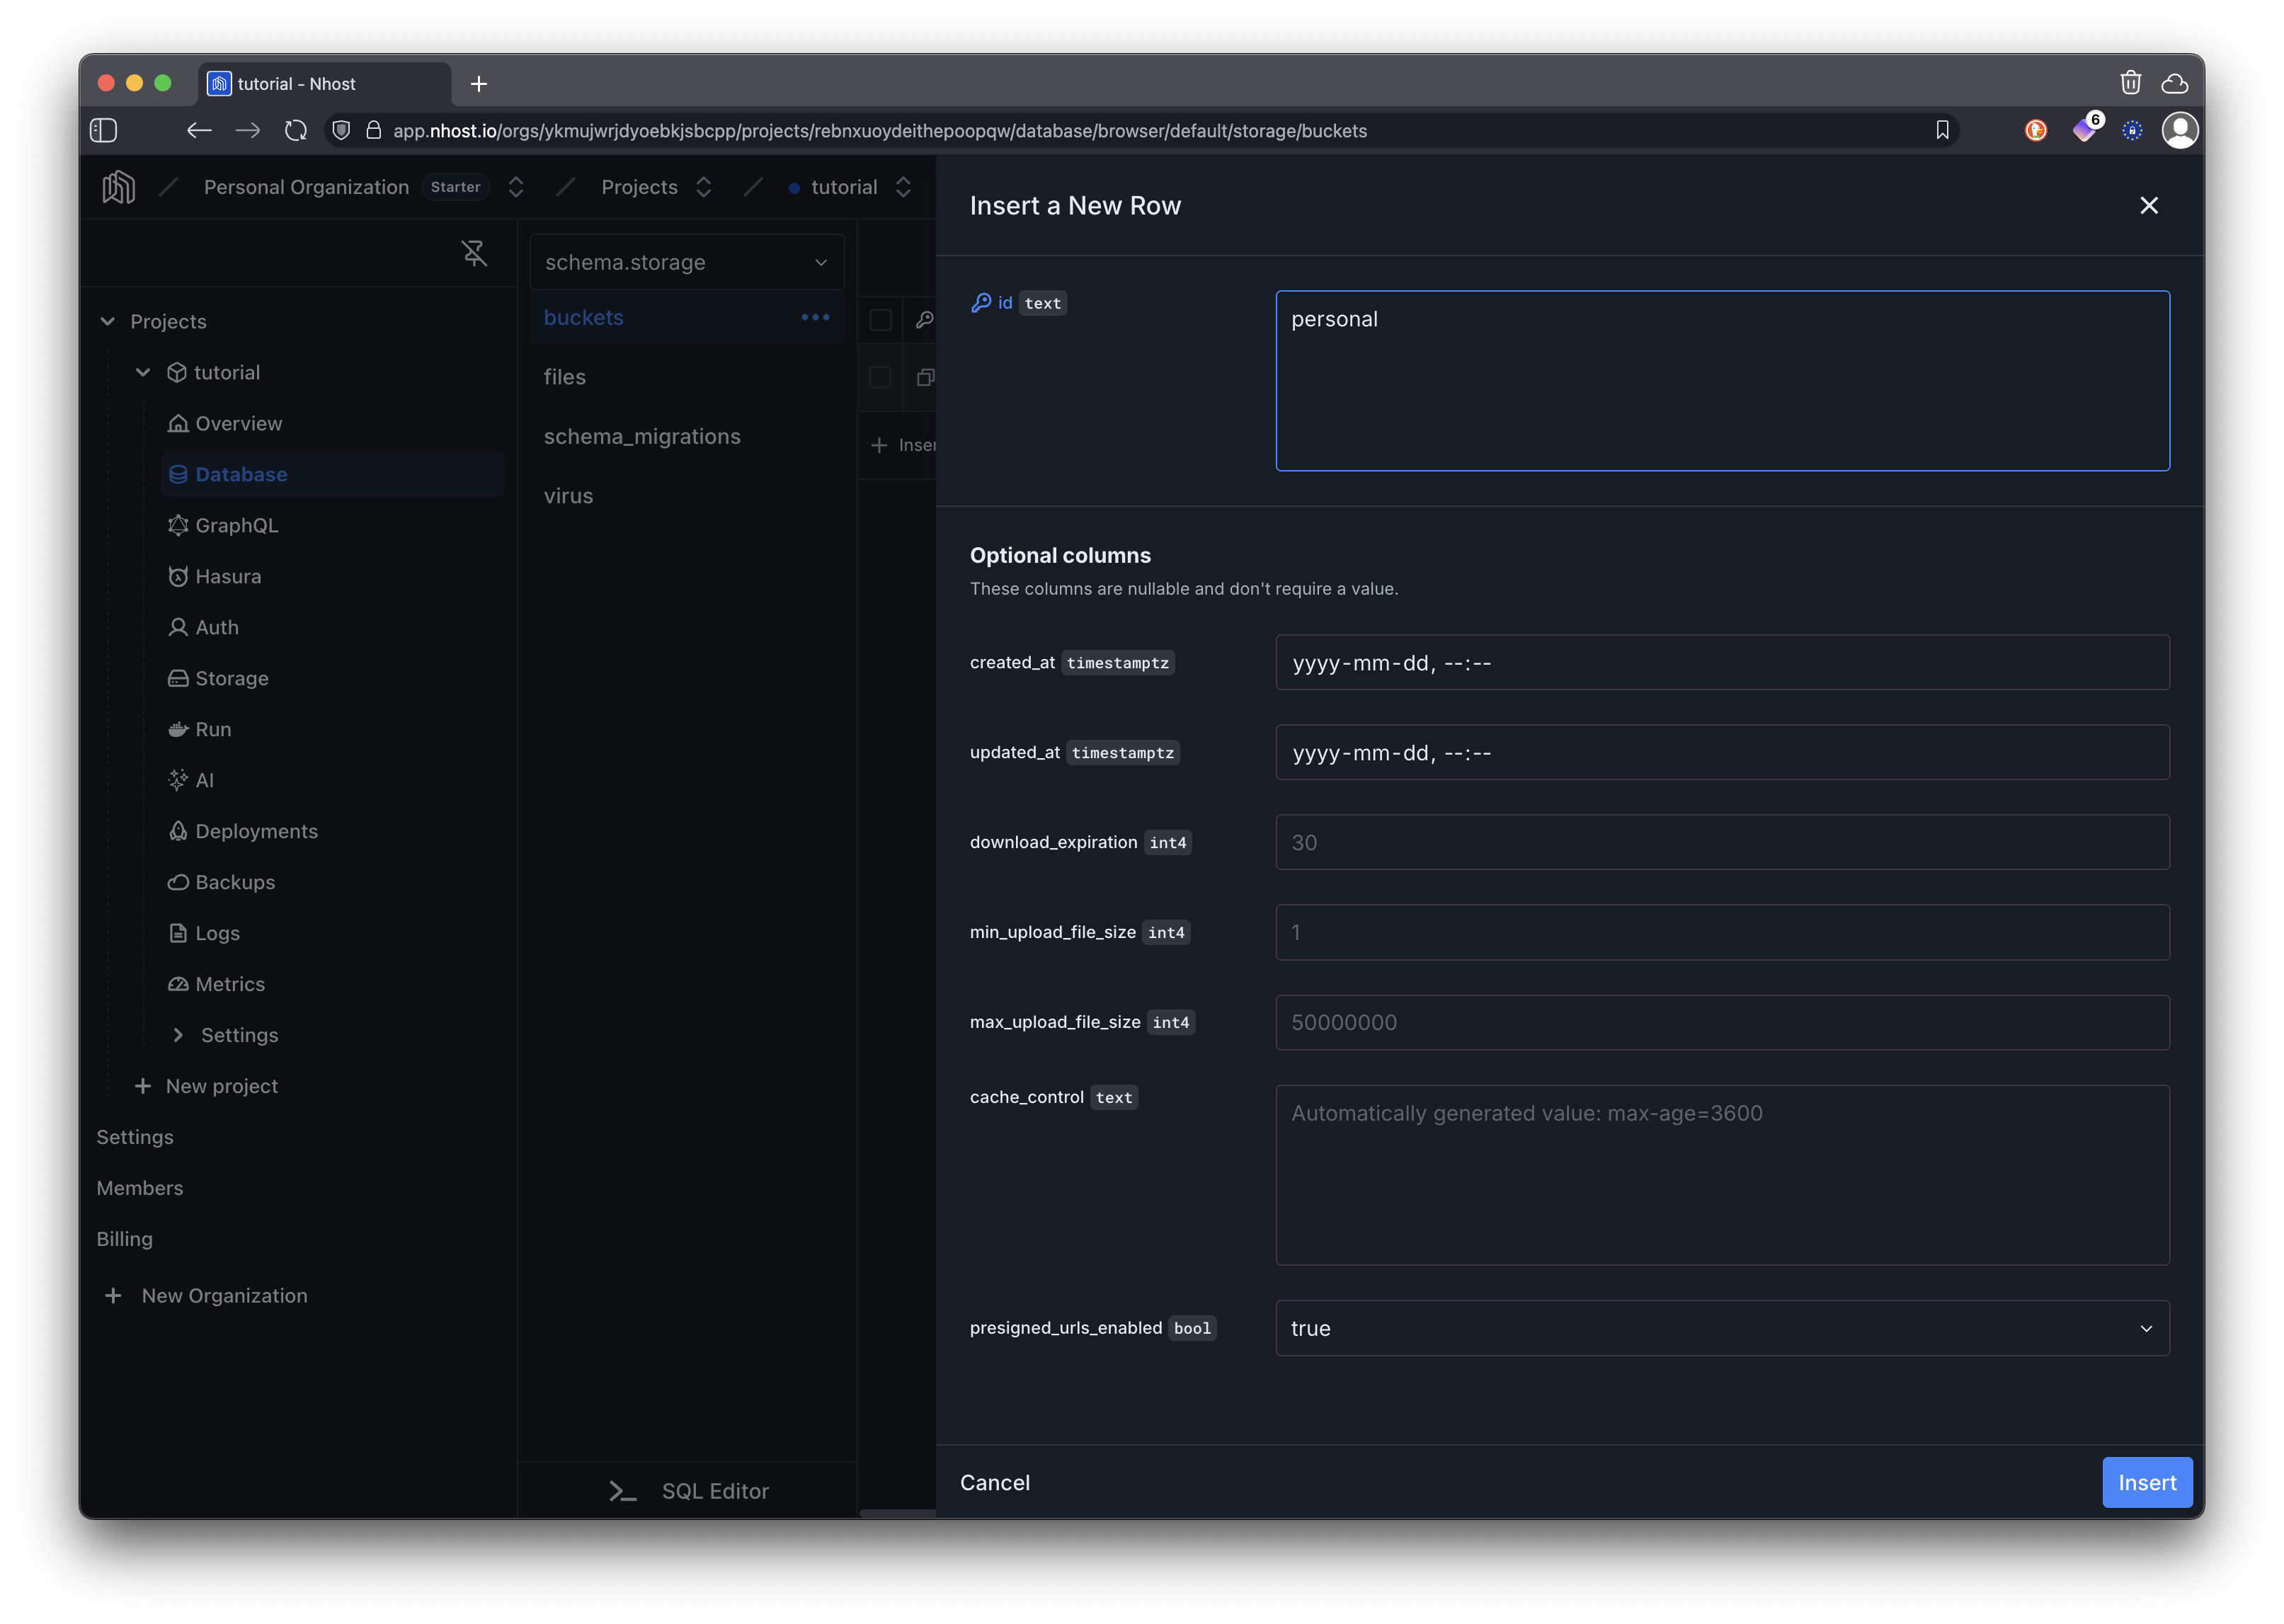
Section titled “Step-by-Step Guide”Create a Personal Storage Bucket
Section titled “Create a Personal Storage Bucket”First, we’ll create a storage bucket where users can upload their personal files.
In your Nhost project dashboard:
- Navigate to Storage
- Click New Bucket in the sidebar
- Set the name to
personaland click Save
Configure Storage Permissions
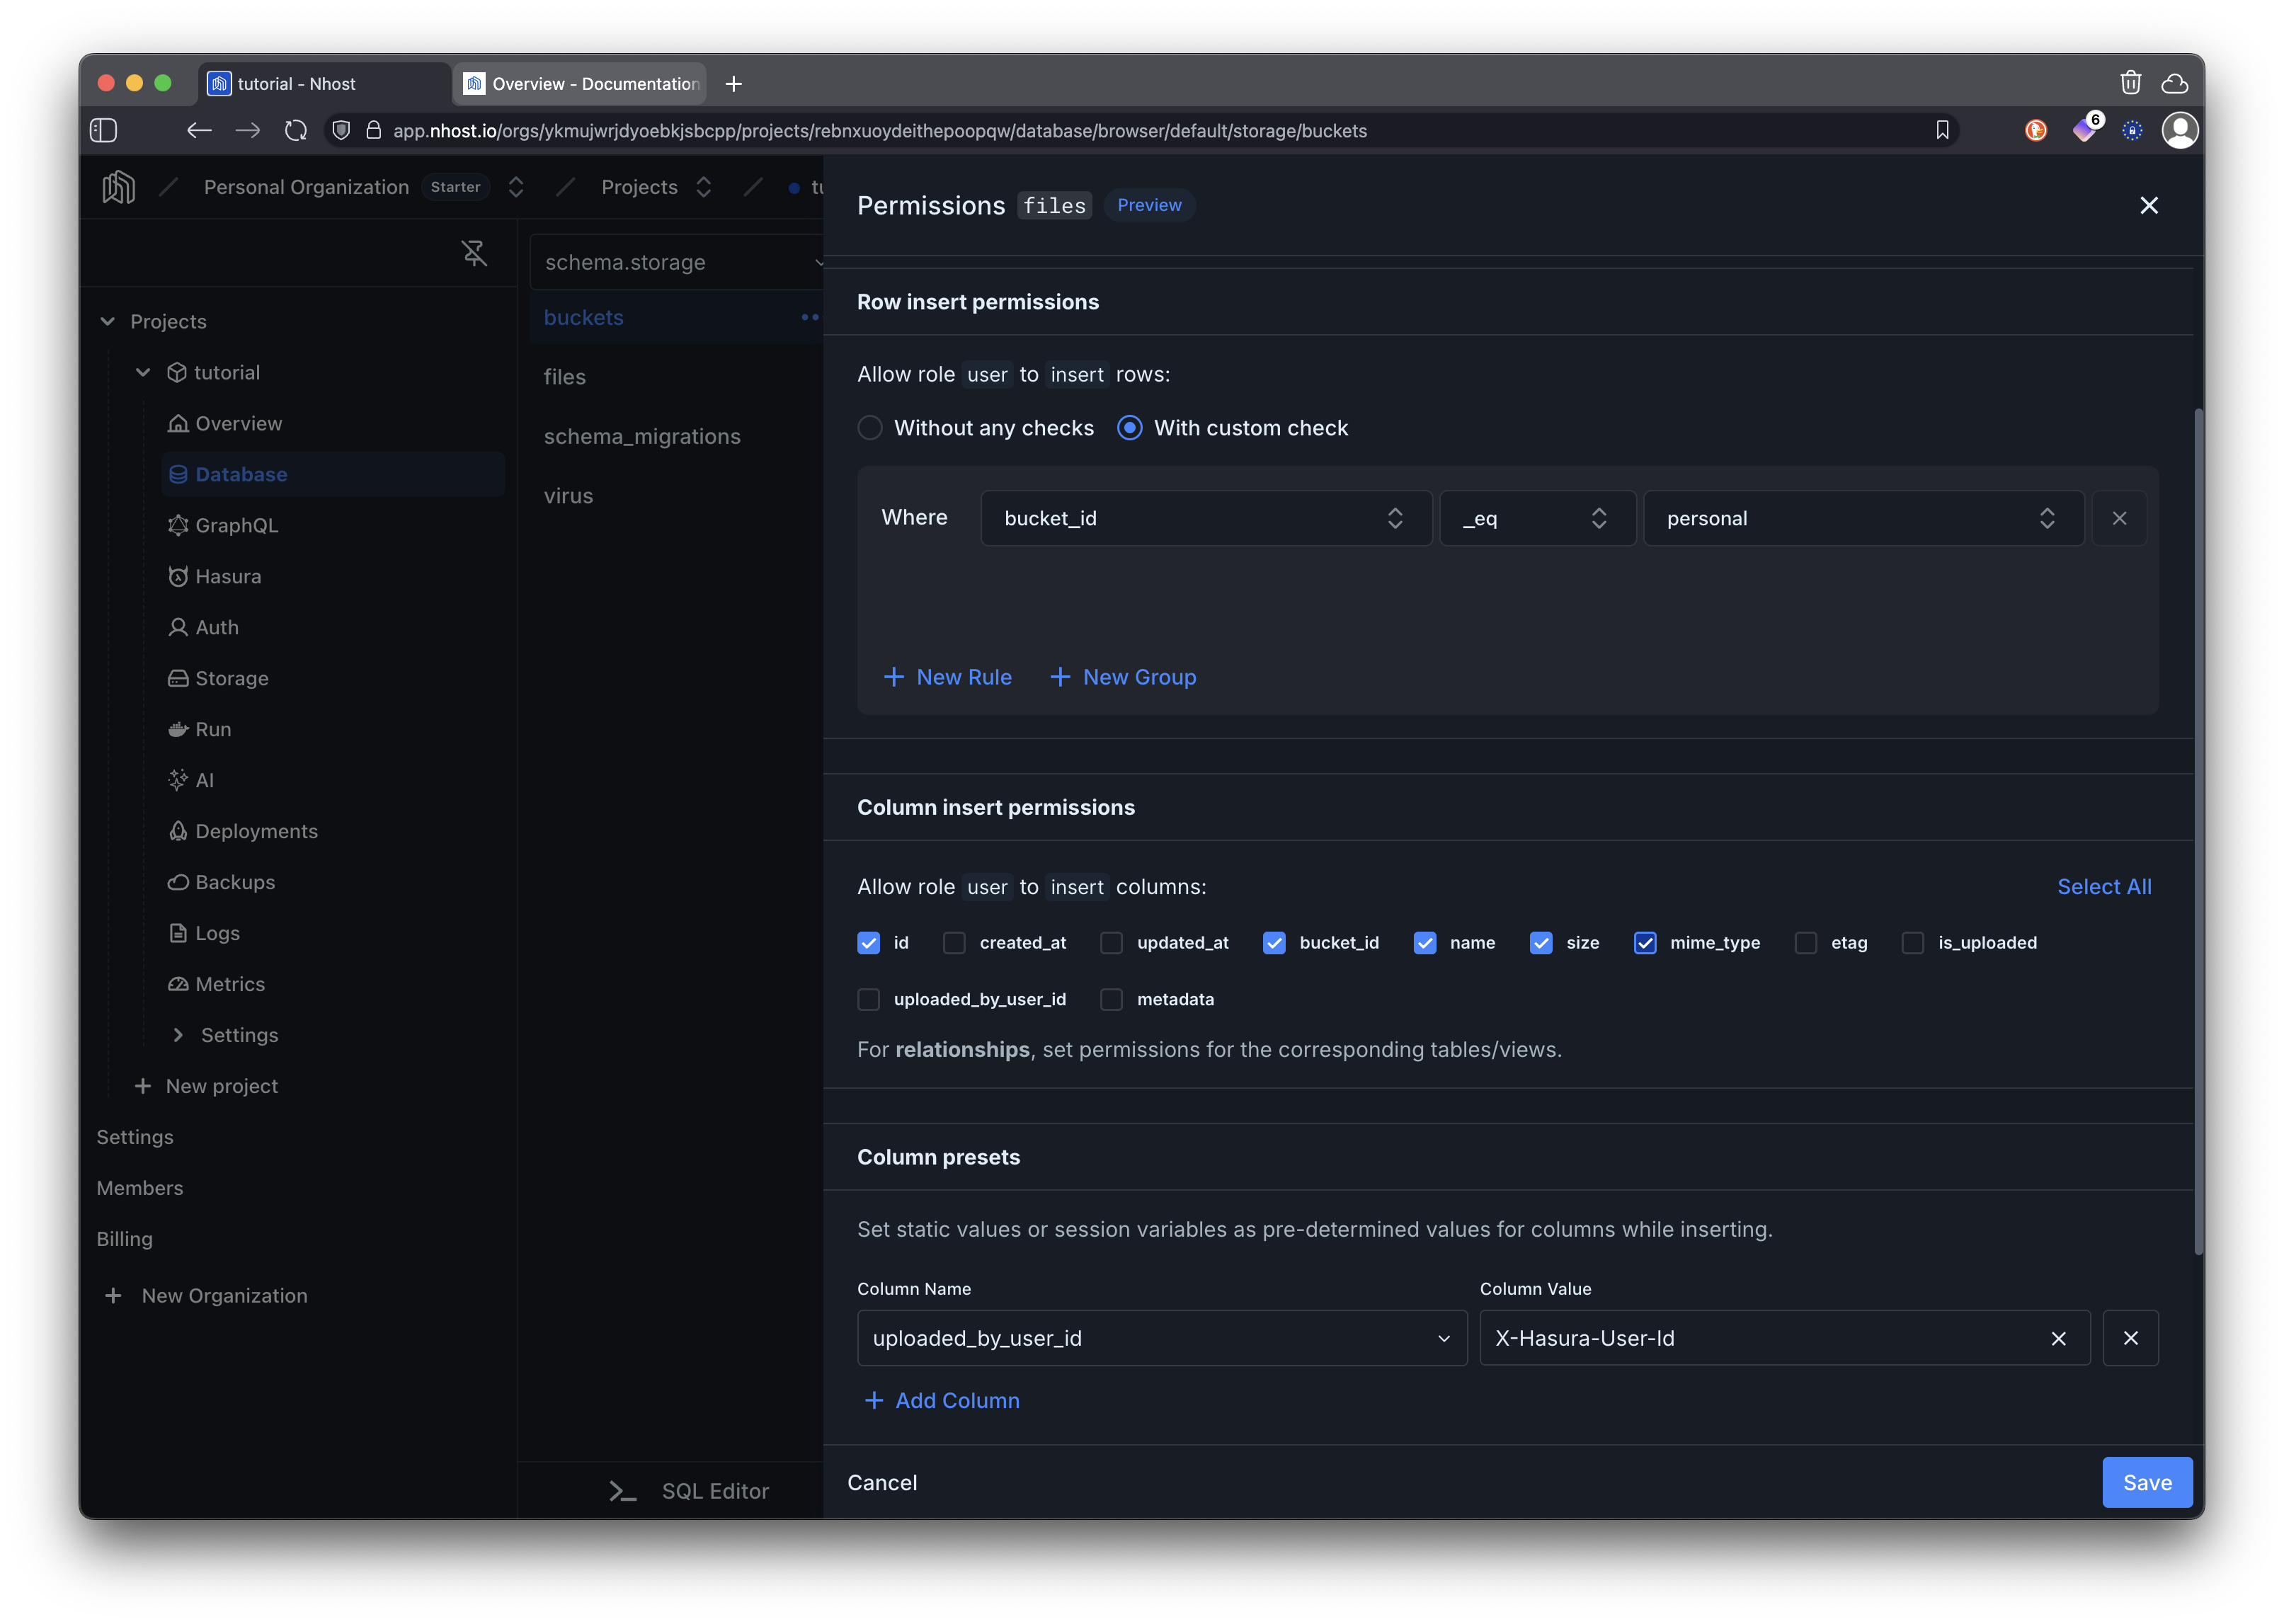
Section titled “Configure Storage Permissions”Now we need to set up permissions for the storage bucket to ensure the user role can only upload, view, and delete their own files.
In the dashboard, navigate to Storage and click Permissions to open the permission grid.
Click the Upload cell for the user role.
- Select With custom check and add a rule:
bucket_idequalspersonal - Enable the Uploader identity toggle — this automatically sets
uploaded_by_user_idto the current user’s ID on every upload, so you can reference it in Download and Delete rules.
Click the Download cell for the user role.
- Select With custom check and add two rules combined with AND:
bucket_idequalspersonaluploaded_by_user_idequalsX-Hasura-User-Id
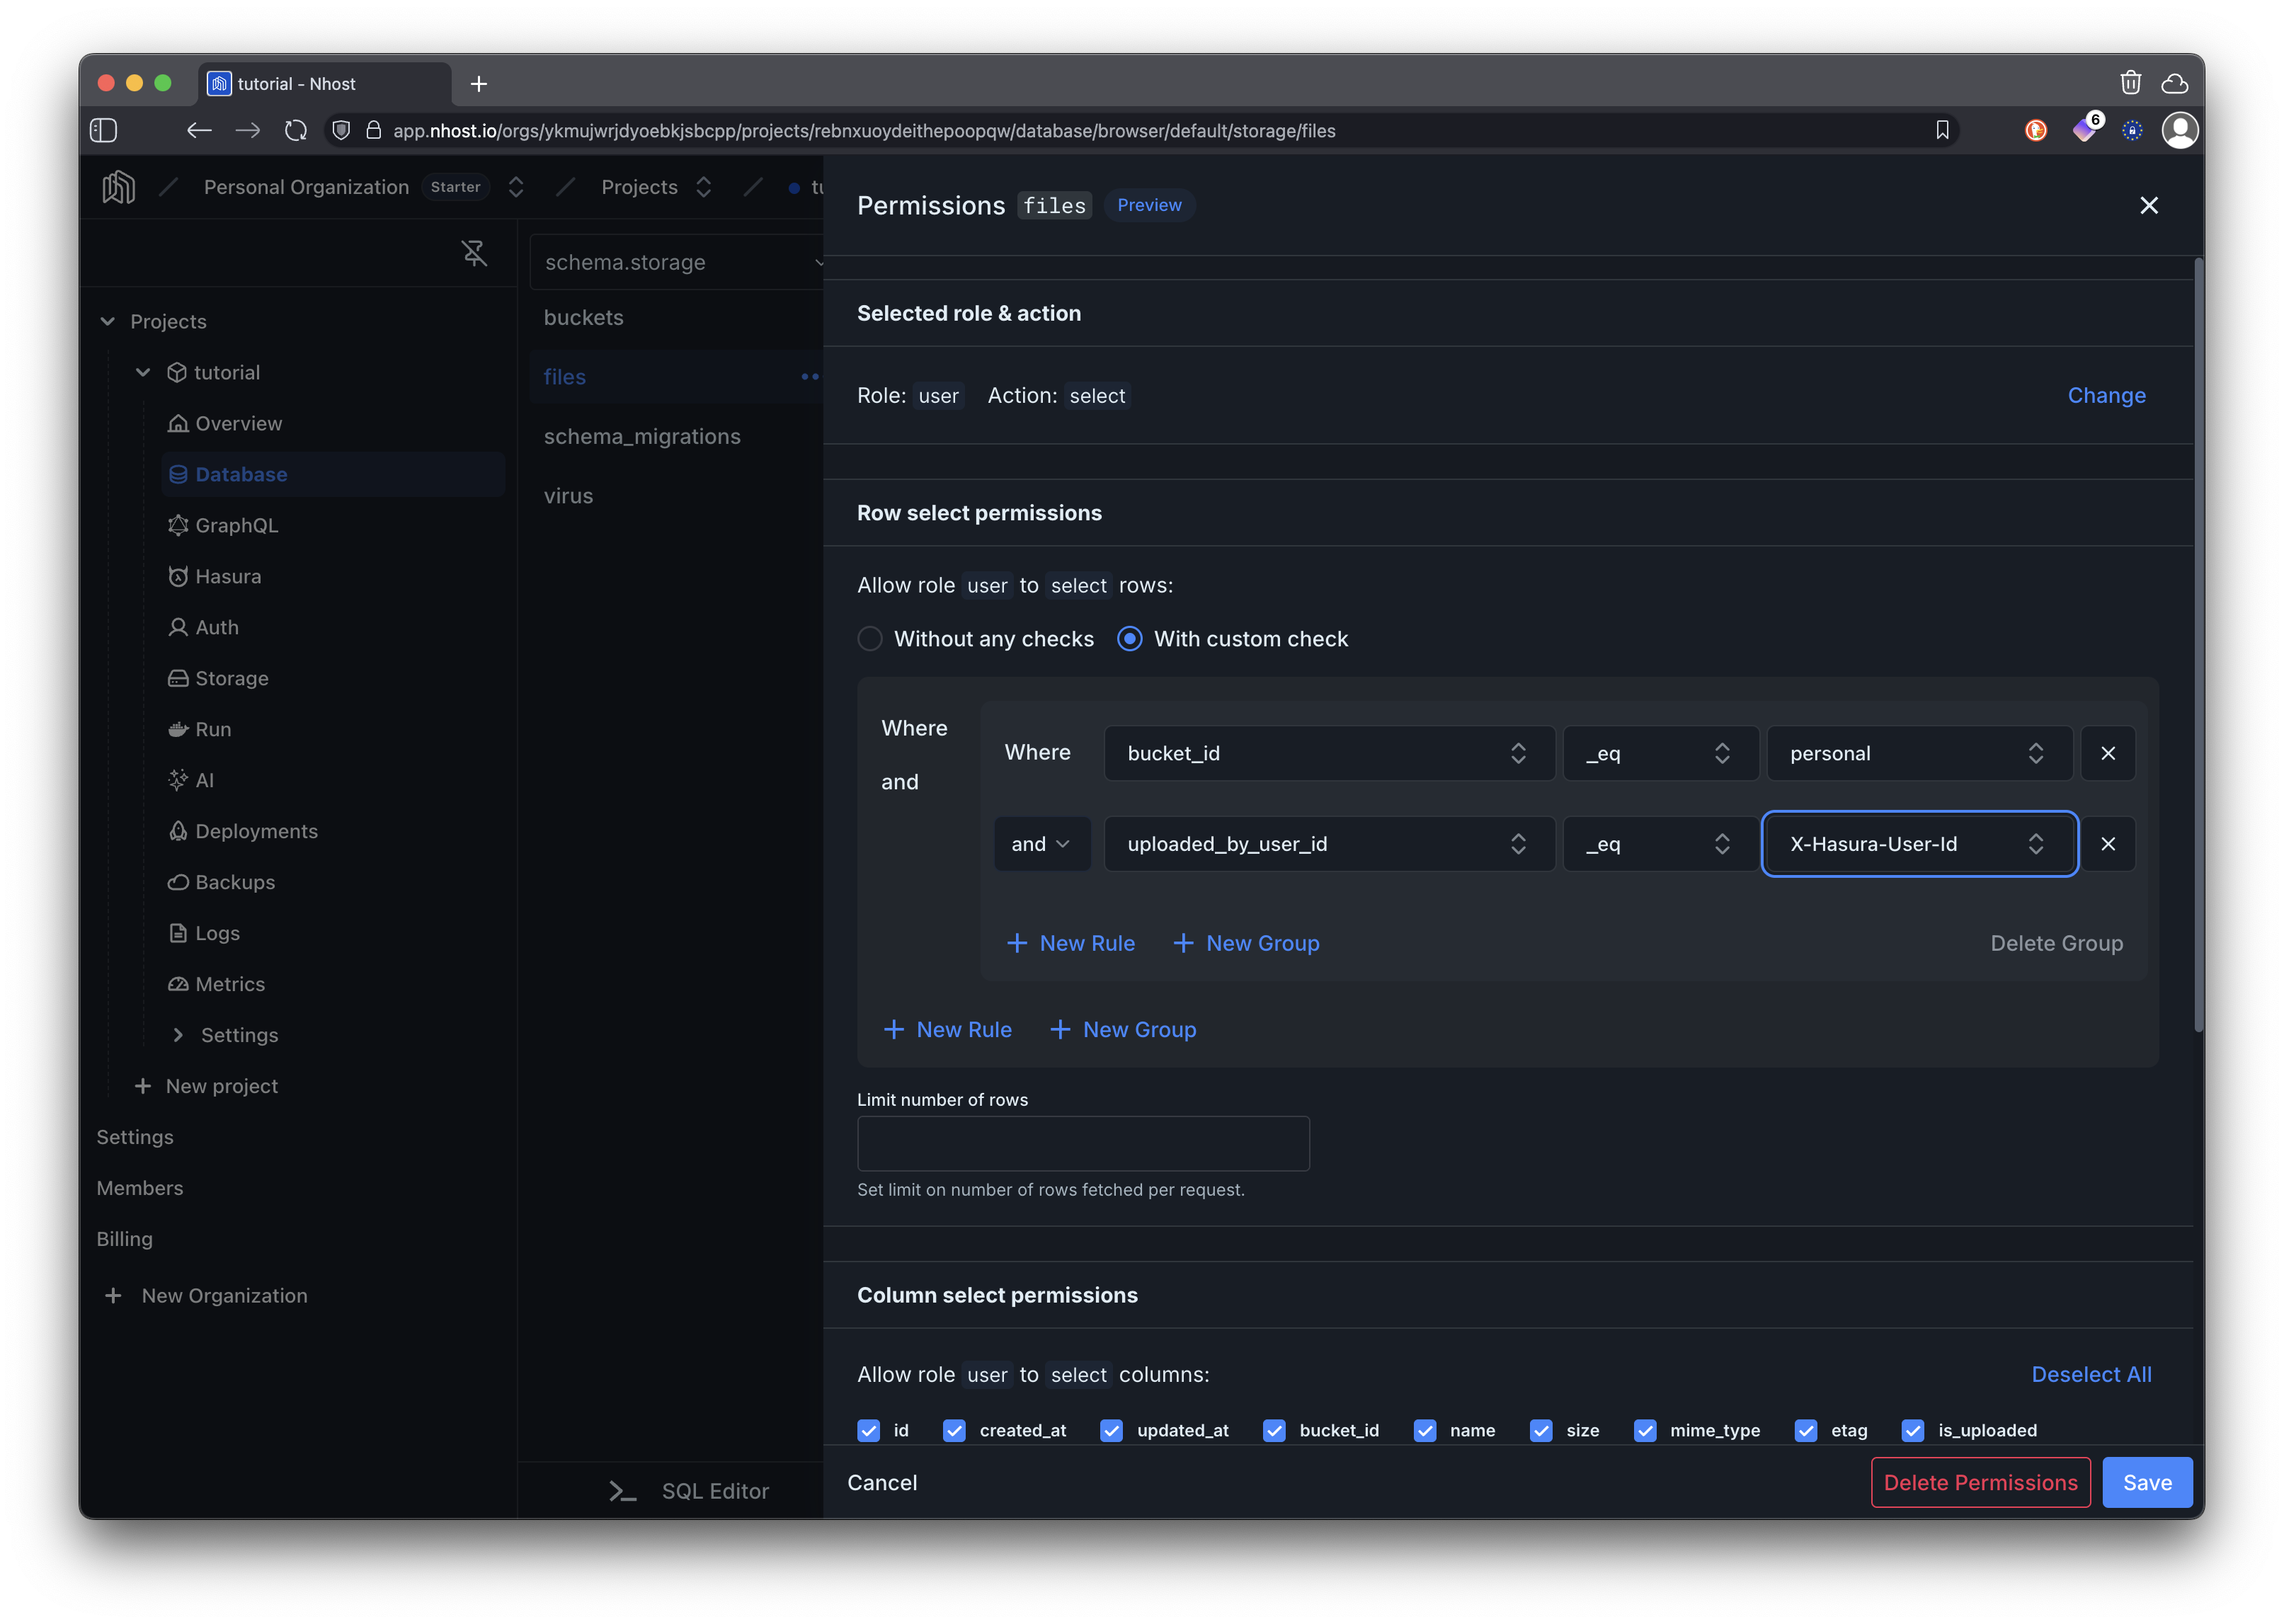
Click the Delete cell for the user role.
- Select With custom check and add the same two rules as Download:
bucket_idequalspersonaluploaded_by_user_idequalsX-Hasura-User-Id

Create the File Upload System
Section titled “Create the File Upload System”Now let’s implement the Next.js file upload functionality using server actions, API routes, and client components. We’ll use server actions for upload and delete operations, and API routes for file viewing and downloading.
First, let’s create server actions to handle file upload and delete operations. Server actions run on the server and provide a secure way to handle file operations.
"use server";
import type { FileMetadata } from "@nhost/nhost-js/storage";import { revalidatePath } from "next/cache";import { createNhostClient } from "../../lib/nhost/server";
export interface ActionResult<T> { success: boolean; error?: string; data?: T;}
export interface UploadFileData { file: FileMetadata; message: string;}
export interface DeleteFileData { message: string;}
export async function uploadFileAction( formData: FormData,): Promise<ActionResult<UploadFileData>> { try { const nhost = await createNhostClient(); const file = formData.get("file") as File;
if (!file) { return { success: false, error: "Please select a file to upload" }; }
const response = await nhost.storage.uploadFiles({ "bucket-id": "personal", "file[]": [file], });
const uploadedFile = response.body.processedFiles?.[0]; if (!uploadedFile) { return { success: false, error: "Failed to upload file" }; }
revalidatePath("/files"); return { success: true, data: { file: uploadedFile, message: "File uploaded successfully!", }, }; } catch (error) { const message = error instanceof Error ? error.message : "An unknown error occurred"; return { success: false, error: `Failed to upload file: ${message}` }; }}
export async function deleteFileAction( fileId: string, fileName: string,): Promise<ActionResult<DeleteFileData>> { try { const nhost = await createNhostClient();
if (!fileId) { return { success: false, error: "File ID is required" }; }
await nhost.storage.deleteFile(fileId);
revalidatePath("/files"); return { success: true, data: { message: `${fileName} deleted successfully` }, }; } catch (error) { const message = error instanceof Error ? error.message : "An unknown error occurred"; return { success: false, error: `Failed to delete ${fileName}: ${message}`, }; }}Create an API route to handle file viewing and downloading. This route will fetch the file from Nhost storage and return it with appropriate headers to the client.
import { type NextRequest, NextResponse } from "next/server";import { createNhostClient } from "../../../../lib/nhost/server";
export async function GET( request: NextRequest, { params }: { params: Promise<{ fileId: string }> },) { try { const nhost = await createNhostClient(); const { fileId } = await params; const fileName = request.nextUrl.searchParams.get("fileName") || "file"; const download = request.nextUrl.searchParams.get("download") === "true";
if (!fileId) { return NextResponse.json( { error: "File ID is required" }, { status: 400 }, ); }
const response = await nhost.storage.getFile(fileId);
if (!response.body) { return NextResponse.json({ error: "File not found" }, { status: 404 }); }
// Get the file content as an array buffer const arrayBuffer = await response.body.arrayBuffer();
// Determine content disposition based on download parameter const contentDisposition = download ? `attachment; filename="${fileName}"` : `inline; filename="${fileName}"`;
// Create the response with appropriate headers return new NextResponse(arrayBuffer, { status: 200, headers: { "Content-Type": response.body.type || "application/octet-stream", "Content-Disposition": contentDisposition, "Content-Length": arrayBuffer.byteLength.toString(), "Cache-Control": response.headers.get("Cache-Control") || "public, max-age=31536000, immutable", Etag: response.headers.get("ETag") || "", "Last-Modified": response.headers.get("Last-Modified") || "", }, }); } catch (error) { const message = error instanceof Error ? error.message : "An unknown error occurred"; return NextResponse.json( { error: `Failed to access file: ${message}` }, { status: 500 }, ); }}The main files page is a server component that fetches the user’s files on the server and renders the file management interface. This component runs on the server and can directly access the Nhost client for data fetching.
import type { FileMetadata } from "@nhost/nhost-js/storage";import { createNhostClient } from "../../lib/nhost/server";import FilesClient from "./FilesClient";
interface GetFilesResponse { files: FileMetadata[];}
export default async function FilesPage() { const nhost = await createNhostClient();
// Fetch files on the server let files: FileMetadata[] = []; let error: string | null = null;
try { // Use GraphQL to fetch files from the storage system // Files are automatically filtered by user permissions const response = await nhost.graphql.request<GetFilesResponse>({ query: `query GetFiles { files { id name size mimeType bucketId uploadedByUserId } }`, });
if (response.body.errors) { throw new Error( response.body.errors[0]?.message || "Failed to fetch files", ); }
files = response.body.data?.files || []; } catch (err) { error = `Failed to load files: ${err instanceof Error ? err.message : "Unknown error"}`; console.error("Error fetching files:", err); }
return ( <div className="container"> <header className="page-header"> <h1 className="page-title">File Upload</h1> </header>
{/* Pass the server-fetched files to the client component */} <FilesClient initialFiles={files} serverError={error} /> </div> );}The files client component is a client component that handles all user interactions including file uploads, viewing, and deletion. It uses server actions for upload and delete operations, and API routes for file viewing and downloading.
"use client";
import type { FileMetadata } from "@nhost/nhost-js/storage";import { useRef, useState, useTransition } from "react";import { deleteFileAction, uploadFileAction } from "./actions";
interface FilesClientProps { initialFiles: FileMetadata[]; serverError: string | null;}
interface DeleteStatus { message: string; isError: boolean;}
function formatFileSize(bytes: number): string { if (bytes === 0) return "0 Bytes";
const sizes: string[] = ["Bytes", "KB", "MB", "GB", "TB"]; const i: number = Math.floor(Math.log(bytes) / Math.log(1024));
return `${parseFloat((bytes / 1024 ** i).toFixed(2))} ${sizes[i]}`;}
export default function FilesClient({ initialFiles, serverError,}: FilesClientProps) { const fileInputRef = useRef<HTMLInputElement | null>(null); const [_isPending, startTransition] = useTransition();
const [selectedFile, setSelectedFile] = useState<File | null>(null); const [uploading, setUploading] = useState<boolean>(false); const [uploadResult, setUploadResult] = useState<FileMetadata | null>(null); const [error, setError] = useState<string | null>(serverError); const [files, setFiles] = useState<FileMetadata[]>(initialFiles); const [viewingFile, setViewingFile] = useState<string | null>(null); const [deleting, setDeleting] = useState<string | null>(null); const [deleteStatus, setDeleteStatus] = useState<DeleteStatus | null>(null);
const handleFileChange = (e: React.ChangeEvent<HTMLInputElement>): void => { if (e.target.files && e.target.files.length > 0) { const file = e.target.files[0]; if (file) { setSelectedFile(file); setError(null); setUploadResult(null); } } };
const handleUpload = async (): Promise<void> => { if (!selectedFile) { setError("Please select a file to upload"); return; }
setUploading(true); setError(null);
startTransition(async () => { try { const formData = new FormData(); formData.append("file", selectedFile);
const result = await uploadFileAction(formData);
if (result.success && result.data) { const file = result.data.file; setUploadResult(file);
// Clear the form setSelectedFile(null); if (fileInputRef.current) { fileInputRef.current.value = ""; }
// Update the files list setFiles((prevFiles) => [file, ...prevFiles]);
// Clear success message after 3 seconds setTimeout(() => { setUploadResult(null); }, 3000); } else { setError(result.error || "Failed to upload file"); } } catch (err: unknown) { const message = (err as Error).message || "An unknown error occurred"; setError(`Failed to upload file: ${message}`); } finally { setUploading(false); } }); };
const handleViewFile = async ( fileId: string, fileName: string, mimeType: string, ): Promise<void> => { setViewingFile(fileId);
try { // Handle different file types appropriately if ( mimeType.startsWith("image/") || mimeType === "application/pdf" || mimeType.startsWith("text/") || mimeType.startsWith("video/") || mimeType.startsWith("audio/") ) { // Use download route for viewable files (inline viewing) const viewUrl = `/files/download/${fileId}?fileName=${encodeURIComponent(fileName)}`; window.open(viewUrl, "_blank"); } else { // Use download route for downloads (force download) const downloadUrl = `/files/download/${fileId}?fileName=${encodeURIComponent(fileName)}&download=true`; const link = document.createElement("a"); link.href = downloadUrl; link.download = fileName; document.body.appendChild(link); link.click(); document.body.removeChild(link);
// Show download confirmation const newWindow = window.open("", "_blank", "width=400,height=200"); if (newWindow) { newWindow.document.documentElement.innerHTML = ` <head> <title>File Download</title> <style> body { font-family: Arial, sans-serif; padding: 20px; text-align: center; } </style> </head> <body> <h3>Downloading: ${fileName}</h3> <p>Your download has started. You can close this window.</p> </body> `; } } } catch (err) { const message = (err as Error).message || "An unknown error occurred"; setError(`Failed to view file: ${message}`); console.error("Error viewing file:", err); } finally { setViewingFile(null); } };
const handleDeleteFile = async (fileId: string): Promise<void> => { if (!fileId || deleting) return;
setDeleting(fileId); setError(null); setDeleteStatus(null);
const fileToDelete = files.find((file) => file.id === fileId); const fileName = fileToDelete?.name || "File";
startTransition(async () => { try { const result = await deleteFileAction(fileId, fileName);
if (result.success && result.data) { setDeleteStatus({ message: result.data.message, isError: false, });
// Remove from local state setFiles(files.filter((file) => file.id !== fileId));
// Clear success message after 3 seconds setTimeout(() => { setDeleteStatus(null); }, 3000); } else { setDeleteStatus({ message: result.error || `Failed to delete ${fileName}`, isError: true, }); } } catch (err) { const message = (err as Error).message || "An unknown error occurred"; setDeleteStatus({ message: `Failed to delete ${fileName}: ${message}`, isError: true, }); console.error("Error deleting file:", err); } finally { setDeleting(null); } }); };
return ( <> <div className="form-card"> <h2 className="form-title">Upload a File</h2>
<div className="field-group"> <input type="file" ref={fileInputRef} onChange={handleFileChange} style={{ position: "absolute", width: "1px", height: "1px", padding: 0, margin: "-1px", overflow: "hidden", clip: "rect(0,0,0,0)", border: 0, }} aria-hidden="true" tabIndex={-1} /> <button type="button" className="btn btn-secondary file-upload-btn" onClick={() => fileInputRef.current?.click()} > <svg width="40" height="40" fill="none" viewBox="0 0 24 24" stroke="currentColor" role="img" aria-label="Upload file" > <path strokeLinecap="round" strokeLinejoin="round" strokeWidth={2} d="M7 16a4 4 0 01-.88-7.903A5 5 0 1115.9 6L16 6a5 5 0 011 9.9M15 13l-3-3m0 0l-3 3m3-3v12" /> </svg> <p>Click to select a file</p> {selectedFile && ( <p className="file-upload-info"> {selectedFile.name} ({formatFileSize(selectedFile.size)}) </p> )} </button> </div>
{error && <div className="error-message">{error}</div>}
{uploadResult && ( <div className="success-message">File uploaded successfully!</div> )}
<button type="button" onClick={handleUpload} disabled={!selectedFile || uploading} className="btn btn-primary" style={{ width: "100%" }} > {uploading ? "Uploading..." : "Upload File"} </button> </div>
<div className="form-card"> <h2 className="form-title">Your Files</h2>
{deleteStatus && ( <div className={ deleteStatus.isError ? "error-message" : "success-message" } > {deleteStatus.message} </div> )}
{files.length === 0 ? ( <div className="empty-state"> <svg className="empty-icon" fill="none" stroke="currentColor" viewBox="0 0 24 24" aria-hidden="true" > <path strokeLinecap="round" strokeLinejoin="round" strokeWidth={1.5} d="M7 21h10a2 2 0 002-2V9.414a1 1 0 00-.293-.707l-5.414-5.414A1 1 0 0012.586 3H7a2 2 0 00-2 2v14a2 2 0 002 2z" /> </svg> <h3 className="empty-title">No files yet</h3> <p className="empty-description"> Upload your first file to get started! </p> </div> ) : ( <div style={{ overflowX: "auto" }}> <table className="file-table"> <thead> <tr> <th>Name</th> <th>Type</th> <th>Size</th> <th>Actions</th> </tr> </thead> <tbody> {files.map((file) => ( <tr key={file.id}> <td className="file-name">{file.name}</td> <td className="file-meta">{file.mimeType}</td> <td className="file-meta"> {formatFileSize(file.size || 0)} </td> <td> <div className="file-actions"> <button type="button" onClick={() => handleViewFile( file.id || "unknown", file.name || "unknown", file.mimeType || "unknown", ) } disabled={viewingFile === file.id} className="action-btn action-btn-edit" title="View File" > {viewingFile === file.id ? "⏳" : "👁️"} </button> <button type="button" onClick={() => handleDeleteFile(file.id || "unknown")} disabled={deleting === file.id} className="action-btn action-btn-delete" title="Delete File" > {deleting === file.id ? "⏳" : "🗑️"} </button> </div> </td> </tr> ))} </tbody> </table> </div> )} </div> </> );}Increase the Next.js Server Action Upload Limit
Section titled “Increase the Next.js Server Action Upload Limit”To increase the upload limit, we want to update our Next.js config file.
import type { NextConfig } from "next";
const nextConfig: NextConfig = { experimental: { serverActions: { bodySizeLimit: "10mb", // increases limit to 10MB }, },};
export default nextConfig;Adjust the limit as needed (2mb, 5mb, 25mb, etc).
Update Navigation Component
Section titled “Update Navigation Component”Add a link to the files page in the server-side navigation component.
import Link from "next/link";import { createNhostClient } from "../lib/nhost/server";import SignOutButton from "./SignOutButton";
export default async function Navigation() { const nhost = await createNhostClient(); const session = nhost.getUserSession();
return ( <nav className="navigation"> <div className="nav-container"> <Link href="/" className="nav-logo"> Nhost Next.js Demo </Link>
<div className="nav-links"> <Link href="/" className="nav-link"> Home </Link>
{session ? ( <> <Link href="/todos" className="nav-link"> Todos </Link> <Link href="/files" className="nav-link"> Files </Link> <Link href="/profile" className="nav-link"> Profile </Link> <SignOutButton /> </> ) : ( <> <Link href="/signin" className="nav-link"> Sign In </Link> <Link href="/signup" className="nav-link"> Sign Up </Link> </> )} </div> </div> </nav> );}Test Your File Upload System
Section titled “Test Your File Upload System”Run your Next.js development server and test all the functionality:
npm run devThings to try out:
- Server-Side Protection: Try accessing
/fileswhile logged out - the middleware will redirect you to the home page. - File Upload Flow: Sign in and navigate to the Files page using the navigation link. The server component will fetch your existing files, and the client component will handle uploads.
- Upload Different File Types: Upload various file types (images, documents, PDFs, etc.) to test the file type handling.
- View and Delete Files: Test the view functionality for different file types - images and PDFs will open in new tabs, while other files will download.
- User Isolation: Sign in with different accounts to verify users can only see their own files due to storage permissions.
- Server-Side Rendering: Notice how your file list loads immediately on page refresh since it’s fetched on the server, unlike client-only React apps.
Key Features Implemented
Section titled “Key Features Implemented”Server/Client Architecture
Clear separation between server components for data fetching and client components for user interactions, following Next.js App Router best practices.
Storage Bucket & Permissions
Dedicated personal storage bucket with proper configuration for user file isolation, leveraging Nhost’s permission system.
Server-Side Data Fetching
Files are fetched on the server and passed to client components, providing immediate data on page load without loading states.
File Upload Interface
User-friendly upload interface with file selection, preview, and progress feedback using client-side interactions.
File Management
Complete file listing with metadata, viewing capabilities, and deletion functionality with proper state management.
File Type Handling
Intelligent handling of different file types with appropriate viewing/download behavior for various media types.
Route Protection
Automatic route protection through Next.js middleware, ensuring only authenticated users can access file upload functionality.
Error Handling
Comprehensive error handling with server-side error detection and client-side user feedback for all operations.